How to Transfer Data from iPad to iPad
Want to learn how to transfer data from iPad to iPad? Read the guide below and learn three different ways to transfer content from your iPad to your new iPad with ease.
iPad Transfer Tips
- iPhone/iPad Calendar Not Syncing
- iPhone Notes Not Syncing with iPad
- Sync iPhone Calendars to iPad
- Sync Samsung Photos to iPad
- Sync Android Files to iPad
- Sync Computer Photos to iPad
- Sync iPad Files to PC
- iPad Photos to External Hard Drive
- Transfer Photos from iPad to iPad
- Transfer Data from iPad to iPad
Unboxing a new iPad is always thrilling, but setting it up and migrating your data over from old device isn’t that exciting. So, if you just bought yourself the iPad Pro/Air and you’re having trouble transferring data from old iPad to iPad Pro/Air, you’re in the right place. In this post, we’ll walk you through several different ways to transfer files from iPad to iPad.
Also Read: How to Transfer Data from iPhone to New iPhone >
Part 1: How to Setup a New iPad
In iOS 11 and above, you can use your current iPad to set up your new iPad by transferring the settings from your current iPad to your new iPad when in close physical proximity. Below is the quick guide on how to do so:
Step 1: Turn on your new iPad. Then, choose your language on your new device with your new and old iPad in close proximity.
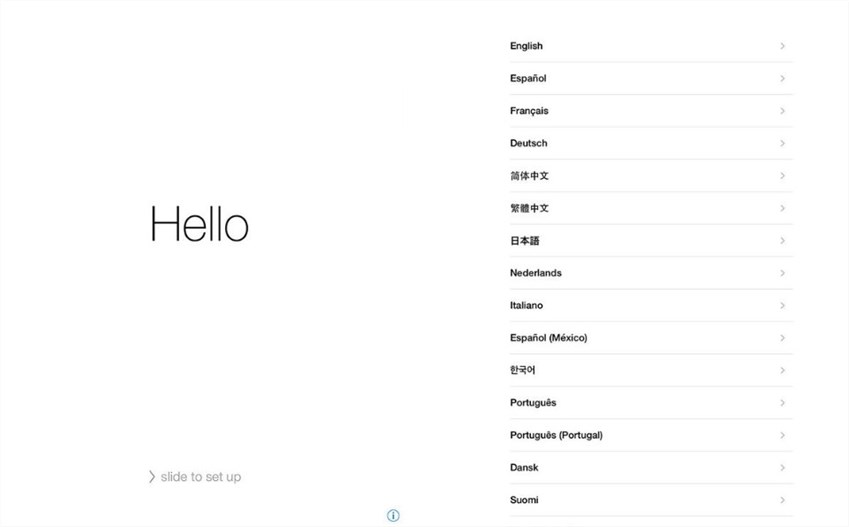
How to Setup a New iPad – Step 1
Step 2: Click “Continue” on your iPad when the popup appears to ask you to set up your new device with your Apple ID.
Step 3: Use your current iPad (old one) to scan the image appearing on your new iPad. On your new iPad, enter your current iPad’s passcode.
Note: if you don’t have an iPad running iOS 11 and above, then you can click “Set Up Manually” to set up your new iPad manually.
Step 4: Set up Face ID or Touch ID on your new iPad.
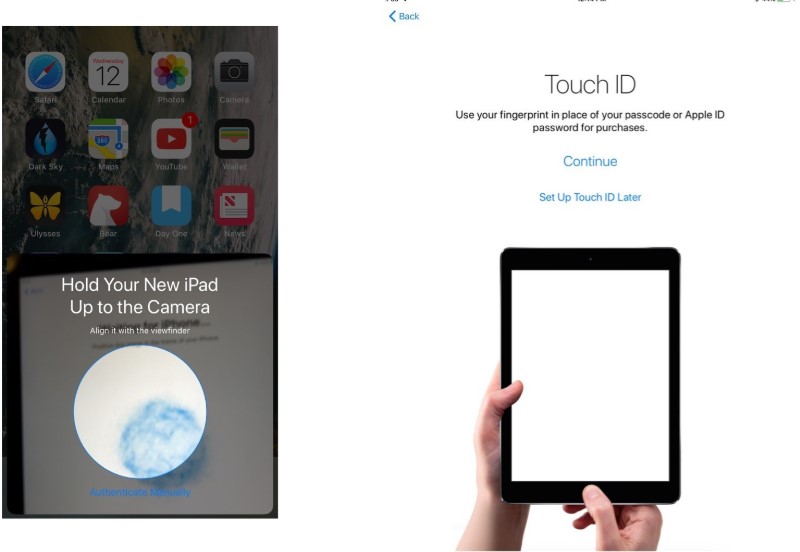
How to Setup a New iPad – Step 4
Step 5: Select whether or not to restore your new iPad from the most recent compatible backup, if that choice presents itself.
Step 6: Select to restore your new device from an iCloud or iTunes backup, set up as a new iPad or move data from an Android device.

How to Setup a New iPad – Step 6
Step 7: Tap “Agree” to the terms and conditions.
Step 8: Tap “Continue” and that’s it to set up your iPad.
Part 2: How to Transfer Data from One iPad to Another With iTunes
Transferring data from one iPad to another with iTunes is a backup and restore process. An iTunes backup consists of all your iPad’s data and settings. Therefore, you can migrate almost everything from your old iPad to the new iPad using iTunes.
Below is the quick guide to help you transfer data from iPad to iPad with iTunes:
Step 1: Firstly, you need to back up your old iPad using iTunes.
- Connect your old iPad to your computer using a digital cable and then open iTunes.
- Click on the “Device” icon and move to “Summary”.
- Then tap on “Back Up Now” option.
Once the backup is done, you can disconnect your iPad from the computer.
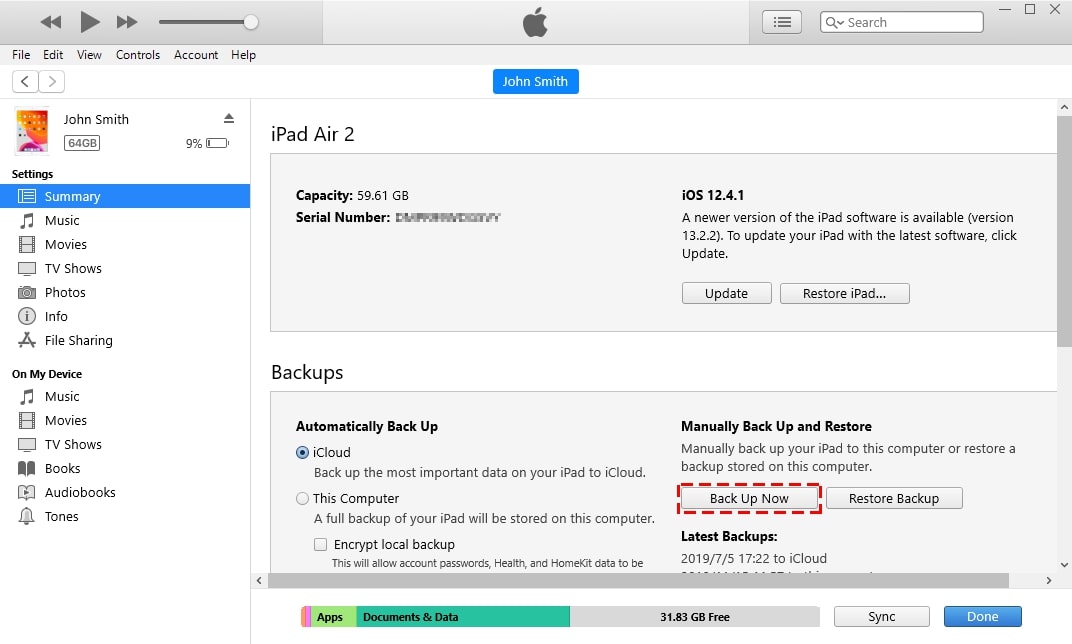
How to Transfer Data from iPad to iPad via iTunes- Step 1
Step 2: Now, you need to restore your new iPad with the iTunes backup.
- Connect your new iPad to the computer using a digital cable and open iTunes.
- Click on the “Device” icon and select “Restore Backup”.
- Select the right backup version and tap “Restore” to start the restore process.

How to Transfer Data from iPad to iPad via iTunes- Step 2
Part 3: How to Transfer Data from iPad to iPad with iCloud
For users looking for a wireless way to transfer content from iPad to iPad, iCloud is the recommended option. With iCloud, you can transfer device settings, app data, photos & videos, messages, ringtones, purchase history from Apple devices, etc. But, of course, there are certain requirements for transferring data from iPad to iPad using iCloud:
- Ensure that you’re using the same Apple ID on both old and new iPad.
- Make sure that there’s enough iCloud space to save the entire data on your old iPad.
- Ensure that you have a reliable Wi-Fi connection on both devices.
Are you ready? Below is the quick guide to help you learn how to transfer data from iPad to iPad using iCloud:
Step 1: On your old iPad, follow the below steps:
- Go to “Settings”>” [Your Name]”>”iCloud Backup”.
- Turn on “iCloud Backup” and tap “Back Up Now” to begin backing up the content on your old iPad.
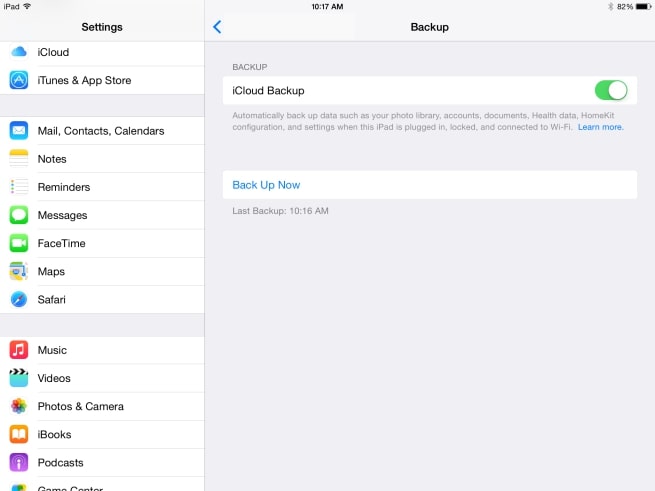
How to Transfer Data from iPad to iPad via iCloud- Step 1
Step 2: Once the backup is done, turn on your new iPad to set it up.
If you have gone through this post before reaching this method, then you know probably know how to set up a new iPad. While setting up your new iPad, you will reach the “Apps & Data Screen”. Here, you can select how you like to transfer data and apps to your new iPad. Just, select “Restore from iCloud Backup” option.
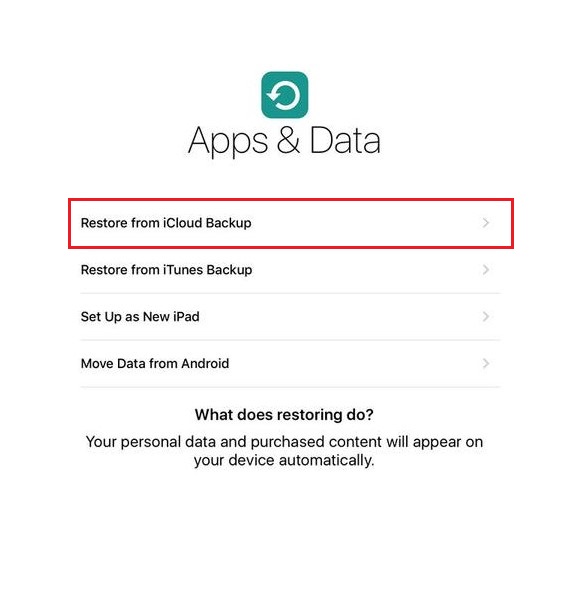
How to Transfer Data from iPad to iPad via iCloud- Step 2
Step 3: Enter your Apple ID and passcode and then select the recent backup you made with your old iPad and that’s it.
If you have already set up your new iPad, then you have to reset it. To do so, go to “Settings”>” General”>” Reset”>” Erase All Content and Settings”.
Part 4: Migrate iPad Data Using AnyTrans
For users looking for a one-click solution to migrate data from iPad to iPad, AnyTrans is the recommended option. Indeed, AnyTrans is designed to make data transfer easier and quicker for iOS users. When switching to a new iPad, your photos, videos, music, messages, contacts, apps, app data and other data from old iPad come along with some simple click. What’s more? AnyTrans even lets you transfer data selectively from one iOS device to another.
Are you ready to use AnyTrans for iOS to transfer apps from iPad to iPad? Get the software on your computer and then follow the below steps:
Step 1: After successful installation, run AnyTrans on your system and connect both of your devices to the computer using a digital cable.
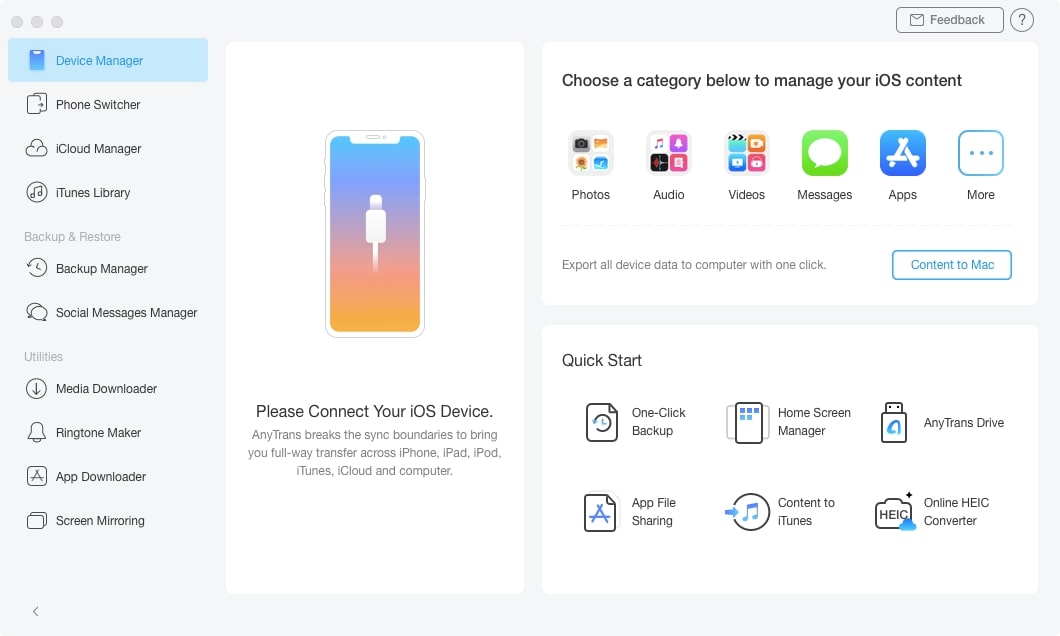
How to Transfer Data from iPad to iPad via AnyTrans for iOS – Step 1
Step 2: Let the software detects both devices. From the main interface, select “Phone Switcher”>” Phone to Phone”>” Next” option.
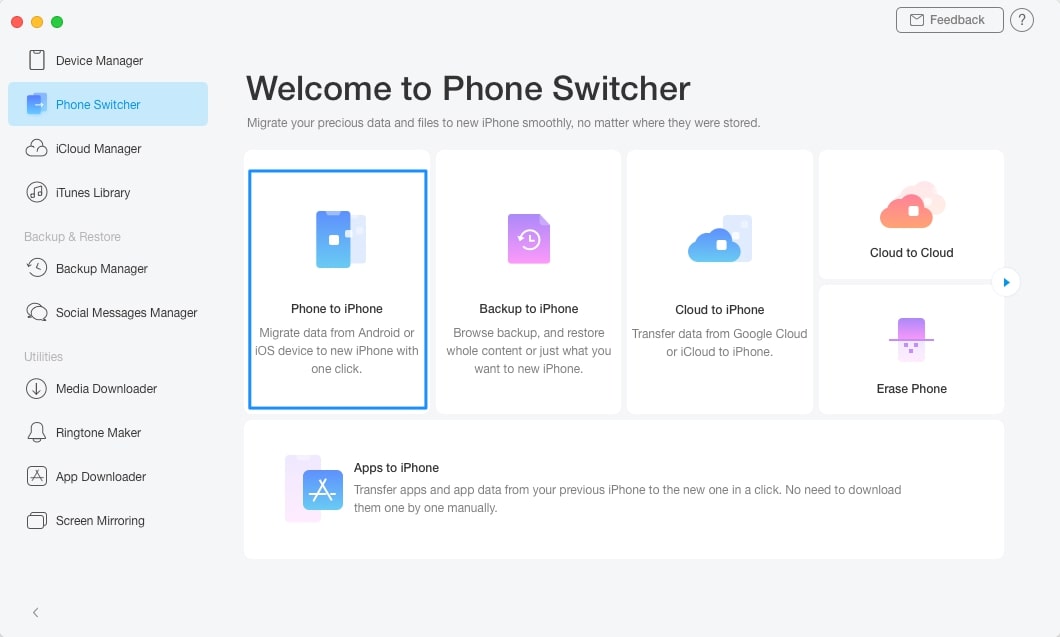
How to Transfer Data from iPad to iPad via AnyTrans for iOS – Step 2
Step 3: Select the file types that you would like to transfer from your old iPad to the new iPad and click on the “Next” button.
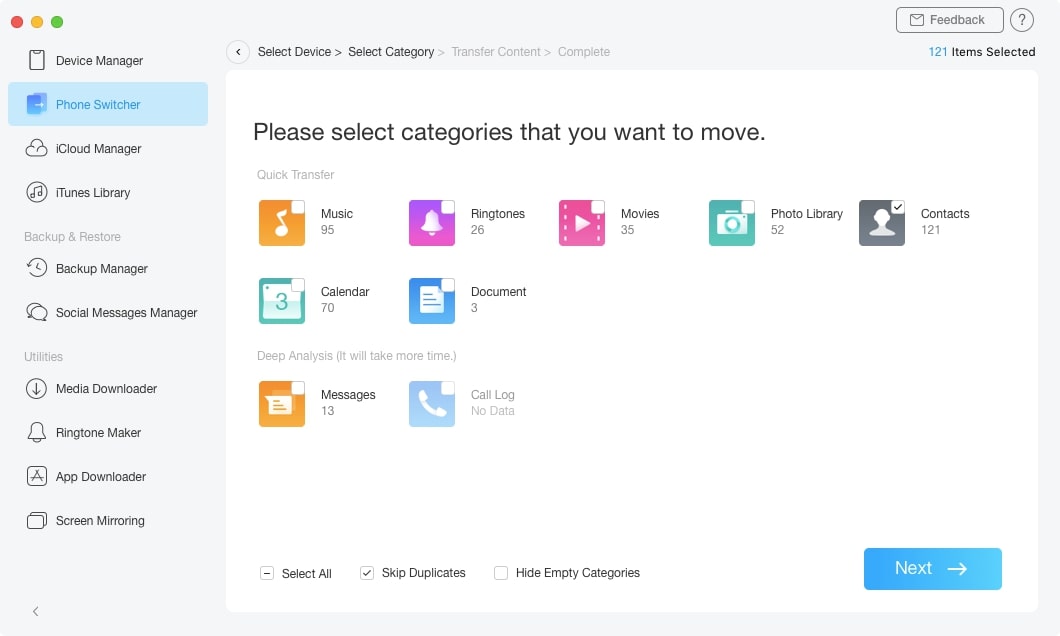
How to Transfer Data from iPad to iPad via AnyTrans for iOS – Step 3
Step 4: Let the software completes the transfer process. Once the transfer is done, you will get a message that says “Transfer Completed”.
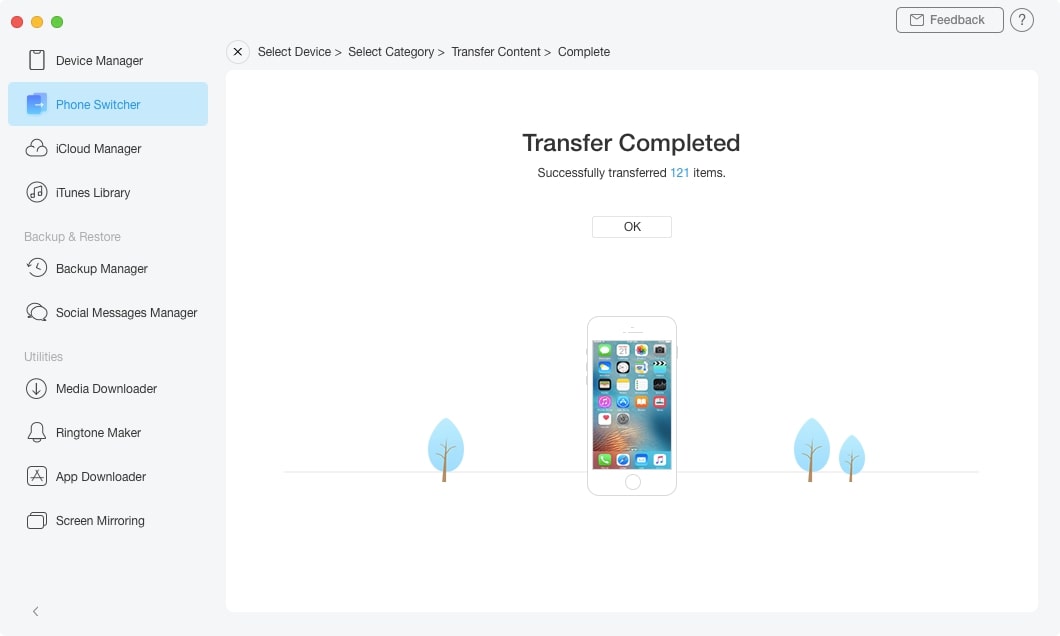
How to Transfer Data from iPad to iPad via AnyTrans for iOS – Step 4
The Bottom Line
That’s how to transfer data from iPad to iPad. As you can now see that if you have set up your new iPad, then AnyTrans for iOS can help you transfer data from your old iPad to the new iPad. The best part is that AnyTrans for iOS helps you do the job without any limitations. So, give a try to it and start migrating data from one iPad to another one like a pro.

Senior writer of the iMobie team as well as an Apple fan, love to help more users solve various types of iOS & Android-related issues.
Product-related questions? Contact Our Support Team to Get Quick Solution >
