How to Transfer Photos from Internal Storage to SD Card
If you are running low on your phone memory, the following guide teaches you how to transfer photos from internal storage to SD card so you can free-up your memory. The guide shows multiple ways to do the task so read on to learn all the available ways.
Android Transfer Tips
Export Data from Android
Import Data to Android
There was a time when a photo captured on an Android device only consumed a little bit of memory space on the device. Today, if you capture a photo on any of the latest Android phones, you will find that the photo takes up at least a few MBs of your memory space. That is the reason your internal memory often gets full as most of the time your captured photos are saved on your phone’s memory.
If you buy an SD card, though, you can transfer all the photos from your internal storage to your SD card. It frees-up your internal memory space that you can use for other essential items and it also gives you an opportunity to connect your SD card to your computer and view your photos on a large screen.
Either way, you are going to need to transfer your photos from your internal memory to your SD card first. The following guide shows exactly how you do it on your device. Let’s check it out.
Method 1. Transfer Photos to SD Card via AnyDroid
If you have a good number of photos to be moved to your SD card and you do not wish to get into the hassle of manually transferring your photos, you can use a third-party app to get your job done.
One of the apps that makes it extremely easy for you to move photos from the internal storage to the SD card on an Android device is the AnyDroid app. It is a complete solution for all of your data transfer needs including photo transfers and it works like a charm on your computer. With the help of the app, you can have all of your photos moved from your internal memory to your SD card in no time.
Here’s what the app has to offer its users:
- Quick photos transfer– the app is extremely fast at transferring photos from your internal memory to your SD card.
- Convenient– it is very easy and convenient to use the app to transfer your photos.
- Selective transfer– you can select what photos to transfer and what photos not to transfer; all within the app.
- Safe and secure– be assured your photos are in good hands.
It is clearly noticeable that the app fulfills all the expectations of a user who wants to transfer photos from internal storage to SD card. If you have made a decision to use this app for your photo transfers, the following is how you do it on computer.
Step 1. Open the AnyDroid website in browser, download and install the app on your computer. Open the app and connect your Android device to your computer.
Free Download * 100% Clean & Safe
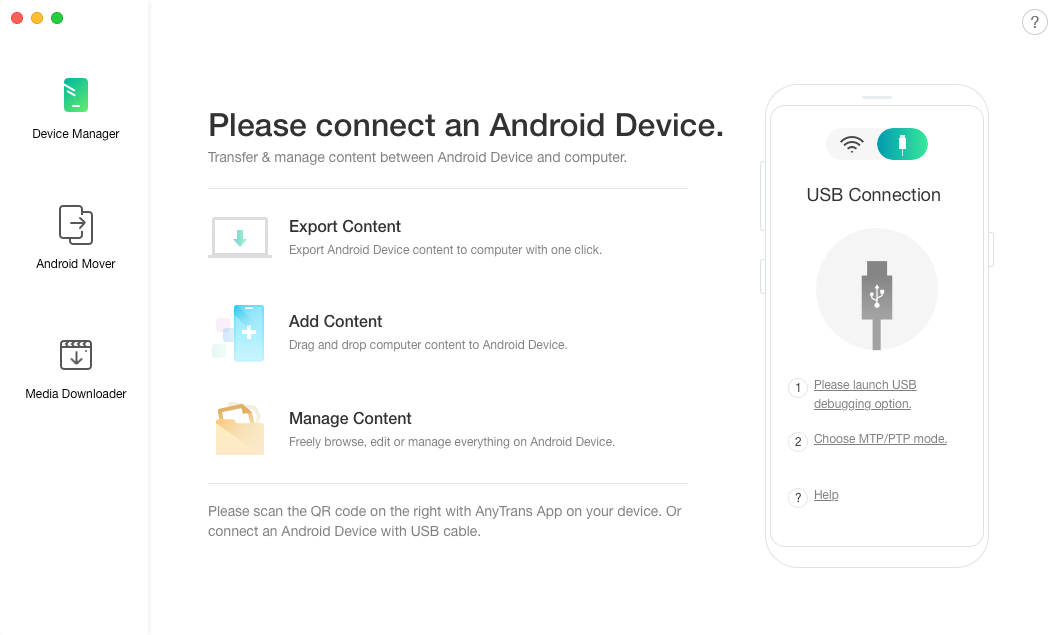
Connect Android device to computer
Step 2. The app will recognize your Android device. When it does, choose to Content to Computer > Click on the option that says Photos on your screen to start transfer.
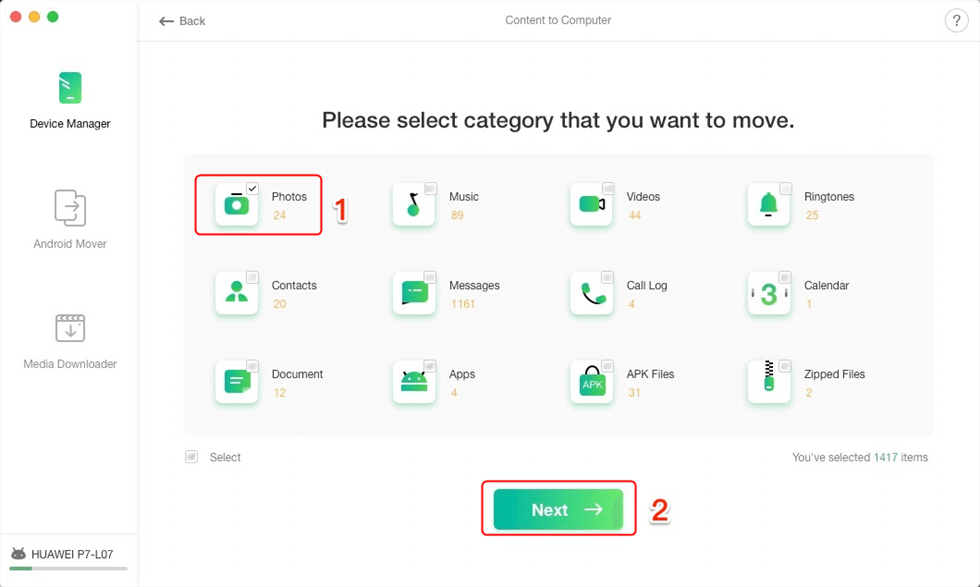
Select Photos Category
Step 3. On the following screen, you will see the thumbnails of all the photos you have got on your device. Click on the photos you would like to transfer to your SD card and select the Send to PC button at the top. Select SD card as the destination.

Choose the Photos you Want to Transfer
Step 4. Wait while the app transfers your photos to your SD card. When it is done, the following confirmation message will appear on your screen.
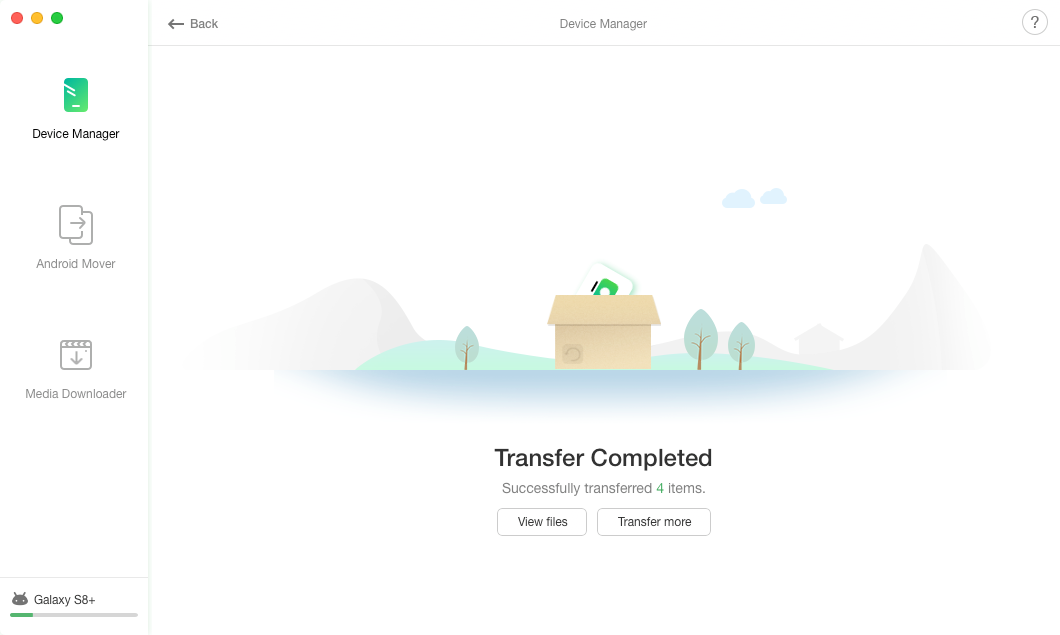
Photos successfully transferred to the SD card
You have just reclaimed the precious memory space on your internal storage and your photos are now available on your SD card for viewing. AnyDroid is indeed a quick and efficient way to transfer photos from one place to another on your device.
Method 2. Transfer Photos to SD Card within Android Phone
If you are not a big fan of using third-party apps to transfer your personal content, you can use one of the built-in tools on your device to get your job done.
Every Android device ships with at least one file manager app to help you manage and move your content around on your devices. You can find this file manager app in the app drawer of your device and you can use it to transfer photos from internal storage to your SD card.
That way you do not need to install anything on your computer as the entire task can be done right from your device itself. However, keep in mind the method may not be efficient if you have loads of photos to be transferred to your SD card. If that is the case, use the method suggested above.
Here’s how you use the file manager app to transfer your photos to an SD card:
Step 1. Launch the built-in file manager app from the app drawer on your device.
Step 2. When the app launches, open the folder that contains your photos. Tap and hold on the photos you would like to move to your SD card, tap on three-dots at the top, and choose Copy.
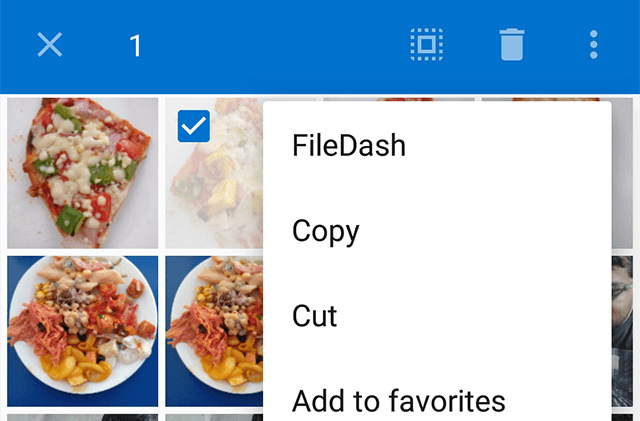
Copy photos from internal memory to SD card
Step 3. Soon as you have copied the photos on your device, you will be prompted to select a folder to paste your photos in. Navigate to your SD card storage, choose a folder, and tap on the Paste option to paste your photos.
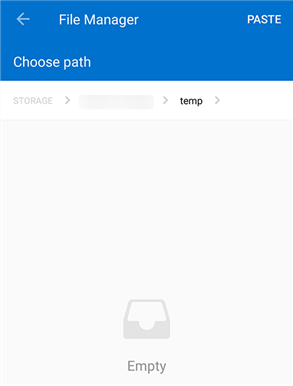
Paste photos in the SD card storage
The app will start copying your photos from your internal storage over to your SD card storage. It should not take too long to copy your photos and you can then view your photos on your SD card.
The Bottom Line
If you often run out of memory on your Android device, you are highly recommended to have your photos transferred to your SD card storage. The above guide shows exactly how you can do it using two unique methods on your device. We hope it helps you out.

Member of iMobie team as well as an Apple fan, love to help more users solve various types of iOS & Android related issues.
Product-related questions? Contact Our Support Team to Get Quick Solution >
