How to Transfer Photos from iPhone to Computer (Windows 7/8/10 Included)
How to transfer photos from iPhone to PC? The following tutorial shows you 4 ways to copy and move photos from iPhone to Windows 7/8/10/Vista/XP, and also make a comparison among them so that you can get photos from iPhone to computer in the best way. Compatible with iPhone 7/8 (Plus), iPhone X and iOS 11.
This guide is focus on how to transfer photos from iPhone to Windows computer, if you are working with a Mac, like MacBook Pro/Air, iMac, etc., you can follow this guide – How to Transfer Photos from iPhone to Mac to get iPhone photos to Mac computer.
AnyTrans – iPhone Photos Manager Tool
1-click transfer all photos (not only Camera Roll) from iPhone to Windows computer. Supports iOS 11, iPhone 7/8 Plus, iPhone X and iOS 11. Now Free Download AnyTrans >

I cannot figure out how to import my photos from my iPhone to a folder on my Windows PC. This is my first iPhone and I am not used to iTunes or the sync features. So far I can get it to sync photos from the photo folder on my pc, but not take them from the iPhone and put them on my PC!
With an iPhone, we can capture high-quality photos using the built-in iSight camera, especially with the new iPhone 8’s 12MP camera and iPhone 8 Plus and iPhone X’s portrait mode, people are really fond of taking pictures with its built-in dual cameras.besides taking photos with iPhone’s built-in camera, we also save images from applications such as Safari and Mail to the iPhone, and also take screenshots on iPhone. These photos are stored on your iPhone, and eating up your iPhone’s storage bit by bit.

Image Credit: pcadvisor.co.uk
One day, you’ll find Photos App becomes the biggest storage consumer and almost haven’t available storage to save one more picture or download one more app. At this moment, you have to consider deleting some photos from iPhone to free up space, but it is necessary to transfer them all to computer for backup before deleting them. How to transfer photos from iPhone to computer?
When it comes to transfer photos from iPhone to computer, for Windows users, many specialists or tutorials tell you that you can make it by many ways, like Windows AutoPlay, Windows Explorer, Windows Photos, third-party software, etc. In this guide we will offer you 4 methods to transfer photos from iPhone to Windows computer. And also make a comparison among them so that you can get the best way to import photos from iPhone to computer.
Part 2:Transfer iPhone Photos to Computer with AutoPlay (Only Camera Roll Supported)
Part 3: Transfer iPhone Photos to Computer with Photos App (Only Camera Roll Supported)
Part 4: Transfer iPhone Photos to PC with Windows Explorer (Only Camera Roll Supported)
Part 5: Best Way to Transfer iPhone Photos to Windows Computer – Comparison Chart
Part 1: Transfer All or Multiple Photos from iPhone to PC with AnyTrans
You know, you can get many ways to transfer iPhone photos to computer, but most of them only help you transfer Camera Roll Photos to computer, and all photos are placed in disorder, etc. Therefore, here we recommend you an iPhone ontent manager tool – AnyTrans, which does great in managing and transferring iPhone photos with those top features, like:
- Transfer all kinds of iPhone photos – AnyTrans supports importing Camera Roll photos, Photo Stream, Photo Library, photos synced from iTunes or computer, iCloud sharing photos, photo albums, etc.
- All photos are resorted – Camera Roll, Panoramas, Live Photos, Screenshots, Selfies and Bursts, etc. are organized by different folder, so you can easily find what you like.
- Super fast transferring speed – AnyTrans can transfer 1500 + photos in 3 minutes.
- Top security guaranteed – 100% copy the original iPhone pictures to computer instead of thumbnails or compressed pictures.
- Extremely easy to use – AnyTrans with clean interface and readily comprehensible screen prompts makes it suit for both of basic and advanced users.
- Compatible with all iPhone models and computer operating system – AnyTrans works well with all iPhones, like iPhone 3gs, iPhone 4/4s, iPhone 5/5s/5c, iPhone 6/6s (Plus), iPhone 7/8 (Plus)/7 and the latest iPhone X, and also supports all Windows and Mac computer.
Next, we will show you how to import photos from iPhone to Windows computer with AnyTrans. No matter you want to export all iPhone photos or just some specific photos, you can make it with following methods.
Method 1: 1-Click to Export All Photos from iPhone to Windows (7/8/10) Computer
Step 1: Free download AnyTrans on your Windows computer, and then install and run it.
Free Download * 100% Clean & Safe
Step 2: Launch AnyTrans, and then connect your iPhone to computer with its USB cable. Then click Device tab, and then click Content to PC button on Homepage of AnyTrans.
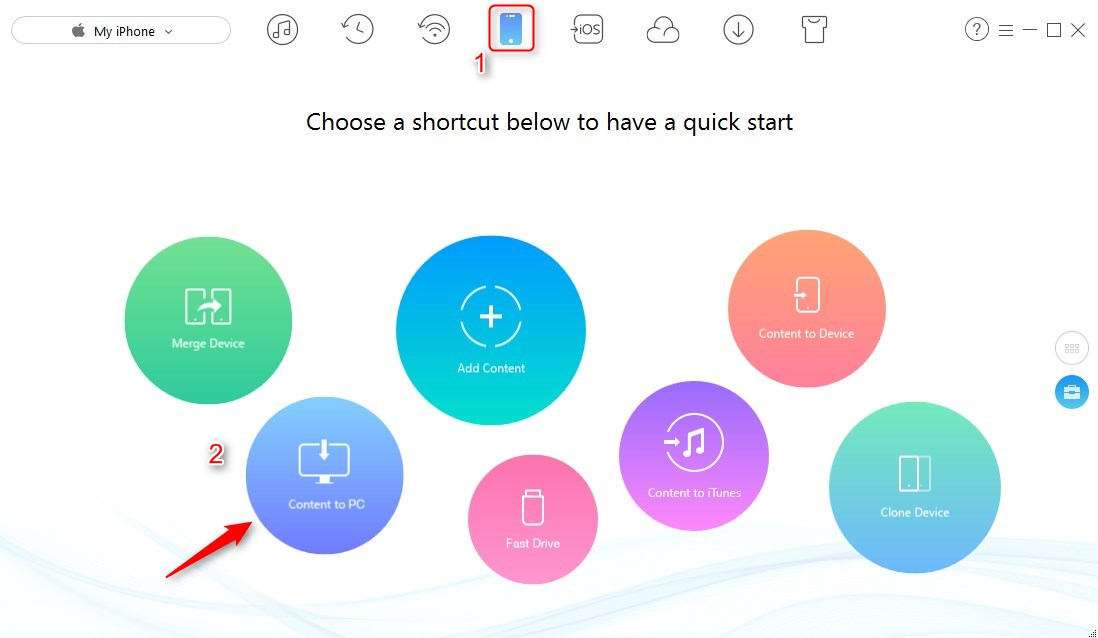
How to Transfer All Photos from iPhone to PC with AnyTrans – Step 2
Step 3: Select the categories of photos you want to export to PC, like Camera Roll, Photo Stream (photos synced to iCloud server), Photo Video, Photo Library (photos synced from computer), Live Photo, Screenshot, etc. Pick up the output folder by clicking Select button, and then click Right arrow button to start transferring photos from iPhone to Windows computer.
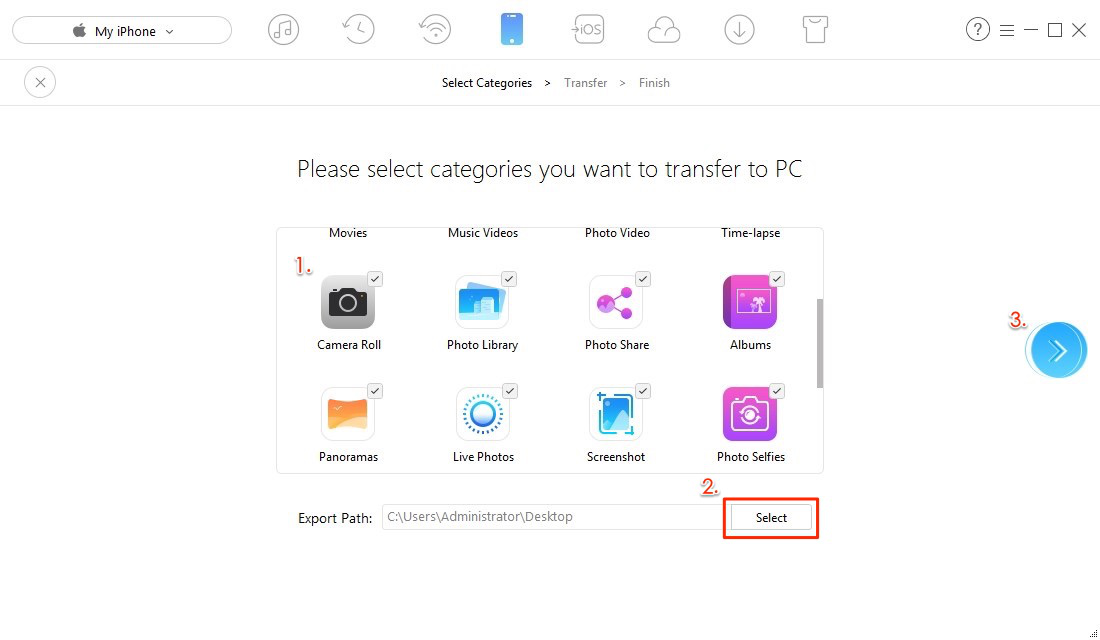
How to Import All Photos from iPhone to PC with AnyTrans – Step 3
Step 4: When the transferring process finished, all the photos exported from iPhone will be saved on your computer in right folder. And you’ll find all the photos are organized in folders like Live Photos, Camera Roll, Panoramas, etc.

How to Import All Photos from iPhone to PC with AnyTrans – Step 4
1 – Click Export All iPhone Photos Now >
Method 2: Transfer Multiple or Selected Photos from iPhone to Windows (7/8/10) Computer
Step 1: Free download AnyTrans on your PC computer, install and run it.
Free Download * 100% Clean & Safe
Step 2: Run AnyTrans, and then connect your iPhone to computer with its USB cable > Click Device tab > Click  button.
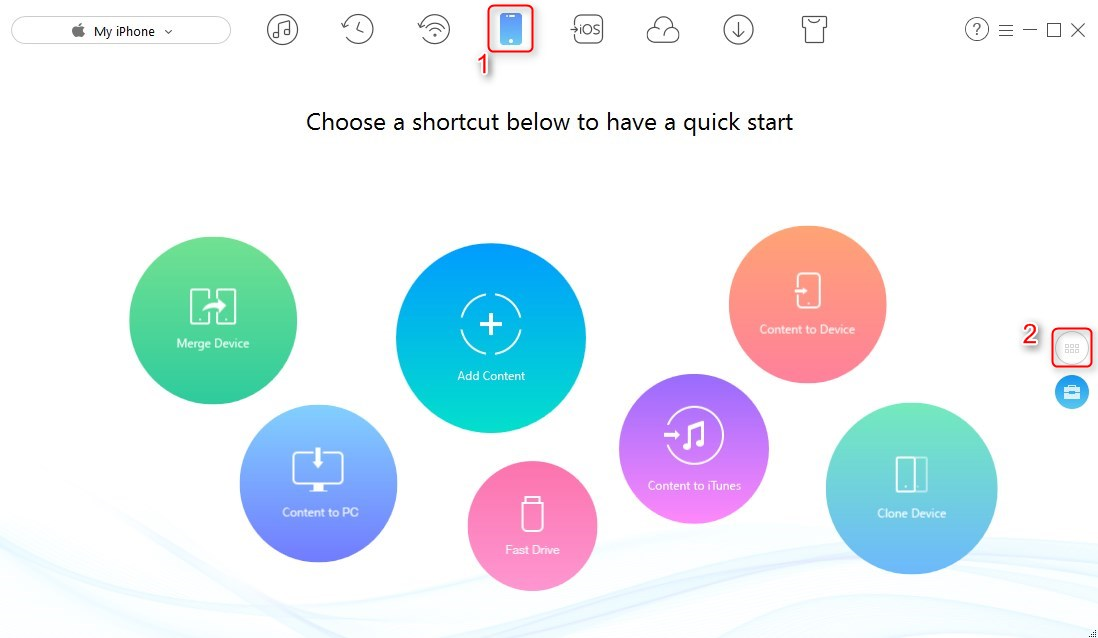
How to Transfer Photos from iPhone 4s/5s/6s/7/8/X to Computer – Step 2
Step 3: Select Photos > Select the album with photos you want to transfer to PC, like Camera Roll, Photo Stream, Photo Library, Photo Share, Live Photo, Screenshot, Location, etc.

How to Transfer Photos from iPhone 4s/5s/6s/7/8/X to Computer – Step 3
Step 4: Select the photos you want to transfer to computer > Click To Computer button to get selected iPhone photos to your computer.

How to Transfer Photos from iPhone 4s/5s/6s/7/8/X to Computer – Step 4
Step 5: Check the transferred iPhone photos on your computer.
- If you want to delete all the photos from iPhone after moving them to computer, you can follow this guide to learn how to delete multiple or all photos from iPhone with AnyTrans.
- If you just upgraded to new iPhone, and want to transfer photos from old iPhone iPad to new iPhone 7 (Plus) or iPhone 8/X, you can follow this guide – How to Transfer Photos from iPhone to iPhone to make it.
Part 2: How to Import Photos from iPhone to PC with AutoPlay (For Windows 7/8 Users)
When transferring photos from iPhone to Windows 7/8 via AutoPlay, only Camera Roll photos can be transferred, Photo Stream and Photo Library photos are not in supported list, and all the photos are placed in disorder, if you want to transfer all kinds of iPhone photos to PC, and organize them in order, you can move to Part 1 find a better solution.
1. How to Transfer Photos from iPhone to Windows 7 with AutoPlay
1. Connect your iPhone to the computer. If the AutoPlay window appears, click “Import Pictures and Videos using Windows”.
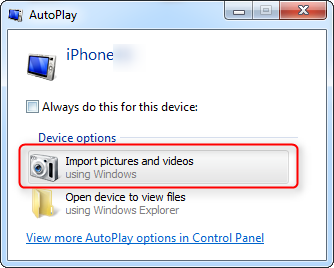
How to Copy Camera Roll Photos from iPhone to Windows 7 Computer
2. Click the Import Settings link > In the resulting window, you can change the folder to which your Camera Roll’s photos will be imported by clicking the Browse button next to the “Import to” field.
3. After setting up your import options, click OK > Choose a tag if desired and click Import button.
When your iPhone is connected to computer, but Windows AutoPlay doesn’t pop up, you can try to fix it with these potential solutions, like: reconnect your iPhone; restart your computer; install the latest driver for your computer, etc. If you still failed to make it, move to Part 1 to transfer iPhone photos to Windows 7/8/10 computer.
2. How to Transfer Photos from iPhone to Windows 8 with AutoPlay
1. Connect you iPhone using the cable with your Windows 8 PC. Wait for your PC to detect your iPhone. You might see a notification with Trust option. Tap on Trust option to continue.
2. Open “The PC” and right-click on the iPhone device and then select “Import pictures and videos”.
3. Select “Review, organize, and group items to import” option if you are transfer or importing images first time. Or click “Import all new items now” if you have already transferred photos from your iPhone. Click Next.
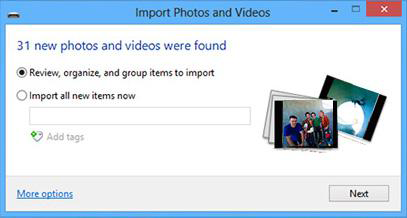
Import Photos from iPhone to Windows 8 Computer
4. Click on “More Option” link to choose folders where you want import iPhone pictures and videos. Set folder for Pictures. click OK and then Next button.
5. Select the groups of photos you want to import, click the Import button.
When connecting iPhone to your Windows 8 computer, if the AutoPlay Window doesn’t appear, or your iPhone photos not showing up on your PC, you can try to fix it with the following methods, like disconnect your iPhone and connect it again, change another USB cable or USB port, restart your computer, etc. If you still fail to fix it, you can move to Part 1 to transfer all iPhone photos to computer with AnyTrans.
Part 3: How to Transfer Photos from iPhone to Computer with Photos App (For Windows 10)
Just like Windows 7, Windows 8, the Photos App on Windows 10 also only supports transferring the Camera Roll photos from iPhone to PC. If you plan to transfer all the photos from your iPhone to computer (including Camera Roll photos, My Photo Stream, iCloud sharing photos, Synced photos from computer, etc.), you can move to Part 1 to make it.
Just like the Photos App on Mac, Windows 10 also has a Photos App, which allows you to upload camera roll photos from iPhone to Windows computer if it is running with Windows 10 operating system. If you are working with a computer like this, follow us to transfer photos from iPhone to Windows 10 with Photos App as below:
Step 1: Download the latest version of iTunes on your computer, and this will helps your computer recognize your iPhone. And then connect your iPhone to computer with its USB cable.
Step 2: Run Photos App on your PC, and then click Import button at top right corner.
Step 3: Select the photos you want to import to PC, and then click Continue button. And then all the selected photos will be transferred your Windows 10 computer.
Part 4: How to Import Photos from iPhone to Computer with Windows Explorer
Windows treats the iPhone as a digital camera or file system, so you can import photos from iPhone to PC with Windows Explorer. And it also only imports Camera Roll photos, and your photos are stored in several folders in disorder, if you want to export all iPhone photos, and keep them organized, please move to Part 1 to make it.
About how to import photos from iPhone to PC with Windows Explorer, you just need to follow the steps below:
Step 1: Connect your iPhone to PC > Open My Computer > Find your iPhone it will appear under Portable Devices Sections.
Step 2: Double click iDevice icon to open your iPhone > You’ll see the Internal Storage icon > Double click it to open it.
Step 3: You’ll see the DCIM folder that is the Camera Roll folder > Double click open it > Open one folder to see if it contains the photos you want to transfer > Select the photos you like and copy them > Paste them to the desired folder of your computer.
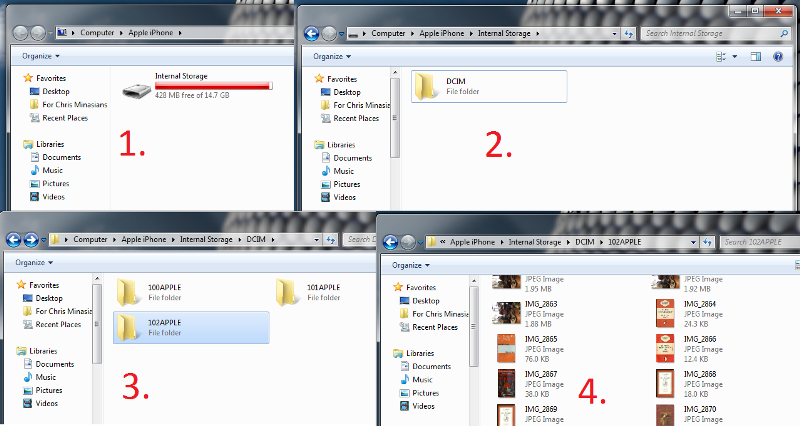
How to Import Photos from iPhone 5s/6s/7/8/X to PC with Windows Explorer
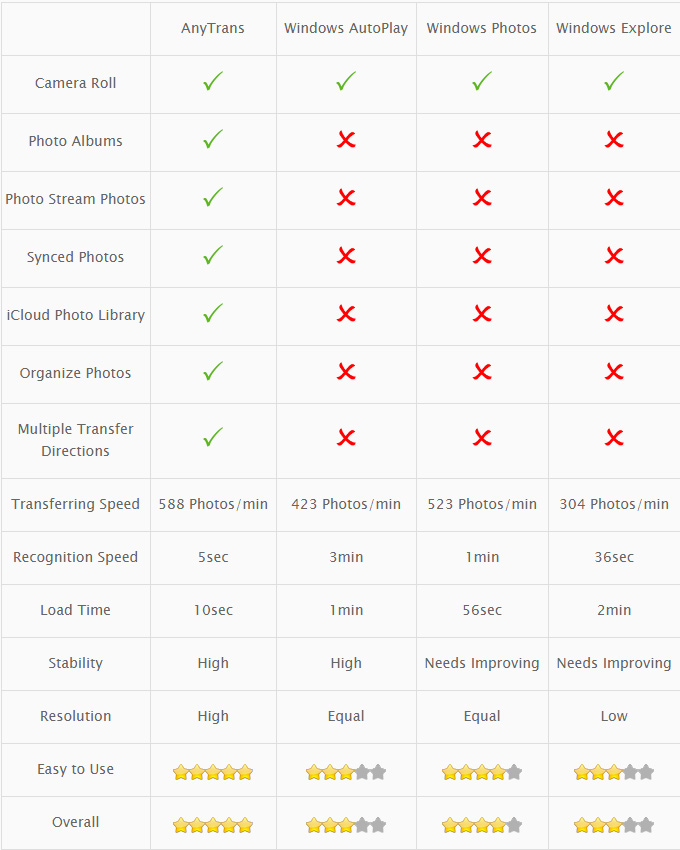
Part 5: Best Way to Transfer Photos from iPhone to Windows Computer – Comparison Chart
| AnyTrans | Windows AutoPlay | Windows Photos | Windows Explore | |
| Camera Roll | ||||
| Photo Albums | ||||
| Photo Stream Photos | ||||
| Synced Photos | ||||
| iCloud Photo Library | ||||
| Organize Photos | ||||
| Multiple Transfer Directions | ||||
| Transferring Speed | 588 Photos/min | 423 Photos/min | 523 Photos/min | 304 Photos/min |
| Recognition Speed | 5sec | 3min | 1min | 36sec |
| Load Time | 10sec | 1min | 56sec | 2min |
| Stability | High | High | Needs Improving | Needs Improving |
| Resolution | High | Equal | Equal | Low |
| Easy to Use |
|
|
|
|
| Overall |
|
|
|
|
| Availability | Try Now > | — | — | — |
Enjoy $ 10 Discount and Buy AnyTrans Now > (“60 Days Money Back” and “Lifetime Free Upgrade” Guarantee)
The Bottom Line
As you can see, although you can get 4 or more ways to transfer photos from iPhone to computer, only AnyTrans supports transferring all the kinds of photo albums, and export photos in well-organized by photo categories. No matter what device you are working with, like iPhone 4s/5s/6/6s/7, or the latest iPhone 8 and iPhone X; no matter what operating system your computer running with, Windows 7/8/10, or Windows XP/Vista. Anyway, AnyTrans is the best tool to backup iPhone photos to computer.
besides copying photos from iPhone to computer, AnyTrans also supports transferring other iOS contents, like Contacts, Messages, Videos, Notes, Voice Mails, Music, etc. Now Download AnyTrans to Try It For Free >
More Related Articles


Member of iMobie team, an Apple fan as well as an anime lover. Like to share solutions on iOS and Android related problems.
Product-related questions? Contact Our Support Team to Get Quick Solution >
Hot & Trending
 How to Recover Photos from iPhone After Factory Reset/Restore Easily
 How to Transfer Photos from iPhone 4/4s/5/5s/6/6s/SE to iPhone 7/7 Plus
 How to Transfer Photos from iPhone to LG
 iPhone Photos Disappeared after iOS 11.3 Update? Here’s How to Get Them Back
 How to Recover Deleted Photos from iPhone X/8 without Computer
 How to Transfer Photos from iPhone to Samsung Quickly and Easily