Best Tools for External Hard Drive Recovery
This article provides a step-by-step approach to external hard drive recovery, showcasing Glary File Recovery as a key tool. It teaches how to easily restore lost files from external hard drives.

Ever wondered if those lost files on your external hard drive are gone for good? Think again! External hard drive recovery is not just a possibility! It’s a reality with the right tools and know-how. Whether it’s precious photos, essential documents, or your favorite music that’s disappeared, there’s hope.
In this guide, we will discuss simple yet effective ways and tools to bring back what you thought was lost forever. Looking for an easy fix? Glary File Recovery is your best bet. Get ready to get your files back with our simple guide on recovering external hard drives. Let’s start our discussion!
Table of ContentsHide
Can an External Hard Drive Be Recovered?
Yes! It is often possible to recover files from an external hard drive that have been deleted, formatted, or corrupted. This is because operating systems do not truly erase data upon deletion.
On a Windows system, deleting a file only removes its logical access. Data stays physically on disk. The space of the deleted file is marked as available by the operating system for new data.
The original data can be recovered until it is overwritten with new data. Data recovery software can help you with external hard drive recovery. It scans for deleted files’ directory entries and rebuilds lost files.
The software also uses file signatures and unique patterns in file headers. It does so to find and piece together data fragments into usable files.
Next, let’s have a closer look at ways for external hard drive recovery.
How to Recover Data from an External Hard Drive
Let’s discuss the recovery process for files from a hard drive that has experienced a common failure type. Choosing the correct recovery method increases your chances of getting your files back.
Way 1. Try an External Hard Drive Recovery Tool
Wondering how can you recover files from a hard drive? It is effortless to use Glary File Recovery. This tool helps you find and bring back lost files from your external hard drive. It’s easy to use, making it great for anyone, even if you’re not a tech expert.
Glary File Recovery works with many types of files. This means it can help you recover documents, photos, and more. No deep computer knowledge is required. The software guides you through the steps to get your files back.
It’s a good choice for when you accidentally delete something or have problems with your drive. With Glary File Recovery, getting your files back is simpler and easier.
Key Features of Glary File Recovery
- User-friendly interface in Glarysoft File Recovery allows easy use for all tech levels.
- Offers quick and deep scan options to suit fast or thorough file searches.
- Supports a wide range of file types, enabling recovery of texts, photos, and documents.
- The preview feature lets users check files before recovering them, ensuring relevance.
- Capable of retrieving files from multiple devices like internal and external drives, and USBs.
- Includes search and filter tools for finding specific files by type or name easily.
All these features make Glarysoft File Recovery an ideal choice for recovering data.
How to Use Glary File Recovery to Recover Lost Files?
Follow the below steps to use Glary File Recovery for external hard drive recovery.
Step 1: Download and Install Glarysoft File Recovery
Start by downloading and installing Glary File Recovery on your device.
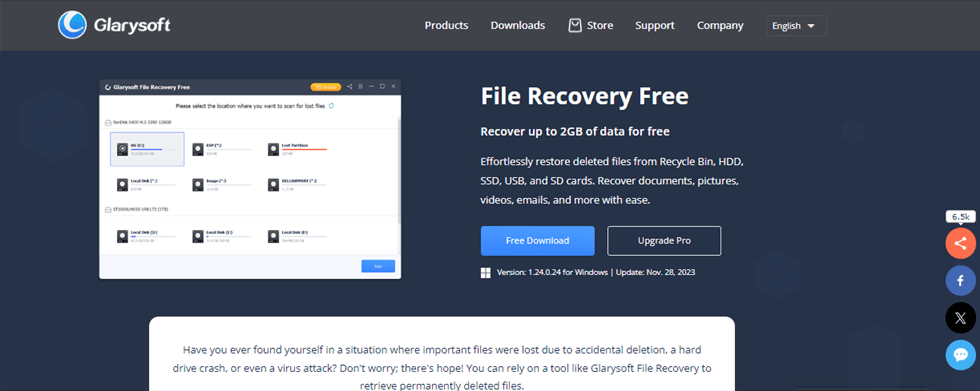
Website Interface of Glarysoft File Recovery
Step 2: Launch a Scan
Select the drive where your data was lost. Glarysoft can navigate through FAT, NTFS, and NTFS+EFS systems. Hit “Scan” to commence a thorough search in the chosen location.
Post-scan, utilize the left panel for sorting options. Filters include name, type, size, date, path, or file type, simplifying your search for specific files.
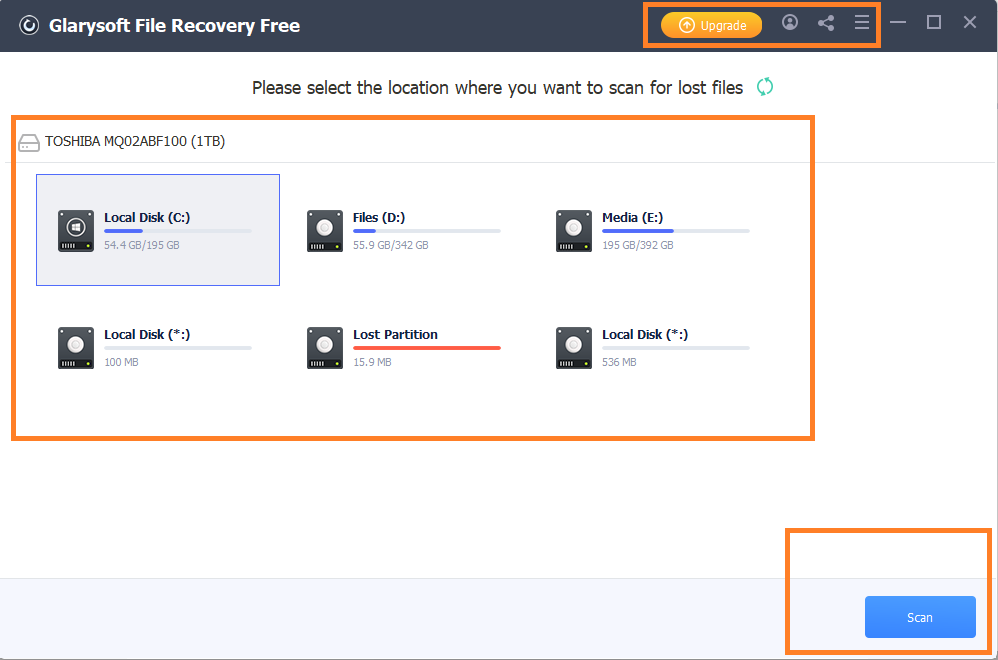
Click the Scan Button
Step 3: Preview and Recover
Glarysoft allows file previews. Adjust the preview format or zoom in for details.
Confirm your files and select those for recovery. Press “Recover” to retrieve lost data, choosing a destination for these files to complete the process.
Finally, access and review your recovered files.
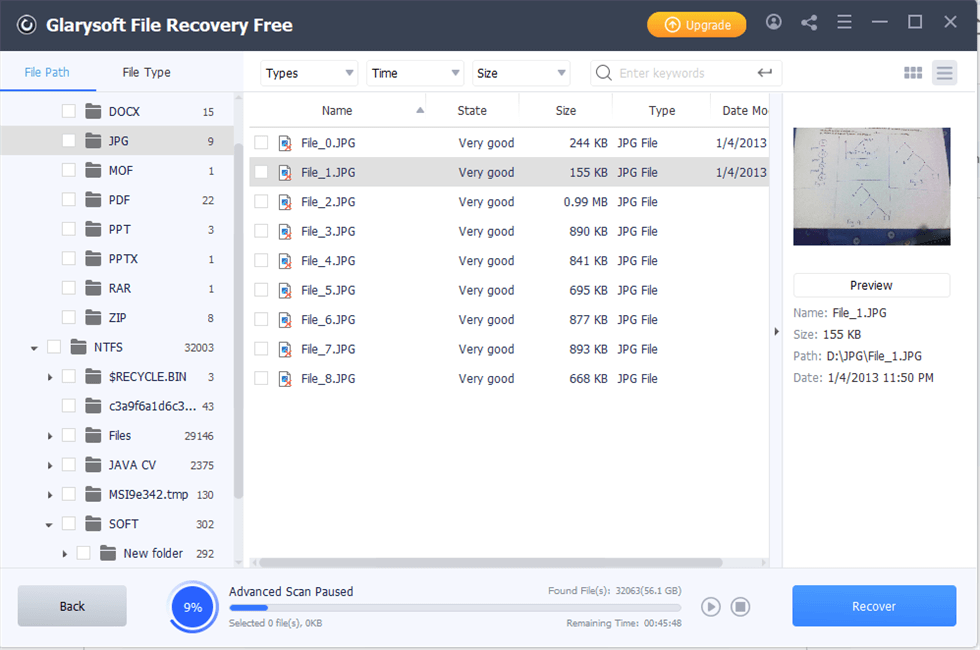
Preview and Recover
We’ve covered using Glarysoft File Recovery for recovering files from hard drives. It’s an easy and effective way. If it’s not for you, see what’s next for other options.
Way 2. Recover from Recycle Bin
Deleted files on an external hard drive are stored in a built-in recycle bin folder. This folder, like system files, is hidden by default at the root directory of the disk. To find lost data, you can check this recycle bin folder on your external hard drive.
How to Recover Deleted Files From Recycle Bin? Take the below steps for external hard drive recovery from the recycle bin.
Step 1. Go to the File Explorer on your computer and open it.
Step 2. Click “View”, Next “Options”. Now, choose the “Change folder and search option.”
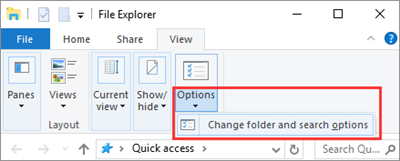
Choose “Change Folder and Search Option”
Step 3. Click “View”, then choose “Show hidden files, folders, and drives. Disable.” Now “Hide protected operating system files” and Apply these settings.
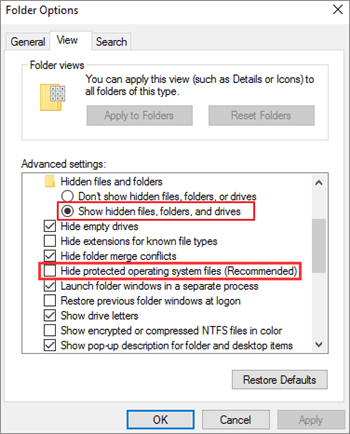
Apply the Settings
Step 4. Now, Open your external hard drive. Here, you can see the $RECYCLE.BIN folder.
Step 5. Open the recycle bin folder and search for the lost files to restore.
That’s all about this method of recovering data from the recycle bin. Now, let’s move ahead to the next potential solution.
Way 3. Recover from Backup
Windows Vista introduced a feature called Backup and Restore for data recovery. This allowed users to make backups and restore them later. However, in Windows 8.1, Backup and Restore were replaced by a new system called File History. Despite this change, you can still recover data on Windows 10 from backups made with Backup and Restore.
Follow the below steps to recover external hard drive data from backup.
Step 1. First of all, open the Start menu.
Step 2. Type “backup” and press Enter.
Step 3. Choose “Go to Backup and Restore (Windows 7)” under the section for older backups.
Step 4. Now choose “Select another backup to restore files from” and pick your backup.
Step 5. Click “Next” and follow the on-screen instructions to finish the recovery.
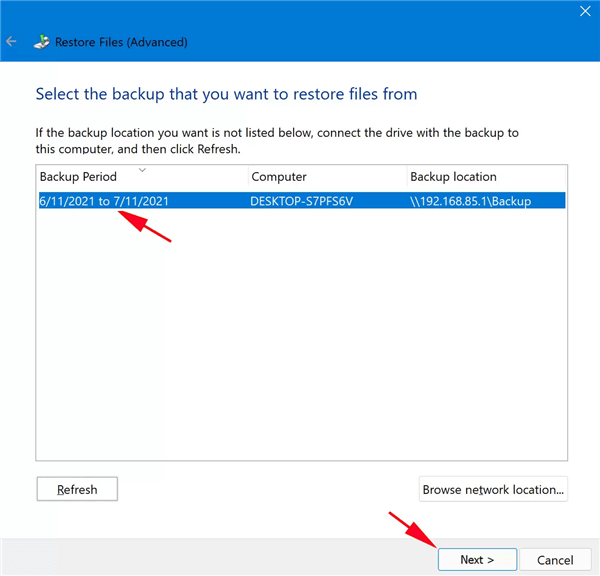
Recover Data from Bakup
It’s quite an easy method for recovering files from backup. If you don’t want to give it a try, move to the next method of external hard drive recovery.
Way 4. Use CHKDSK Command
Every Windows computer includes a tool called CHKDSK. This tool checks the integrity of a drive’s file system. It also tries to repair any logical errors. Despite lacking a graphical interface, using CHKDSK is quite simple.
It can be accessed through the Command Prompt. Users simply enter specific commands to start the process. This utility plays a crucial role in maintaining the health of your drive by scanning for and fixing issues. It’s a valuable resource for troubleshooting and ensuring your data’s safety.
The below steps will help you with external hard drive recovery using the CHKDSK command.
Step 1. In the search box on the taskbar, type “cmd” and choose Run as administrator.
Step 2. Enter the following command and hit Enter: chkdsk X: /f (ensure to replace X with the letter assigned to the HDD you want to fix).
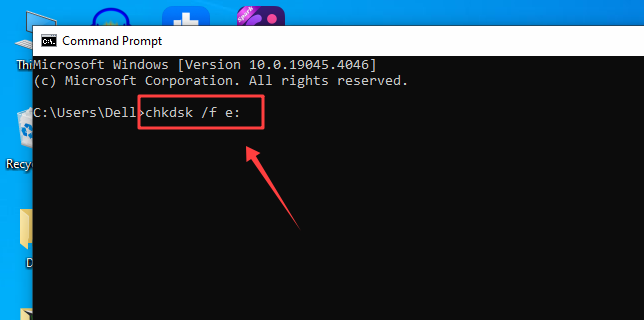
Entering Command to Run CHKDSK
Step 3. Wait for CHKDSK to complete.
So far, we’ve covered how to use the CHKDSK command for external hard drive recovery. Let’s discuss the next method on our list.
Way 5. Run First Aid in Disk Utility
Mac users have an alternative to CHKDSK called First Aid in Disk Utility. First Aid diagnoses and repairs faulty storage devices. First Aid in Disk Utility features a user-friendly interface, making it easy to use. This tool is essential for keeping y542eryour Mac’s storage in good health by fixing issues efficiently. Below are the steps to help you with external hard drive recovery using First Aid in Disk Utility.
Step 1. First of all, go to Finder, then Application. Now go to Utilities and launch Disk Utility.
Step 2. From the list on the left, choose the hard drive you want to repair and click the First Aid button.
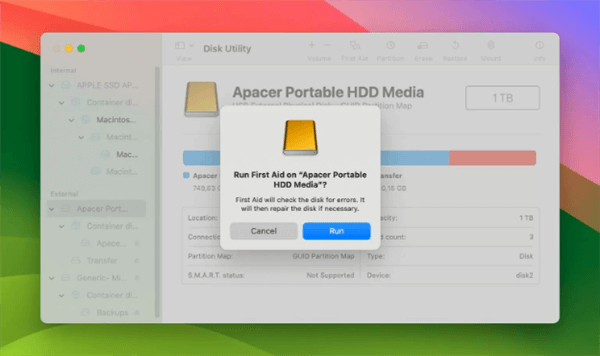
Run First Aid in the Utility Disk
Step 3. Now, confirm that you want First Aid to check the partition for errors.
That’s all about running First Ain in the Utility Disk for external hard drive recovery. Now, let’s discuss the next best method for the same purpose.
Way 6. Reinstall Driver
Even experts can slip up, including those coding for hard drives. A bad driver might lock you out of your HDD. But fixing it by reinstalling only takes minutes. It’s a simple process that can restore your access. Thus, ensuring your data is reachable again. Quick and easy, this solution gets your system back on track without much hassle. Here are the steps to follow for reinstalling Driver.
Step 1. Type “device manager” in the search bar on the taskbox and choose the Device Manager option.
Step 2. Go through the available categories and search for your external HDD. You will most probably find it under Portable Devices.
Step 3. Right-click the SD card and choose Uninstall device.
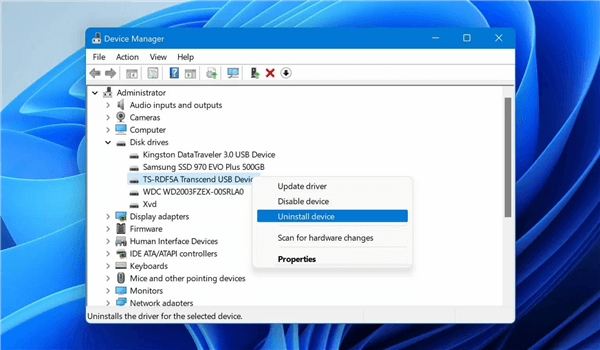
Choose Uninstall Device
Step 4. Now wait for the right driver to be automatically installed.
Now that you know how to reinstall the driver for external hard drive recovery. However, if you don’t want this method a try, move to the next one.
Way 7. Try Windows System File Checker
SFC opens a command prompt for scanning, highlighting file corruption. Don’t close the prompt until the scan finishes. SFC might report no integrity violations. If it fixes corrupted files, you’ll be informed. If not, you’ll need to replace files manually. Follow the steps below to run SFC for receiving deleted or corrupted data.
Step 1. Right-click the start menu icon to access the elevated command prompt. Choose Command Prompt (Admin) from the list. Alternatively, use the shortcut keys Win + X and select it.
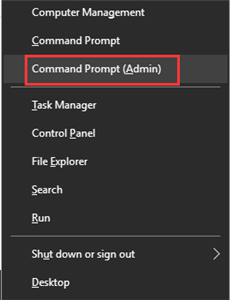
Choose Command Prompt (Admin)
Step 2. After launching the command line, enter the command below to start the SFC scan: SFC /scannow
Ensure you don’t interrupt this process; wait until it finishes. The result will be shown once the scan is complete.
Step 3. Hit Enter on the keyboard after typing. It will start searching for lost or corrupted files on your PC.
That’s it! So far, we have discussed 7 ways for external hard drive recovery. Now, let’s talk about the other best tools for recovering lost data.
Other Tools for External Hard Drive Recovery
Recovering data from external hard drives is simple with the right tools. We’ve chosen the following best tools, based on tests, user feedback, and features.
1. TestDisk
TestDisk is a powerful tool designed for serious data recovery tasks. It is best for fixing lost partitions and reviving disks that won’t boot. This tool is a go-to for tackling tough data loss problems. But it’s best suited for those with some technical know-how due to its text-only interface.
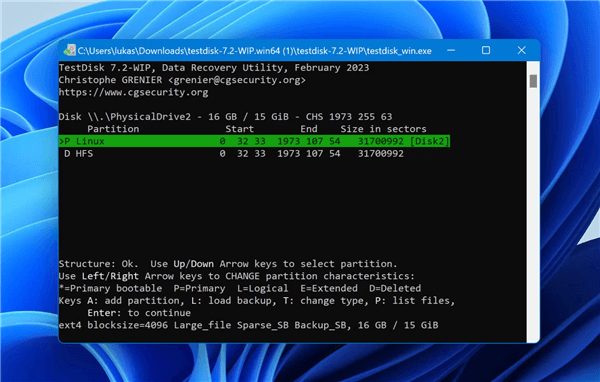
TestDisk
Key Features:
- It’s great at getting back lost partitions and helping recover entire data sections.
- Can make non-booting disks start up again, crucial for system recovery.
- Works on many operating systems, including Windows, Mac, and Linux.
- Handles a range of filesystems like FAT, exFAT, NTFS, and ext2/ext3/ext4.
- Free to use and modify, making it accessible to everyone.
- Broad compatibility with different versions of Windows, macOS, and Linux kernels.
TestDisk’s reliance on a command-line interface may be challenging for less tech-expert users. It’s not the best for single file recovery, focusing instead on larger-scale solutions like partition and system repairs. Let’s discuss the next tool on our list for external hard drive recovery.
2. R-Studio
R-Studio offers a range of data recovery tools for almost every situation. It can restore data across all major file systems and search for files without metadata. The tool also fixes startup problems, recovers data over a network, and more. It’s made for technicians and network professionals working on data recovery for corporate networks and business computers.
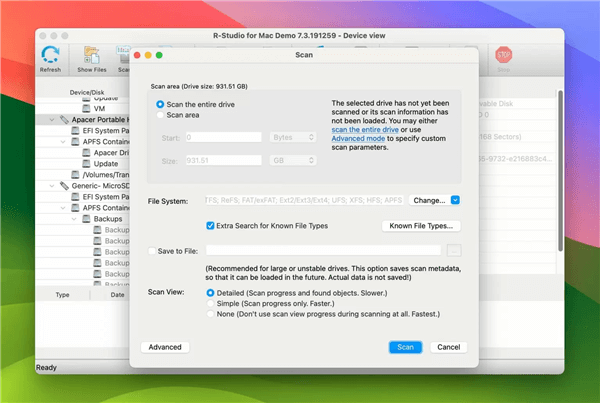
R-Studio
Key Features:
- Packed with advanced features for professionals.
- Comes as a bootable ISO for recovery without starting the OS.
- Includes disk sanitization to securely erase data.
- Best for those with technical knowledge; not for beginners.
- Limited preview options during scans.
- Supports a wide range of file systems and partitions.
- Enables multiple recovery jobs at once.
- Files can be sorted by type, date, and more.
- Has a built-in hex editor for detailed file analysis.
However, R-Studio is too complex for beginners. Let’s move ahead to the next best tool for external hard drive recovery.
3. Recuva
Recuva is a free program for recovering lost files like photos, music, documents, and videos from hard drives, memory cards, and USB devices. It’s simple to use and offers a free version.
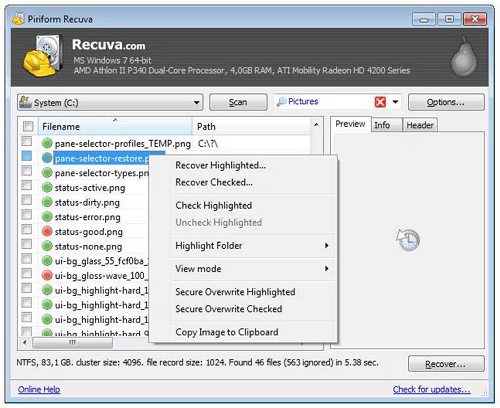
Recuva
Key Features
- Affordable with a free option.
- Preview feature available.
- Less effective than more expensive tools.
- The interface feels outdated.
- Limited in restoring original file organization.
- Free and Pro versions are available.
- Works on Windows 10, 8.1, 7, Vista, XP.
- Supports multiple languages.
Recuva stands out for its affordability and ease of use. However, it recovers fewer files than premium competitors and has limited support for file formats.
The interface is a bit dated but still user-friendly, with a preview screen that enhances usability. Despite its limitations, Recuva remains a viable option for basic file recovery needs on modern Windows versions.
Now, let’s keep the momentum going and move to the next part!
Common Reasons for External Hard Disk Data Loss
External hard drives are essential for storing extra data. But they’re also prone to data loss. This can happen for a variety of reasons, making understanding these causes crucial to prevent future losses.
- Accidental deletion of files without a backup.
- Physical damage from drops or spills.
- Corruption due to unsafe removal or power failures.
- Virus or malware attacks that target external hard drives.
- Overheating of the hard disk, leading to hardware malfunction.
- Formatting the drive without saving data elsewhere first.
Data loss in external hard drives can be a setback. Yet knowing these common causes helps in taking preventive measures. It’s about keeping your data safe and your hard drive in good condition.
Final Thought
External hard drive recovery is possible, and we’ve shown you how. From easy tools to simple steps, getting your files back can be straightforward. Whether you accidentally deleted something or faced a drive failure, solutions are at hand. Remember, quick action is key. The sooner you try to recover your data, the better your chances.
And for a user-friendly option, Glary File Recovery stands out. It’s designed to help you find and restore lost files with ease. So, if you’ve lost important data on an external hard drive, don’t worry. With the right approach and tools like Glary File Recovery, getting your files back is often just a few clicks away.
Product-related questions? Contact Our Support Team to Get Quick Solution >
