How to Blur Background on iPhone [2026 New!]
This article teaches how to blur background on iPhone. It shows simple steps to use your iPhone’s camera for professional-looking photos. The guide is perfect for anyone who enjoys photography. By following this guide, you’ll easily learn to create that amazing blur effect.

Ever wanted to blur the background in your iPhone photos?
This guide makes it easy! Blurring the background makes your main subject stand out. It’s a cool trick to make your pictures look pro.
We’ll show you how to do this with just your iPhone. It’s for anyone who likes taking pictures. You’ll learn to get that blur effect behind your subject. This makes your photos look great. You don’t need fancy gear, just your iPhone is enough! It’s fun and easy.
Get ready to impress with your shots. Ready to find out how to blur background on iPhone? Let’s start and see how simple it is to make your photos amazing!
Table of ContentsHide
Blur Background On iPhone with Portrait Mode
1. What Is Portrait Mode?
Portrait mode is an excellent shooting mode in the iPhone’s built-in Camera application. It works by using depth effect software to create a blurry, soft background while keeping your subject in sharp focus.
iPhone’s Portrait Mode
As the name suggests, it is perfect for shooting ideal portraits of people and pets. But do you know you can also use it to make the backgrounds pretty blurry behind your subjects?
Portrait mode is especially useful when the background is distracting or ugly. Making the background blur helps you to create a pleasing image and subject stand out.
It is available on the iPhone 11 Pro Max, iPhone 11 Pro, and iPhone 11. You will also find it on the iPhone 7 Plus, iPhone 8, iPhone X, iPhone XR, iPhone XS Max, and iPhone XS.
Unfortunately, Portrait mode is not available on the iPhone 8, iPhone 7, or older. However, the techniques discussed in this article will help you to create blurred backgrounds on any iPhone. Let’s discuss our next parts on how to blur background on iPhone!
2. How To Blur Background On iPhone with Portrait Mode?
Do you want to create images with dreamy, blurred backgrounds? If yes, you can do this effortlessly with Portrait Mode. Follow the below easy and quick steps to get a perfect blurred background.
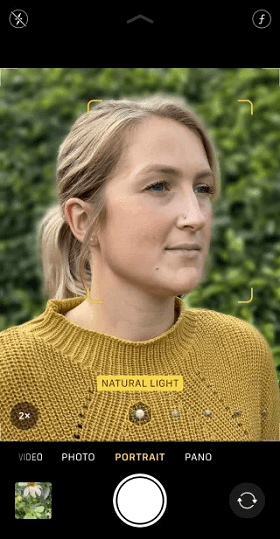
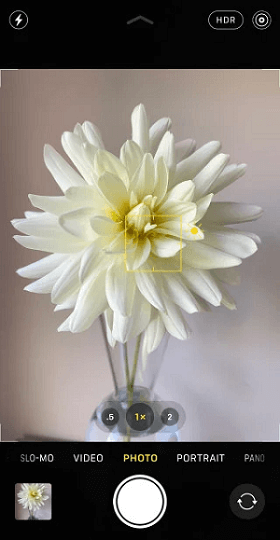
Step 1. Open the Camera application on your iPhone. Then choose Portrait mode at the bottom of the screen.
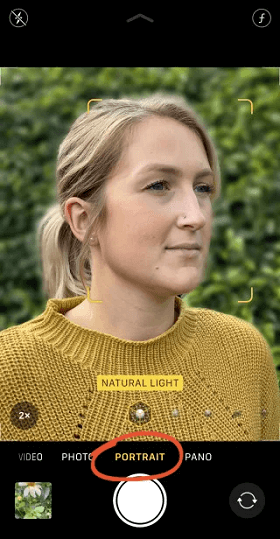
Choose the Portrait Mode
Step 2. Your subject has to be between two and eight feet away from the camera. And there needs to be fairly plenty of light. Now, wait for the words “Natural light” to appear in yellow.
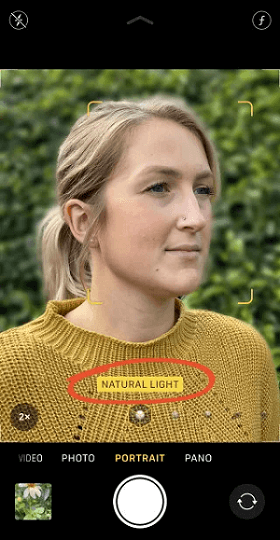
Wait for natural light to appear
This shows that the depth effect is working. Now you can take your shot.
Step 3. Now, cross-check the viewfinder to ensure the depth effect is generating good results. Your subject should appear sharp, while the background should be blurred. Now, simply press the shutter button to take a photo with a gorgeous blurred effect.
That’s all about this method. Now, let’s move ahead to the next part of our discussion.
How to Blur Background on iPhone with iPhone Photo Editing
When your shooting skills can’t meet your demands, or you just seeking how to blur background on iPhone. You can do this in the photo editing process. It’s easy and quick to blur the background of a photo.
Have a look at the method below to blur the background of your existing photos.
Blur Background on iPhone with Photo Editing Feature
You can apply Portrait Mode if your iPhone model supports the “ Portrait Light Effect.” Follow the below steps to apply the Portrait Mode to get a nice blurred background.
- Find the photo you want to get a blurred background.
- Tap “Edit” and touch the square below the photo. Then drag to choose the light effect you want.
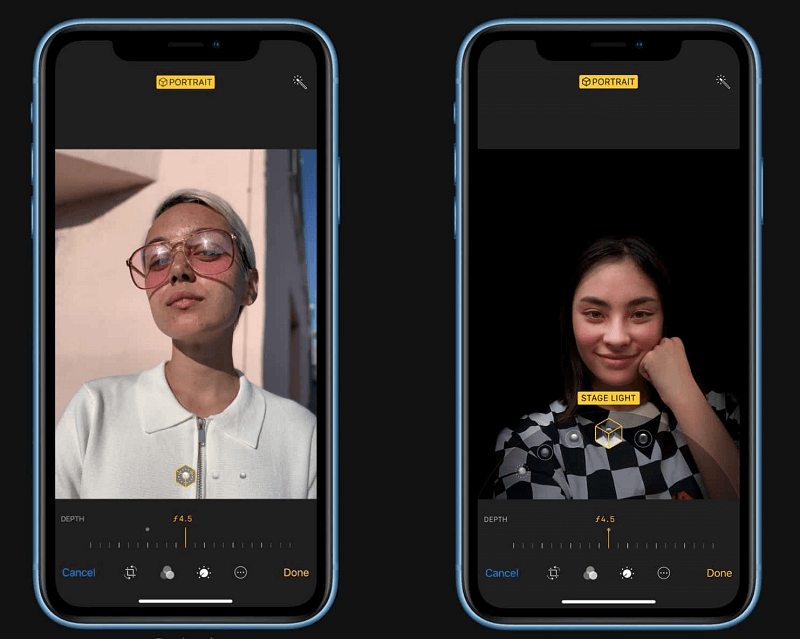
Choose the light effect you want
- Adjust the intensity of the light effect by dragging the slider right and left. Tap “Done” to save the changes you made.
In case, you are not satisfied with the blurred background, you can still tap restore to get the original image back. Or you can try the next method to get a beautiful blurred background!
How to Blur Background on iPhone With Background Blur App at Ease [Professional]
If your iPhone does not support portrait mode, there are numerous blur background apps available to help you create visually appealing blurred backdrop photographs. And Picscart – Online Photo Editing Tool is at the top among them! Just download Picscart a powerful editing tool, to effortlessly blur backgrounds.
Picsart Logo
Picsart is a versatile photo editing app renowned for its wide array of features, with the ability to transform ordinary photos into captivating masterpieces. Among its impressive toolkit is the Blur Background feature, offering iPhone users a seamless way to add depth and focus to their images. Here’s how to blur backgrounds using the Picsart app:
- First, make sure you have PicsArt installed on your iPhone. You can download it from the App Store if you haven’t already.
- Launch the PicsArt app on your iPhone. Choose the photo from your Camera Roll or Gallery that you want to edit.
- Once you’ve selected the photo, tap on the “Effects” icon (it usually looks like a magic wand or star).Scroll through the effects options until you find the one that allows you to blur the background. It might be named something like “Blur” or “Background Blur.”
- After selecting the blur effect, you can adjust the intensity of the blur using the slider provided.
- Once you’re happy with the blurred background effect, tap on the “Save” or “Export” button to save your edited photo to your Camera Roll or share it directly from the app.
That is it. With Picscart, you may quickly and easily blur the background of an image. Picscart also offers image-blurring capabilities.
Get Closer To Your Subject Get Amazing Background Blur
Do you want to know how to blur background on iPhone without using Portrait Mode? If yes, this section is for you!
It’s super easy! And you can do it using any iPhone – even those models that don’t have Portrait mode.
All you have to do is move close to your subject.
Step 1: Move Closer to Your Subject
This little amazing technique is a guaranteed way to create photos with a blurred background. The closer you move to your subject, the blurrer the background becomes.
To test out this technique with your iPhone, find a subject that you would like to photograph.
Ensure the subject isn’t too close to the background. Otherwise, you will fail to capture a blurred background. If the background is further from the subject, it will appear more blurred.
Then, hold your iPhone a few feet away from the subject. Next, move your phone closer to the subject slowly. Now, the background gradually appears more blurred the closer you move.
Background starts appearing blurred
If you move too close to the subject, the camera will fail to focus completely. The subject will appear blurred when this happens. So, you must be far enough to ensure the subject looks sharp and crisp, yet close enough to blur the background.
You also have to ensure the background has some details to blur. If you’re shooting against a white or plain wall, there won’t be any detail to blur.
Step 2: Set the Focus Point Manually
When you take close-up photos, the depth of field is limited. This results in only a small area of the image being in sharp focus. The rest of the scene looks blurred.
So it is important to tell the camera which part to focus on. If you don’t, the camera can focus on the wrong part. It will result in a blurred subject.
Simply tap that area of the screen to set the focus point on your subject.
The yellow box indicates the focus point
Alternatively, you can also lock focus. This will allow you to take multiple photos without having to reset the focus point repeatedly. Tap and hold for a couple of seconds to lock focus until you see AF/AE Lock.
Move closer if the background doesn’t look blurred after setting the focus point.
Note: Don’t forget to reset the focus point every time you change the distance between the subject and the camera.
The Bottom Line
To blur the background on your iPhone, use Portrait Mode, edit photos, or get close to your subject. Portrait Mode makes the subject sharp and the background blurry.
If your photo is already taken, use the iPhone’s edit feature to add a blur effect. No Portrait Mode? No problem! Just move closer to what you’re photographing. This makes the background blur naturally. Don’t forget to set the focus on your subject by tapping the screen.
These easy steps help you make beautiful photos with a blurry background. Try it and see how your photos stand out. This simple guide shows how to blur background on iPhone, making photography fun and creative. What’s more, try Picscart when you do not know how to blur background on iPhone without Portrait Mode!
Product-related questions? Contact Our Support Team to Get Quick Solution >
