Full Guide on How to Resize An Image on iPhone
This article guides you on how to resize an image on iPhone in easy stepwise manner. We’ll show how to use the Photos app, Picscart Online Image Resizer, and Shortcuts app for this purpose. You can use them for various scenarios like social media posts, personal projects, and professional use.

A top-quality and portable camera. What comes to mind? iPhone! We use them to capture moments everywhere we go. Well, it’s no surprise, given the amazing quality of photos iPhones can take.
But not every picture we snap is perfect right off the bat. Sometimes, the size isn’t quite right for sharing on social media or fitting into a specific frame on a website.
So, do you also want to know how to resize an image on iPhone? In this article, we’ve got the tips and tools you’ll need. We’ll show you how to do it using the in-built features as well as other online tools.
Possible Scenarios for Resizing Images on iPhone
There are countless scenarios where you might find yourself needing to resize an image on your iPhone. Whether it’s for personal use or sharing with others, the right size can make all the difference. Here are a few situations where adjusting the size of your photos could be particularly useful:
- Social Media Posts: To make sure your photos look their best on platforms like Instagram or Facebook, resizing them to fit specific dimensions can be crucial.
- Personal Projects: If you’re working on a digital scrapbook or photo collage, resizing images can help you fit everything together perfectly.
- Professional Use: For business presentations or marketing materials, photos need to be the right size to convey your message.
- Wallpapers: Adjusting the size of an image to use as your iPhone wallpaper ensures it fits the screen without stretching or pixelation.
- Emails and Messaging: To avoid sending very large files that might be hard for others to download, resizing photos before sharing them is a thoughtful step.
In each of these scenarios, knowing how to resize images on your iPhone efficiently can enhance the way you use and share your photos.
Resize An Image on iPhone in the Photos App
The iPhone comes equipped with a built-in method to resize images directly within its operating system, thanks to the Photos app. This handy feature allows users to adjust their pictures quickly without needing any additional software. Whether you’re looking to free up some storage space by reducing file sizes or preparing images for online use, the Photos app can help you resize your photos efficiently and effortlessly.
Steps to Resize Images Using Photos App
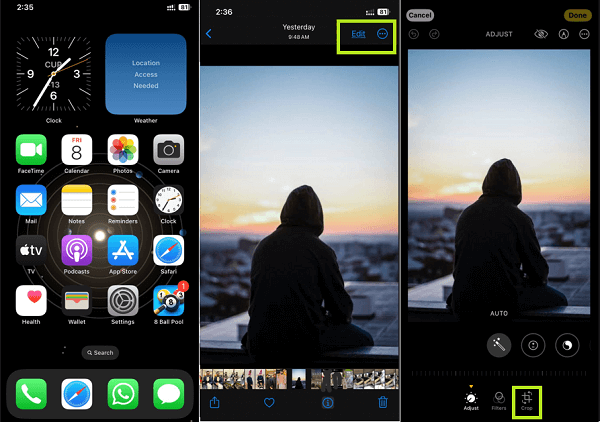
- Open the Photos app on your iPhone and navigate to the image you wish to resize.
- Tap on the “Edit” button located in the top right corner of the screen to enter editing mode.
- Select the “Crop” tool icon, which might also include options for straightening and adjusting the perspective of your photo.
Opening a photo to edit in iPhone
- Drag the corners of the box that appear to crop the photo to your desired size. You can choose aspect ratios like square, 4:3, 16:9, etc., for precise resizing.
- Once you’re satisfied with the new size, tap “Done” in the bottom right corner to save your resized image.
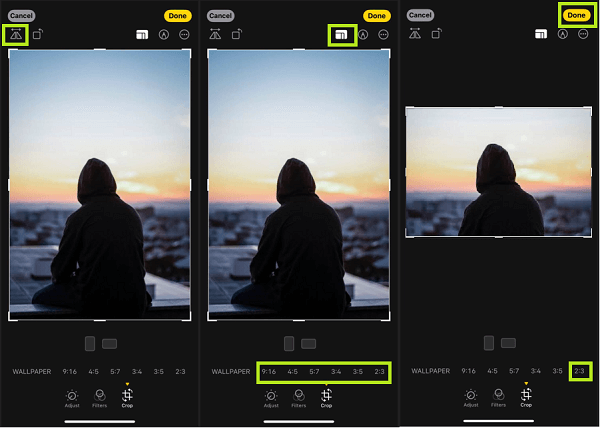
Resizing an image using aspect ratio
If you want to resize an image for professional use without losing its quality, you can use some professional resizing tool.
Resize Image for Social Media Use without Losing Quality [Professional]
If you need to resize an image without losing any resolution and in a professional manner, various image resizer tools can help. One such tool is Picscart– Online Image Resizer, a versatile and user-friendly platform that ensures your images are resized perfectly for any use, especially for social media.
Picscart– Online Image Resizer
Picscart is a versatile online photo editing platform designed for both novice and professional users. Among its various features, the Resize Image function stands out, allowing users to effortlessly adjust the dimensions of their images without compromising quality. This tool is perfect for resizing images for social media, web design, or print, providing precise control over width, height, and aspect ratio.
Key Features of Picscart
- Resize Image: Easily adjust the dimensions of images while maintaining quality, perfect for social media, web, or print.
- User-Friendly Interface: Intuitive design makes photo editing accessible for users of all skill levels.
- Wide Range of Editing Tools: Comprehensive suite of tools including filters, effects, cropping, and retouching.
- High-Quality Output: Ensures edited images retain their original quality, suitable for both personal and professional use.
- Cross-Platform Compatibility: Accessible on various devices, allowing seamless editing across smartphones, tablets, and desktops.
Steps to Resize Images with Picscart
Step 1. Launch the Picscart platform on your device by navigating to the website or opening the app.
Step 2. Click on the “Upload” button to select and upload the image you want to resize from your device.
Step 3. Once your image is uploaded, navigate to the “Resize” option in the toolbar.
Step 4. Enter the desired width and height for your image. You can also maintain the aspect ratio by checking the appropriate box.
Step 5. Click “Apply” to resize your image. Once satisfied with the changes, click “Save” to download the resized image to your device.
How to Resize A Photo Using Shortcuts
Resizing a photo on your iPhone can also be incredibly efficient using the Shortcuts app. This method allows you to automate the process, making it quicker to adjust the size of your photos with just a few taps. The Shortcuts app, available on iOS, lets you create custom actions for various tasks, including photo resizing.
By setting up a photo resizing shortcut, you can easily change the size of any photo without manually editing it every time. This is especially useful for those who frequently need to adjust image sizes for different purposes.
Steps to Resize Images Using Shortcuts
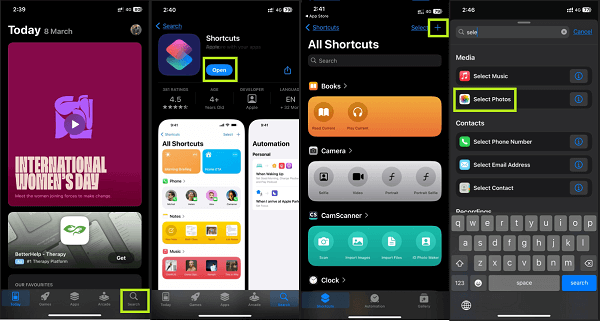
- Open the Shortcuts app on your iPhone. If you don’t have it, download it from the App Store.
- Tap on the “+” button in the top right corner to create a new shortcut.
- Search for and select the “Select Photos” action to add it to your shortcut. This action lets you pick which photo you want to resize.
Selecting the file format and downloading the image
- Add the “Resize Image” action by searching for it and selecting it. Here, you can specify the size you want your photos to be resized to.
- Add the “Save to Photo Album” action to automatically save the resized image back to your Photos app.
- Name your shortcut and tap on the “Done” button. Now, whenever you need to resize a photo, you can simply run this shortcut, select your photo, and let the app do the rest.

Adding Select photos, resize image, and Save to photo album to Shortcuts
Conclusion
Now you know how to resize an image on iPhone. It’s simpler than you think, right?
With the built-in Photos app, Picscart Online Image Resizer, and the Shortcuts app, we have shown you multiple methods. These tools ensure your images fit perfectly wherever they are intended.
What’s more, Picscart – Online Photo Editing Tool allows you to resize images with its powerful image resizer app for iOS. Use Picscart image resizer to adjust image sizes without losing quality!
Product-related questions? Contact Our Support Team to Get Quick Solution >
