How to Rotate Picture on iPhone [Solved]
We often click pictures with our iPhones that turn out amazing. However, sometimes they are a bit crooked or in the wrong orientation. This calls for rotating the picture to make it straight or changing it from portrait mode to landscape mode or the other way around. In this guide, we have discussed 3 tried and tested ways how to rotate picture on iPhone.

How many times have you clicked the perfect picture, but it is slightly tilted, or is in the wrong mode? Or, when setting a WhatsApp status, you need to turn a landscaped image into portrait mode? Many times, we are sure!
It is at this moment that you realize that a slight rotation might make the image look better! But how to rotate picture on iPhone, you ask? Well, you are in luck, because in this guide, we have put together not one, but 3 easy ways to rotate a picture on an iPhone.
Table of ContentsHide
Why Rotate Picture on iPhone?
Rotating your photos is really important for fixing their orientation.
When you take pictures with your iPhone, they can be in portrait or landscape mode, and your phone’s auto-rotate feature decides the angle of your image. But don’t worry, if you need to manually correct the orientation, you can easily rotate images via the Photos app, or a third-party photo editor.
Not only does this fix any wonky angles, but it can also improve the composition of your photos and create a more interesting angle that aligns with other elements in the image.
With that sorted, let us have a look at 3 different ways how to rotate picture on iPhone.
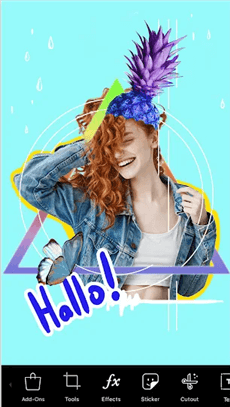
How to Rotate Picture on iPhone with Picsart App?
Picsart is a versatile and powerful photo editing app designed to help users make quick adjustments and creative edits to their photos directly from their iPhone. One of the key features of Picsart is its ability to easily rotate pictures, making it simple to correct orientation issues or to achieve a desired artistic effect. With its intuitive interface and extensive feature set, Picsart is ideal for both beginners and experienced editors looking to rotate their images efficiently.
Key Features of Picsart for Rotating Pictures on iPhone:
- User-Friendly Interface: The app is designed to be easy to navigate, ensuring users can quickly find and use the rotation tool.
- Comprehensive Editing Tools: Besides rotating, Picsart includes tools for cropping, resizing, and enhancing your photos.
- Precise Rotation Control: Offers the ability to rotate pictures by fixed angles (90°, 180°, 270°) or by custom degrees for precise adjustments.
- Filters and Effects: Enhance your rotated photos with a variety of filters and effects to make them stand out.
- Social Media Integration: Easily share your rotated and edited photos directly to your social media platforms from within the app.
Steps to Rotate a Picture Using Picsart on iPhone:
Step 1. Download and install Picsart on your iPhone. Launch the app, tap the ‘+’ button to create a new project, and select the image you want to edit from your gallery.
Step 2. In the editing menu at the bottom, scroll through the options and select ‘Tools’. Then, choose ‘Rotate’ from the list of available tools.
Click Tools Below
Step 3. Use the rotation dial or enter the specific degree of rotation to adjust the image to your desired orientation. You can rotate the picture left or right in increments of 90 degrees or fine-tune the angle for more precision.
Step 4. Once you have adjusted the image to the desired angle, tap the checkmark to apply the changes.
Step 5. After applying the rotation, save your edited image by tapping the ‘Download’ icon. You can also share it directly to your social media platforms from within the app.
How to Rotate Picture on iPhone with Photos App?
If you don’t want to use a third-party app, you can also rotate a picture on your iPhone directly from the Photos App. Here are the steps for it:
How to Rotate Picture on iPhone by 90 Degrees?
If you just want to rotate your image by 90 degrees, here is how to do it:
Step 1. Launch the Photos App on your iPhone and open the image you want to rotate.
Step 2. Tap on “Edit” at the top-right corner of the screen.
Step 3. Tap on “Crop” from the 3 options given at the bottom of the screen.
Step 4. You will see 2 options at the top-left of the screen indicated by a triangle and a square. The triangle is for flipping the image, while the square is for rotating the image by 90 degrees. As we want to rotate the image, we will tap on the square.
Tap the Crop Option
Step 5. This will rotate the image at a 90-degree angle. Keep rotating the image till you get the desired orientation.
Step 6. Tap “Done” to save the changes.
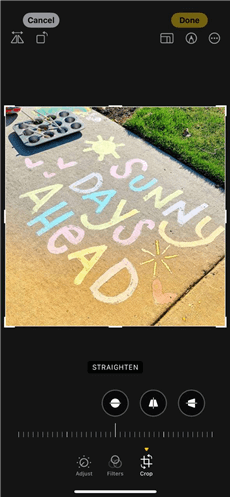
How to Rotate Picture on iPhone in a Certain Angle?
In the previous section, we discussed how to rotate an image at a 90-degree angle. However, if you don’t want to rotate it to 90 degrees, and simply want to rotate it just enough to straighten it a bit, you can follow the steps below:
Step 1. Launch the Photos App on your iPhone and open the image you want to rotate.
Step 2. Tap on “Edit” at the top-right corner of the screen.
Step 3. Tap on “Crop” from the 3 options given at the bottom of the screen.
Step 4. Just above the “Crop” option, you will see a slider to straighten the images. Move the slider to the left or right to rotate the image to your desired angle.
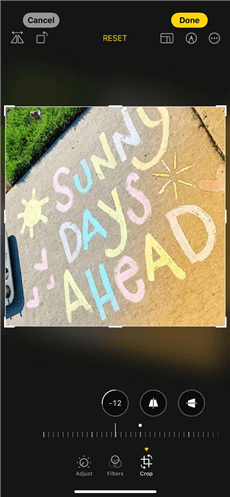
Move the Slider to Adjust the Angle
Step 5. Once you have adjusted the image to the desired angle, tap “Done” to save the changes.
How to Rotate Multiple Pictures on iPhone at Once?
As an iPhone user, you must know that you can only rotate one picture at a time via the Photos App or any third-party photo editor. However, if you want to rotate multiple images at once, you will have to get help from the iPhone widget, Shortcuts. Here are the steps to add Shortcuts and how to rotate picture on iPhone using this widget:
How to Add the Shortcuts Widget?
To add Shortcuts to your iPhone, follow these steps:
Step 1. Tap and hold your iPhone screen till all the icons start to wiggle. Then tap on the “+” sign at the top-left of the screen.
Step 2. This will open the “Widgets” on your iPhone. Scroll through the widgets till you find the “Shortcuts” widget, and tap on it.
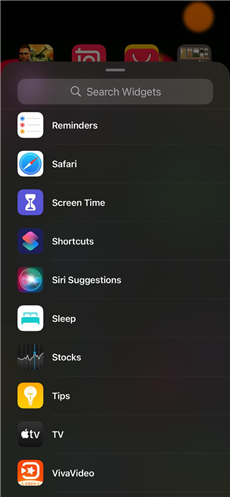
Scroll to the Shortcuts Widget
Step 3. Next, tap “Add Widget” to add it to your home screen.
Step 4. Drag the “Shortcuts” icon to place it anywhere on your home page and tap “Done.”
Now that you know how to add the “Shortcuts” widget, let us tell you how to rotate picture on iPhone using it.
How to Make a Rotate Image Shortcut?
Follow these steps to make a “Rotate Image” shortcut:
Step 1. Click on the “Shortcuts” widget on your home screen and go to “All Shortcuts.”
Step 2. Tap on the “+” sign at the top-right and click on “Add Action.”
Tap Add Icon to Make a Shortcut
Step 3. From the “Apps” tab, select “Photos > Select Photos.”
Step 4. Tap on the arrow in front of “Select Photos” and turn the toggle on for “Select Multiple.”
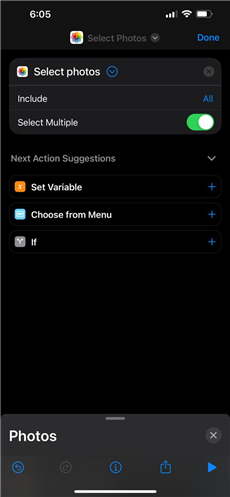
Turn the Toggle on to Select Multiple
Step 5. Now swipe up from the bottom to open the options menu and tap the “x” on the top right.
Step 6. This will bring you back to the previous page. Now tap on “Categories > Media.”
Step 7. Under the “Image Editing” tab, select “Rotate Image/Video.”
Step 8. The degrees are set to 90 degrees by default. Tap on it to change it to your desired number and tap “Done.”
You have now successfully created your “Rotate Image” shortcut.
How to Rotate Multiple Images Using Shortcuts?
Now that you have your shortcut in place, it is time to rotate the images:
Step 1. Open the “Shortcuts” widgets and tap on “All Shortcuts.”
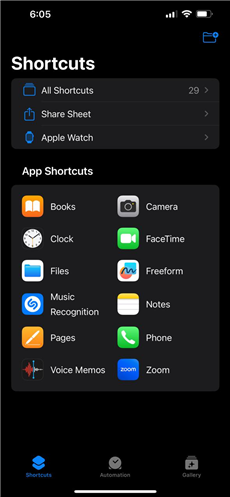
Go to All Shortcuts
Step 2. You will see your newly created “Rotate Image/Video” shortcut. Click on it, select the images you want to rotate and tap “Add.”
Step 3. You will see a small tick mark on the shortcut, indicating that your iPhone has successfully rotated your selected images.
Step 4. All your rotated images will now be available in the “Recents” folder in the Photos App.
And that is how to rotate multiple pictures on an iPhone at once!
Frequently Asked Questions
Q1. Why can’t I rotate a picture on my iPhone?
There are a few reasons why you might not be able to rotate a picture on your iPhone:
- Orientation Lock is On
Swipe down from the top-right corner of your screen to open Control Center. Check if the Portrait Orientation Lock button (it looks like a lock with an arrow around it) is highlighted. If it is, tap it to turn it off.
- The Photo’s Metadata is Locked
This is rare, but some photos taken with specific cameras or settings might have locked rotation data. You can try editing the photo with a third-party app like Picsart that allows overriding metadata.
Q2. How to Rotate Picture on Windows?
If you want to rotate a picture on Windows, you can use Picsart’s online version. The steps are the same as those on the app. You can go to the first part of this post to learn the steps.
The Bottom Line
Whether you are rotating your photos to fix their orientation or you simply want to straighten them up a bit, there are several options available that can help you with it. In this comprehensive guide, we have discussed 3 ways to rotate an image.
While using the Photos app is pretty simple it does not offer editing features, and the Shortcuts method is a bit difficult. However, Picsart is not only easy to use, but it also has several basic and advanced editing features. So, if you ever want to rotate your pictures, Picsart is the answer!
Product-related questions? Contact Our Support Team to Get Quick Solution >
