How to Transfer Music from USB or Flash Drive to iPhone
Want to move songs from a USB flash drive to iPhone? Learn how to access music directly from a USB drive, add songs to the iPhone Music library with AnyTrans, or sync music with Finder or Apple Devices.
If you have MP3s or other music files on a USB flash drive, there are now several ways to use them on an iPhone. The best method depends on one important question: do you only want to access the music files on the iPhone, or do you want to add the songs to the iPhone Music library?
On current iPhones, a compatible USB drive can be connected directly and opened in the Files app. If you want the songs to appear in the iPhone’s Music library, you can transfer them through a computer with AnyTrans or use Apple’s current Music/Finder/Apple Devices syncing workflow.
Quick answer: For iPhone 15 and later, connect a compatible USB-C flash drive and open Files > Browse to access the music directly. This does not automatically import those songs into the Apple Music library. To add local USB music to the iPhone Music library, use AnyTrans for selective transfer or import the songs to your computer’s Music library and sync them with Finder or Apple Devices.
Can You Connect a USB Flash Drive Directly to iPhone?
Yes. Apple currently supports connecting external storage devices such as USB drives and SD cards to an iPhone. You can then access compatible files through the Files app or another supported app.
The connection depends on your iPhone model:
| iPhone Type | What You May Need |
| iPhone with USB-C | A compatible USB-C flash drive or USB-C adapter |
| iPhone with Lightning | A compatible Lightning-to-USB adapter; some drives may also require external power |
Apple currently requires an external storage device to use a supported format and have a compatible partition structure. Supported formats include APFS, Mac OS Extended, exFAT and FAT32 in the applicable configurations.
Accessing Files Is Different from Adding Songs to Apple Music
This distinction is important. Connecting a flash drive lets the iPhone access files stored on that external device. It does not automatically add those audio files to the Apple Music library as normal synced songs.
| Your Goal | Recommended Method |
| Open or copy audio files from the flash drive | Connect the USB drive directly and use Files |
| Add selected songs to the iPhone Music library without traditional full-library syncing | Use AnyTrans on a PC or Mac |
| Maintain a computer music library and sync it to iPhone | Use Music + Finder on Mac or Apple Music + Apple Devices on Windows |
Method 1. Access USB Music Directly on iPhone
If you have a compatible flash drive and only need the music files available on your iPhone, you may not need a computer at all.
How to Open a USB Drive on iPhone
Step 1. Connect the USB drive to the iPhone’s charging port using the appropriate connector or adapter.
Step 2. Open the Files app.
Step 3. Tap Browse.
Step 4. Under Locations, tap the name of the connected USB drive.
Step 5. Open the folder containing your music files.
You can work with supported files directly from the external storage or copy files into a location available through Files.
This method is best when you need file access. It does not turn the USB folder into your Apple Music library or automatically make the songs appear alongside music synced through Apple’s Music app.
What About iPhone 15 and Later?
iPhone 15 and later models use USB-C, so connecting current USB-C flash drives and other compatible external storage is much simpler. Apple currently lists external storage devices among the accessories supported through the iPhone USB-C connector.
What About Lightning iPhones?
Older Lightning iPhones can also work with external storage through a compatible adapter. Some USB devices require more power than the iPhone can provide, in which case a powered adapter may be necessary.
Method 2. Transfer USB Music to iPhone with AnyTrans
If you want the songs from the flash drive transferred into the iPhone’s managed music collection without using the traditional full-library sync workflow, AnyTrans provides a computer-to-iPhone music transfer option.
AnyTrans’s current music-management documentation supports transferring songs from a computer to an iPhone, iPad or iPod touch. Because a connected USB drive appears as computer-accessible storage, you can select music files directly from that drive when adding songs.
AnyTrans – Add Music from USB to iPhone
- Select music files from a connected USB drive and add them to iPhone.
- Add selected songs instead of syncing an entire computer music library.
- Current AnyTrans documentation supports computer-to-iOS music transfer.
- Manage existing songs from the same Music interface.
- Supports iPhone, iPad and iPod touch devices running iOS 5 or later according to the current AnyTrans guide.
How to Transfer Music from USB to iPhone with AnyTrans
Step 1. Connect both the iPhone and USB flash drive to your Windows PC or Mac.
Step 2. Launch AnyTrans and wait for it to recognize the iPhone.
Step 3. Open Device Manager, then choose Music and Songs.
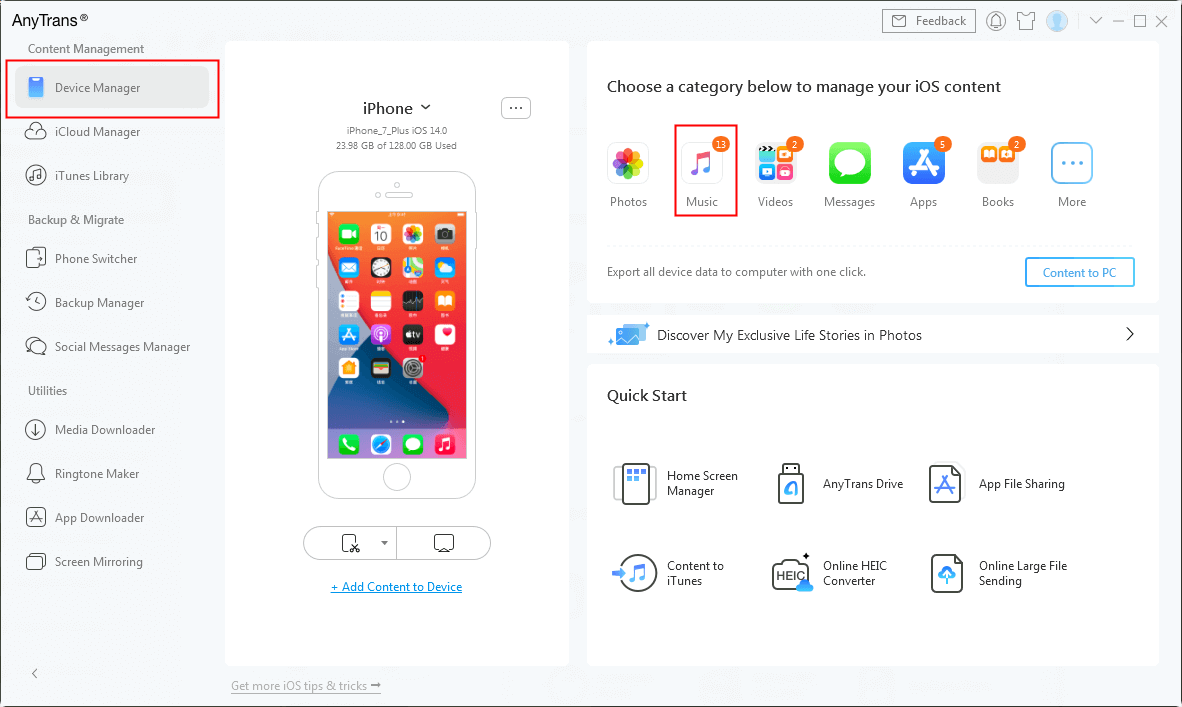
Open the Music area for the connected iPhone.
Step 4. Click the Add button.
Step 5. In the file-selection window, open the connected USB drive.
Step 6. Select the songs you want to transfer and click Open.
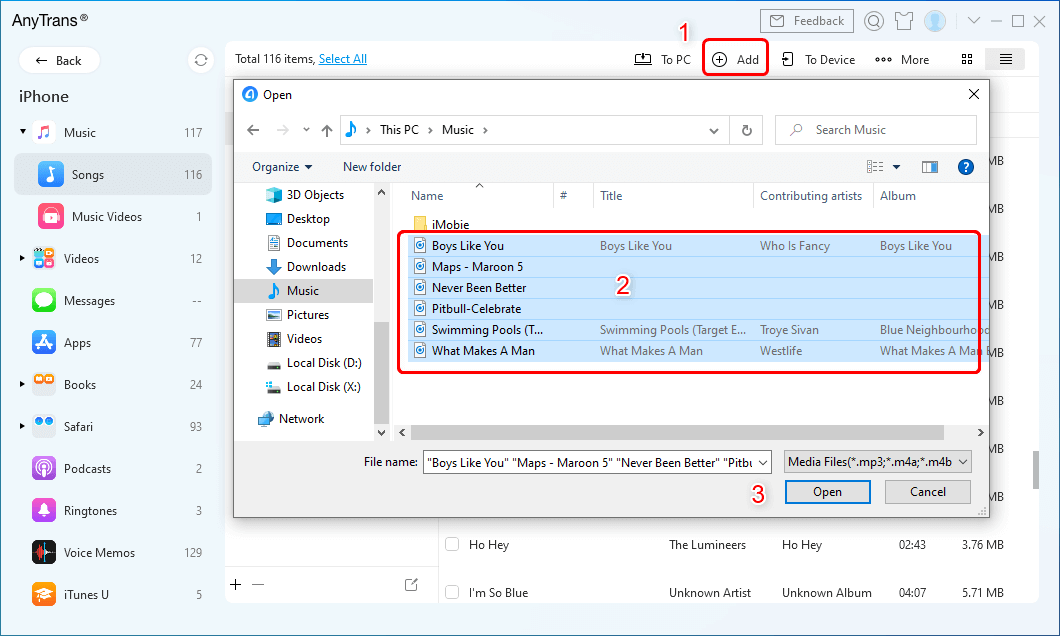
Choose the songs stored on the USB drive and add them to the iPhone.
Step 7. Keep the iPhone connected until the transfer completes, then check the music on the device.
Transfer only audio that you have the right to copy. DRM-protected subscription or purchased media may have restrictions that do not apply to ordinary MP3, AAC or other supported personal audio files.
Why Use AnyTrans Instead of Library Sync?
Apple’s traditional computer sync model can associate the iPhone with a particular music library. Apple warns that syncing a device with a different library can replace the content of that synced media type when you choose Erase and Sync.
AnyTrans’s current product information describes its music transfer workflow as allowing users to add music from a computer without replacing the existing songs through a full-library sync.
This can be useful when the flash drive contains only a few tracks and you do not want to rebuild or sync an entire music library.
Method 3. Sync USB Music with Finder or Apple Devices
If you prefer Apple’s official computer-based workflow, first import or copy the music from the USB drive into the computer’s music library, then sync that library to the iPhone.
On a Mac: Use Music and Finder
On macOS Catalina and later, Finder handles iPhone syncing.
Step 1. Connect the USB drive to the Mac.
Step 2. Add the desired music files from the USB drive to the Mac’s Music library.
Step 3. Connect the iPhone to the Mac.
Step 4. Open Finder and select the iPhone in the sidebar.
Step 5. Open the Music section.
Step 6. Turn on Sync music onto [iPhone].
Step 7. Choose the songs, albums, artists or playlists you want.
Step 8. Click Apply or Sync.
If Finder reports that the iPhone is already synced with another music library, read the warning carefully. Choosing Erase and Sync can remove previously synced music of that type and replace it with content from the current Mac.
On Windows: Use Apple Music and Apple Devices
Apple’s current Windows setup uses the Apple Music app to manage a computer music library and the Apple Devices app to sync that content with an iPhone.
Step 1. Connect the USB drive to the Windows PC.
Step 2. Open Apple Music and import the desired music from the USB drive into the Windows music library.
Step 3. Connect the iPhone to the computer.
Step 4. Open Apple Devices.
Step 5. Select the iPhone in the sidebar.
Step 6. Choose the Music syncing options and select the music you want transferred.
Step 7. Apply the sync settings.
Can You Still Use iTunes?
Yes in compatible Windows or older macOS environments. Apple still documents iTunes as supporting music syncing, but it is no longer the only current method.
For current Macs, use Finder. For current Windows setups using Apple’s newer apps, use Apple Music and Apple Devices.
What If Sync Library Is Enabled?
If you subscribe to Apple Music and use Sync Library, some manual computer-sync controls can be unavailable because your music is being kept up to date through Apple’s cloud library instead.
Check your current library configuration before changing sync settings simply to add a few USB tracks.
Why Is My USB Drive or Music Not Showing Up?
The USB Drive Does Not Appear in Files
Check the connector, adapter, drive format and power requirements. Apple currently supports several common storage formats, but the drive must use a compatible configuration.
The Flash Drive Needs More Power
Some external storage devices draw more power than an iPhone can supply. Older Lightning iPhones in particular may need a powered adapter. Larger external hard drives can also require external power.
The Song Appears in Files but Not in Music
This is expected when you simply connect or copy the file through Files. Accessing an audio file as a document is not the same as importing it into the Apple Music library.
Use a computer music-sync workflow or a compatible iPhone music manager if your goal is to have the song managed as part of the device’s music collection.
The Computer Wants to Erase and Sync
This normally means the iPhone is associated with a different computer music library. Do not click Erase and Sync until you understand which currently synced songs will be replaced.
AnyTrans Does Not Recognize the iPhone
Make sure the iPhone is unlocked, the USB cable supports data transfer and you have trusted the computer when prompted.
AnyTrans’s current Windows guide also notes that Apple device/iTunes components may be required on Windows for device detection.
A Music File Will Not Transfer or Play
The file may use an unsupported codec, be damaged or contain DRM restrictions. Test the original file on the computer first and confirm that it is a normal playable audio file before troubleshooting the iPhone.
FAQs About Transferring Music from USB to iPhone
1. Can I transfer music directly from a USB drive to an iPhone?
You can connect a compatible USB drive directly to an iPhone and access supported files through the Files app. However, opening or copying an audio file in Files does not automatically add it to the Apple Music library.
2. Can iPhone 15 or later read a USB flash drive?
Yes. iPhone 15 and later use USB-C, and Apple currently supports connecting compatible external storage devices through the USB-C port.
3. Can a Lightning iPhone use a USB flash drive?
Yes with a compatible Lightning-to-USB adapter. Some USB drives require additional power, in which case a powered adapter may be necessary.
4. How do I add MP3 files from USB to the iPhone Music library?
You can connect the USB drive to a computer and add the MP3s with AnyTrans, or import them into the computer’s Music library and sync them through Finder on Mac or Apple Devices on Windows.
5. Can I transfer USB music to iPhone without iTunes?
Yes. You can access music directly from external storage through Files, use AnyTrans for selective computer-to-iPhone transfer, use Finder on Mac, or use Apple Music and Apple Devices on a current Windows setup.
6. Does Finder replace iTunes for music syncing on Mac?
Yes on macOS Catalina and later. Apple currently uses Finder to sync music and other supported content between a Mac and an iPhone.
7. What replaced iTunes for iPhone music syncing on Windows?
Apple now provides the Apple Music app for the Windows music library and the Apple Devices app for syncing content with an iPhone. Compatible Windows setups can still use iTunes.
8. Will syncing music erase songs already on my iPhone?
It can if the iPhone is associated with a different computer music library and you choose Erase and Sync. Review Apple’s warning before proceeding. A selective transfer tool uses a different workflow and may be more suitable when you only want to add several tracks.
9. Can AnyTrans add songs without syncing the whole library?
AnyTrans’s current music-management workflow supports adding selected songs from a computer to an iOS device. A connected USB drive can be used as the file source when selecting those tracks.
10. Why can I see my MP3 in Files but not in Apple Music?
Files treats the MP3 as a file stored locally or on external storage. The Apple Music library uses a separate music-management and syncing system, so simply viewing or copying the MP3 in Files does not automatically import it into Music.
The Bottom Line
There is no longer just one way to get music from a USB flash drive onto an iPhone. If you only need access to the files, a compatible USB drive can connect directly to the iPhone and appear in Files. This is especially straightforward on USB-C iPhones.
If you want the songs added to the iPhone’s managed music collection, connect the flash drive to a computer. AnyTrans lets you selectively add songs from the USB drive without relying on a full traditional music-library sync. Apple’s official alternative is to import the songs into the computer’s Music library and sync them with Finder on Mac or Apple Devices on Windows.



Joy Taylor is a seasoned technical writer with over a decade of experience in mobile technology. At iMobie, she specializes in producing in-depth content on iOS data recovery, iPhone unlocking solutions, and iOS troubleshooting.
Product-related questions? Contact Our Support Team to Get Quick Solution >

Mentioned in Top Tech Sites:

Highly Rated by Users:
based on Customer Reviews