Top 3 Best Vlog Editing Software Enhancing Your Videos
We’ve taken the legwork to help you find the best vlog editing software, and we’ve found top the three options that are worth trying in 2024.

Creating high-quality videos for your vlog does not end with setting up your camera and filming. It also requires thorough editing of the videos to make them look more engaging. So, if you’re a professional vlogger or aspiring, and you’re wondering which vlog editing software is best for you, you’ve come to the right post.
What is a Vlog
A vlog, also known as “video blog,” is a form of digital content that creators (bloggers)use to share experiences, opinions, and stories through video. Unlike regular blogs, a vlog is created in video format and is often recorded as a selfie. Plus, it allows creators to create a more direct and personal connection with viewers.
Below are common categories of vlog that you should know:
● Lifestyle Vlog
● Tutorial/How-to Guide Vlog
● Review Vlog
● Educative Vlog
● Gaming Vlog
● Music Vlog
● Beauty Vlog
● Comedy Vlog
3 Best Vlog Editing Software You Can’t Miss
Finding the ideal vlog editing software for your needs can be quite stressful considering the huge number of vlog editing tools that claim to offer the best services online. So, in this section, we’ll introduce you to our best three vlog editing tools that have proven to stand out in the industry over the past few years.
1. Movavi Video Editor – Best Vlog Editor
Movavi Video Editor is one of the best software that is specially designed for video creators, including vloggers to create and edit your vlog videos easily. This tool allows you to access excellent features like AI background removal and motion tracking, drag-and-drop filters, titles, transitions, overlays, and lots more to make your video editing process for your vlog faster.
Also, if you’re looking to add stylish titles, apply filters and color correction, insert transitions, or overlay effects, Movavi supports features that allow you to get the job done within a few clicks. You don’t even need any background video editing skills.
Key Features
● Edit and convert videos in different formats with lightning-fast speed.
● Allows DVD burning and direct video capturing.
● Supports hundreds of filters, titles, and transition effects that can be used to spice up videos.
● Movavi Video Editor also supports 3D video editing.
● Share your edited videos directly to popular social media platforms like YouTube, Vimeo, and lots more in a single click.
Pros
● Excellent AI-powered editing tools.
● Its straightforward user interface makes video editing a breeze.
● Offers cool feature sets that you can use to make unique videos that suit your brand style.
Cons
● The free version has some limitations.
Here are the steps to use Movavi Video Editor to Edit Your Vlog Videos:
Step 1: Download Movavi Video Editor on your Mac or Windows computer.
Step 2: Once you finish installing the software, launch it and click on “New Project”. Then, click on “Add Media Files” to upload the vlog videos that you’d like to edit.
Step 3: Cut & Trim the Video
If you want to cut your video into different parts, click on the video clip from the “Timeline” and select the part you’d like to cut. Then, click on the “Split” icon at “Toolbar” that is just right at the top of the “Timeline”. Repeat this process for every part of the clip you wish to cut.
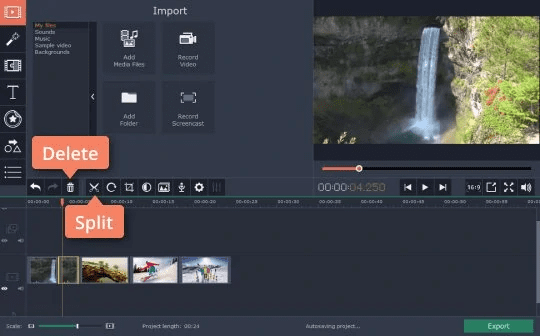
Cut the Video in Movavi Video Editor
● However, to trim your video, you just need to select the “part” of the video you intend to trim from the timeline and click the “Delete” on your keyboard to get the job done.
Step 4: Add Special Effects
To add special effects to your video, navigate to the “Filter” tab and select the “Special effects” you’d like to use from the tool’s library. Then, drag and drop it to the segment of the video you’d like to use and select “Apply to All Clips”.
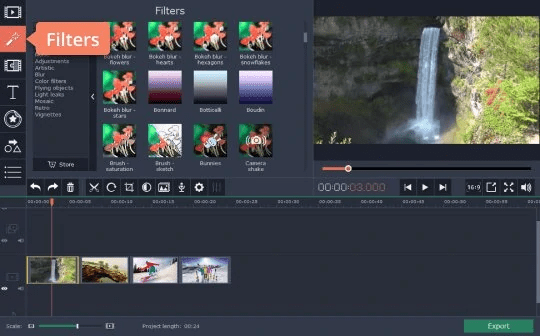
Add Special Effects for the Video
Step 5: Insert Transitions
If you wish to add transitions to make your video look more professional, scroll to the top left side and click on the “Transition” tab as shown in the screenshot below. Then, choose the transition style that suits the theme of your video.
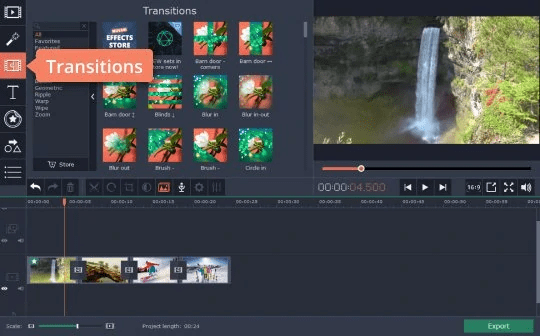
Insert Transactions
● Drag and drop the selected transition effect on a desired area of the video clip in the timeline. Then, double-click it and select a desired duration from the pop-up window that appears.
Step 6: Add Voice Over
To record your voiceover, click on the “Microphone” icon from the “Quick settings” area at the top of the timeline and choose the recording device, quality, and volume to record your voice. Then, click on “Start Recording” to get the job done. Once you’re done, click “Stop Recording”.
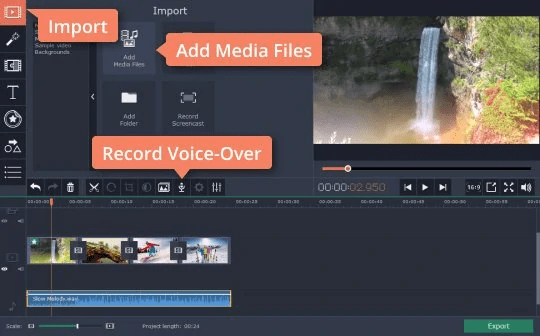
Add Voice Over the Video
Step 7: Preview & Save Video
Once you finish adding voice-over to your video, click on the “Play” button under the “Preview” box to preview the edited video. Then, click on the “Export” icon at the bottom-right corner to save the video to your computer’s local storage.

Preview & Save the Video
● You can also upload the video online by clicking on the “Upload Online” tab and selecting a preferred platform to publish the video.
2. Adobe Premiere Pro
The next vlog editor on our list is Adobe Premiere Pro. Although this tool is not a beginner-friendly choice, it offers many professional video editing features that vloggers with video editing experience can utilize to take their video editing to the next level. It’s packed with features for automatic audio mixing, audio captioning, transcription, and lots more.
Adobe Premiere Pro also supports a built-in AI tool known as Sensei that allows you to execute different operations like retuning songs to fit your video perfectly, cutting videos, etc.
Key Features
● Supports both 4k and 8k video resolutions.
● Offers many interesting titling tools.
● Easily convert audio to text in more than 14 languages using advanced speech-to-text tools.
● Supports for 360-degree VR.
Pros
● Execute video editing operations very fast.
● Powerful video rendering and stabilization tools.
● Built-in collaboration tools for large teams.
Cons
● Newbies might find the tool’s interface a bit too intimidating.
● Some tools require advanced video editing skills.
3. Filmora Video Editor
Filmora is another big brand in the game, and it is very popular for its simple video editing interface. This software boasts pretty fast video editing features that you can easily work with immediately after you download it on your computer. Plus, it supports a plethora of built-in video effects, transitions, titles, and lots more that you can use to make your videos look more captivating.
Also, Filmora Video Editor is compatible with both Windows and Mac computers, and it offers cool audio editing features that you can use to edit the audio aspect of your video clips flawlessly.
Key Features
● Supports more than 1 billion stock media from popular websites like Unsplash, Pexel, Pixabay, etc.
● Edit your videos within a few clicks using ready-made presets and instant mode.
● It also supports some advanced features like speed ramping, motion tracking, green screen, and many more.
● Efficient audio mixing tools like auto-ducking and audio visualizer.
Pros
● It offers many easy video editing tools.
● Fast rendering tool.
● Offers many effects and stock media to choose from.
● Supports Mac and Windows computers.
Cons
● You might experience occasional lags while using the app.
● It can be quite difficult to differentiate clips in the timeline when handling multiple videos.
Conclusion
We hope our list of vlog editing software helps you narrow down your choice of which vlog editor to add to your arsenal. As you can see from the above, Movavi Video Editor, Adobe Premiere Pro, and Filmora Video Editor are all excellent tools for editing vlog videos. However, you must consider the limitations of each app to be able to make the best decision. We recommend the Movavi Video Editor for both experienced and non-experienced vloggers.
Product-related questions? Contact Our Support Team to Get Quick Solution >
