Trust This Computer Keeps Popping up? Fix it in 8 Ways!
The “trust this computer” keeps popping up often when connecting your iPhone to a computer. It usually happens due to iTunes bugs, cable problems, or saved settings conflicts. This article explains why it happens and gives step-by-step fixes like updating iTunes, disabling the personal hotspot, or resetting trust settings.
AnyFix – Fix iOS Issues in 5 Minutes
Download AnyFix – iOS System Recovery and use it to repair your iOS problems, such as ‘trust this computer keeps popping up’, iPhone keeps restarting on iOS 18/26, iPhone stuck in recovery mode and system crash, etc.
Many iPhone users often get stuck with the annoying message “Trust This Computer” appearing again and again, even after selecting “Trust.” This problem mostly happens when connecting the phone to a Windows PC or Mac using a cable. The pop-up prevents smooth data transfer, backups, or syncing.
If the “this computer keeps popping up” issue won’t go away, you can fix it easily by following a few simple steps outlined in this guide. Let’s start exploring!
Part 1. What are the Trust Settings on Your Device and Why It Happen
When you connect your iPhone to a computer for the first time, Apple asks whether you “trust” the computer. Granting trust allows iTunes or Finder to access your iPhone’s data.
However, this message may reappear due to the following reasons:
- Outdated or corrupted iTunes version
- iPhone system glitches
- Cable or port connection issues
- Personal Hotspot is being turned on
- Saved trust settings are getting reset after an update
Well, this error isn’t that serious, as you can fix it within minutes using the eight fixes mentioned below with detailed steps.
Part 2. Fix ‘Trust This Computer Keeps Popping up’
Fix 1. Restart Both Devices
Restarting both your iPhone and computer clears temporary glitches that may trigger the “Trust” prompt repeatedly. Here are the steps to counter this issue:
Step 1: First, disconnect the iPhone from the computer’s USB port. Second, force restart the device by holding the side and volume buttons together, then slide to power off.
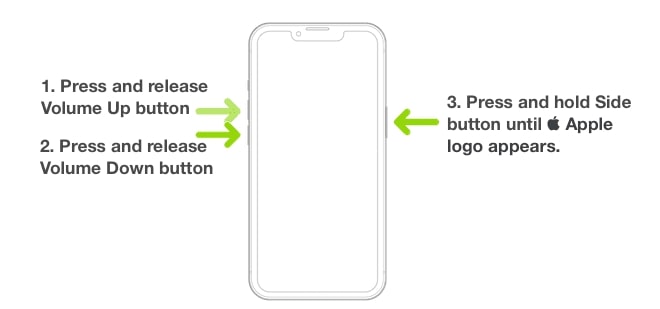
Step 2: Restart your computer (Windows or Mac). Once both devices are back on, reconnect the iPhone and select “Trust” when asked. This quick fix often removes glitches and re-establishes a proper connection.
Fix 2. Update iTunes on the Computer
An outdated iTunes version is the most common cause of repeated trust prompts. Apple regularly updates iTunes for compatibility with new iOS versions. Now update iTunes to the new version:
Step: On Windows, open the iTunes app and click on the “Help” option. From the extended drop-down menu, hit “Check for Updates.” Install any available updates, then try reconnecting your iPhone.
Fix 3. Disable Personal Hotspot on iPhone
Some users discovered that keeping the “Personal Hotspot” on makes the iPhone repeatedly ask for trust permission every time it’s connected. A user in the Apple Community shared the following real fix:
The REAL FIX! I finally found it after a few months! Turn off your Hot Spot. It seems kinda dumb but that did it for me.
Make sure your Personal Hotspot is turned off. If your personal Hotspot is turned on every time you plug the device into the MacBook, it will ask for permission and make you enter your PIN password.
Step 1: Go to Settings on your iPhone and tap on “Personal Hotspot.”
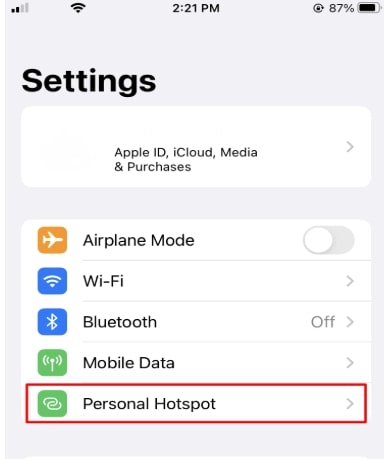
Step 2: Here, turn off the toggle for “Allow Others to Join” and reconnect your iPhone to the computer. Disabling the hotspot helps maintain a stable and trusted connection.
Fix 4. Fix iPhone System Issues via AnyFix
If the above fixes don’t work, your iPhone system might have a minor firmware error. Tools like AnyFix can help repair system bugs that lead to repeated “trust” prompts. AnyFix is a professional iOS system recovery tool to fix over 150 iPhone issues. Additionally, it offers more
functions in one tool. No matter whether your device is stuck in the reboot mode or you want to downgrade iOS, this tool can save you from tediou troubleshooting or searching jobs.
How to fix system issue via AnyFix
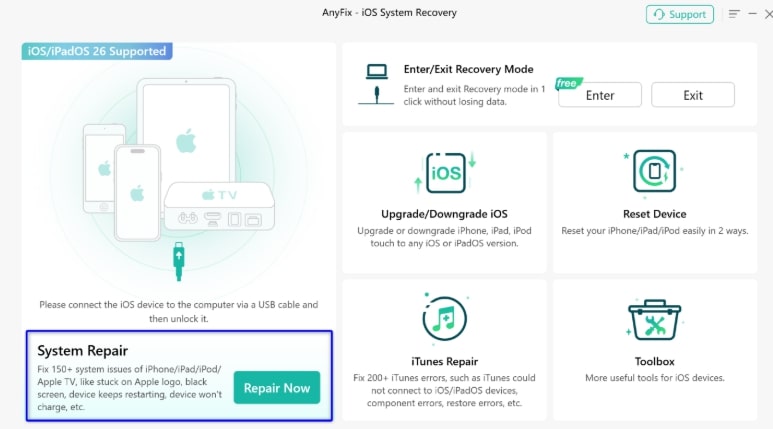
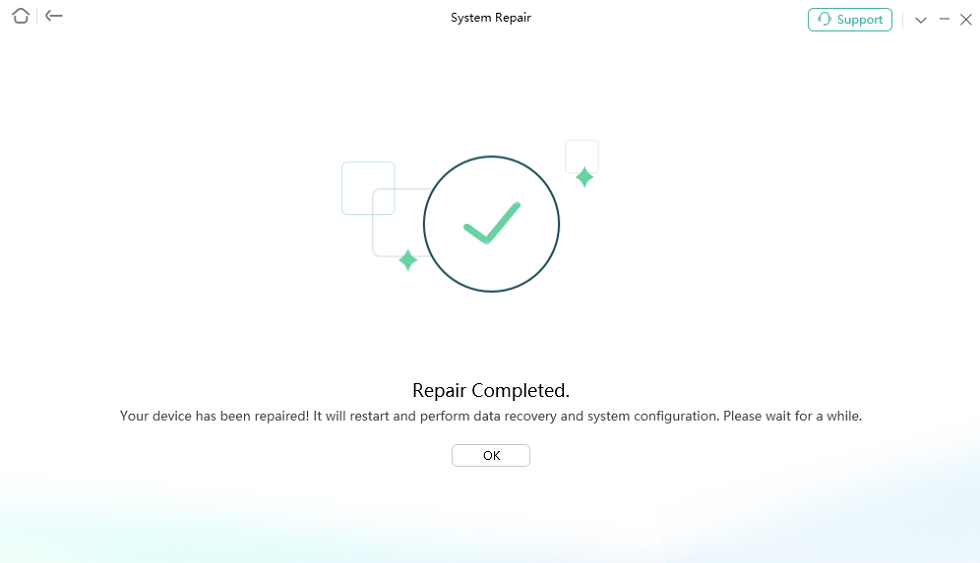
Step 1: Download and install AnyFix on your computer and connect your iPhone via cable. Afterward, choose the “System Repair” option and tap on the “Repair Now” button.
Step 2: From the available list of options, choose “Update Issues” and process by tapping the “Start Now” button.

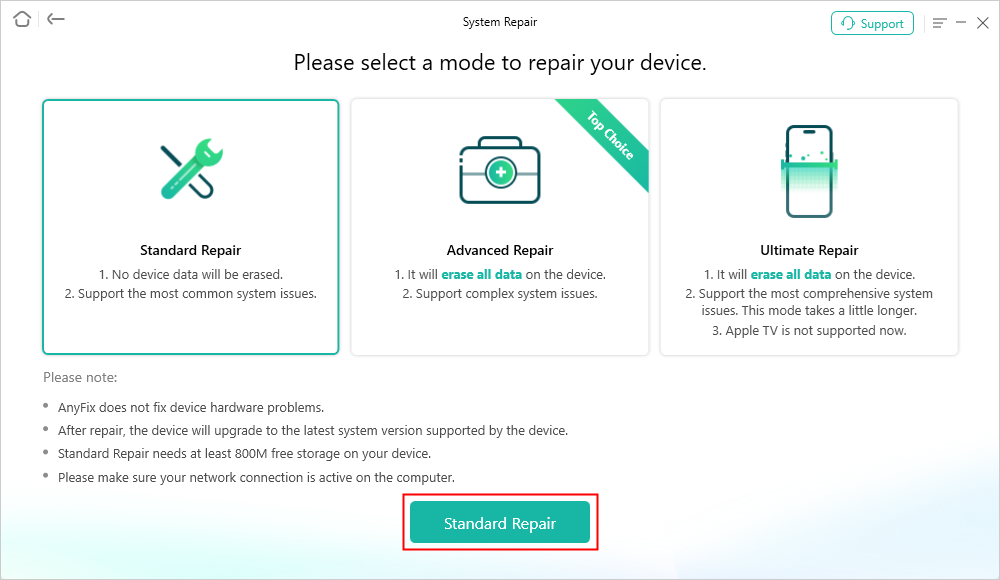
Step 3: Moving forward, choose the “Standard Repair” option and click the “Standard Repair” button to start updating the iOS issues
Step 4: Follow the on-screen prompts to download the firmware and proceed by clicking “Start Standard Repair.” Once the repair is completed, hit the “OK” button and reconnect your iPhone. The pop-up should no longer appear unless you connect to a new device.
Fix 5. Reset Trust Settings on iPhone
If you’ve previously trusted multiple computers, the stored data may cause conflicts. Resetting trust settings clears all saved authorizations.
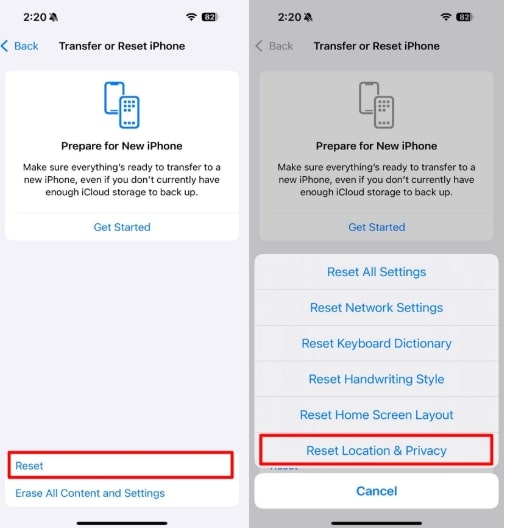
Step 1: Open “Settings” and click on “General.” Scroll down and tap the “Transfer or Reset iPhone” option.
Step 2: Now, tap “Reset” and hit the “Reset Location & Privacy.” Enter your passcode if asked. This will delete all trust data, and when you connect your iPhone again, you can freshly choose “Trust” This Computer.
Fix 6. Try a Different Cable or Port
In some cases, it is as simple as a broken cable or dust in the port. Unstable connections may be caused by a bad or uncertified cable. Use an original Apple Lightning cable or an MFi-certified cable. So, disconnect the current cable and use another. Also, where feasible, use another USB of your PC or Mac.
Fix 7. Reset Network Settings
If none of the above solutions work, resetting network settings may help. It clears out any saved Bluetooth, Wi-Fi, or VPN data that could interfere with the trust connection.
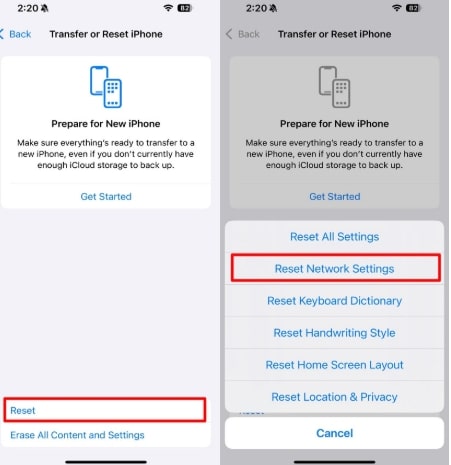
Step 1: Head to iPhone “Settings” and go to the “General.” Scroll down to tap on “Transfer or Reset iPhone.”
Step 2: Now, tap “Reset” and click on the “Reset Network Settings.” Confirm and restart your device. After that, reconnect your iPhone and the message should no longer appear.
Fix 8. Check Your Accessories
Sometimes, accessories like external docks or USB hubs interfere with the iPhone’s connection. So, disconnect all accessories from your computer. Plug in your iPhone directly into the computer port. Check if the pop-up appears again. If the issue disappears, one of the accessories was likely causing the connection problem.
Part 3. FAQs
Q1. How do I remove trust from a computer?
Go to Settings > General > Transfer or Reset iPhone > Reset > Reset Location & Privacy. This removes all previously trusted computers.
Q2. How to fix trust this computer alert iOS not showing iPhone?
Try restarting your iPhone and updating iTunes. Also, check your cable connection and use an original Apple cable.
Q3. How do I get my iPhone to trust my computer after not trusting?
Reconnect your iPhone, and when prompted, tap “Trust This Computer” again. If the option doesn’t appear, reset trust settings and reconnect.
Q4. How to access iPhone data if the screen is broken?
iTunes or Finder may be used in case your iPhone had been trusted previously and the screen was broken. Otherwise, third-party programs such as AnyFix or iMobie can work in some cases, although only when the trust permission has been given.
Part 4. Conclusion
The repeated “trust this computer” keeps popping up issue can be annoying, although it is normally caused by simple reasons. It can be sorted out in a few minutes by restarting devices, updating iTunes, or switching off the personal hotspot. In case of deeper issues, resetting the trust settings or repairing the iPhone system can be of help. Plus, try using original cables and keep your software updated to avoid this issue in the future.

Wanda Norris is a junior author in iMobie specializing in iOS tips and solutions. She keeps a close eye on every iOS update to provide practical, easy-to-understand guides that help users solve problems and master their Apple devices.
Product-related questions? Contact Our Support Team to Get Quick Solution >
