How to Use Fake GPS for Tinder Safely
Tinder showing matches from the wrong city? This guide explains how to use Tinder Passport, fake GPS tools, and location fixes safely on iPhone and Android.
Quick Answer: The safest way to change your Tinder location is to use Tinder Passport, the official feature included with Tinder Plus, Gold, and Platinum. If you want to use fake GPS for Tinder, Android users can use mock location settings, while iPhone users usually need either Tinder Passport or a desktop-based GPS tool. If your Tinder location is stuck in an old city, first check location permissions, clear cache, connect to a local Wi-Fi network, and restart or reinstall the app.
If you are searching for fake GPS for Tinder, you are probably trying to match in another city, plan ahead before traveling, protect your real location, or fix Tinder showing matches from the wrong place. The right method depends on your device, your risk tolerance, and whether you want the safest official solution or a more flexible GPS location tool.
It’s a common and frustrating problem: you open Tinder, ready to connect with people nearby, only to find you’re still seeing matches from a city you left weeks ago. This exact issue, where the app refuses to update to your current location, can make finding relevant connections feel impossible. You’re not alone in wondering how to change your location on Tinder effectively and safely. Many users worry about account safety or are simply confused by the options available.

Start with the Safest Method: Using Tinder Passport
The most secure and officially supported way to change your Tinder location is with Tinder’s built-in Passport feature. As a premium function included with Tinder Plus, Gold, and Platinum subscriptions, it is designed to work inside the app and avoids the account risks that come with unauthorized spoofing methods.
Tinder Passport was created for users who want to explore connections in different cities before they travel, or for those who are simply curious about other locations. The process is straightforward and allows you to switch your location as often as you like.
How to Use Tinder Passport: A Step-by-Step Guide
- Open Tinder and tap your profile icon.
- Go to Settings.
- Scroll down to the Discovery Settings section.
- Tap Location.
- Choose Add a new location.
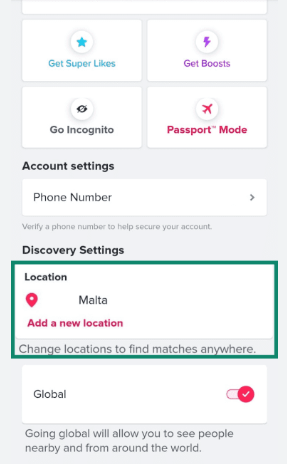
- On the map screen, search for your desired city by name or manually move the pin.
- Confirm your selection to set your new Tinder location.
Once you complete these steps, your profile will begin showing to users in the area you selected, just as if you were physically there.
Tinder Passport vs. Fake GPS: Which Method Is Right for You?
Deciding how to set a fake location for Tinder involves a trade-off between cost, convenience, flexibility, and account safety. The two main approaches—using Tinder Passport or using a fake GPS tool—can produce a similar result, but they work very differently.
Here’s a direct comparison to help you decide
| Criteria | Tinder Passport | Fake GPS / Location Changer |
| Method Type | Official Tinder feature | Third-party GPS location method |
| Success Rate | Guaranteed inside Tinder | Varies by device, app, and setup |
| Cost | Requires Tinder Plus, Gold, or Platinum | Some tools are free; desktop tools may be paid |
| Technical Skill | Very low | Low to moderate |
| Account Safety | Safest option | May carry risk if used unnaturally |
| Best For | Travel planning and safe city switching | More flexible GPS control across apps |
The bottom line: If your priority is account safety and simplicity, Tinder Passport is the clear winner. If you need more flexible GPS control across multiple apps, a desktop-based location changer can be a practical alternative. If you use unsupported mobile spoofing apps, especially with sudden long-distance jumps, the risk is higher.
How to Set Up Fake GPS for Tinder on Android
Android’s flexible operating system allows users to manually set a device’s location using a feature designed for developers. This process is known as using a mock location. It lets a third-party app supply GPS data to the entire system, including Tinder.
Step 1: Choose and Install a Reliable App
Instead of sending you to the Play Store to guess, we recommend starting with an app called GPS Emulator. Across our tests on multiple Android devices, it has proven to be stable, simple to use, and effective with location-based apps.
Step 2: Enable Developer Options
This hidden menu gives you access to advanced system settings. Enabling it is safe and reversible.
- Navigate to Settings > About Phone.
- Scroll to the Build number.
- Tap it seven times in a row.
- You will see a message confirming, You are now a developer!

Step 3: Select the Mock Location App
Now you can tell your phone to get its GPS data from your selected app instead of its internal hardware.
- Go back to the main Settings menu.
- Tap System > Developer options.
- Scroll down to the Debugging section.
- Find Select mock location app.
- Tap it and choose GPS Emulator or the app you installed.
After this setup, open GPS Emulator, set your desired location on its map, and then launch Tinder. The app will now read the location you selected.
It is also important to understand why a spoofed location might suddenly revert to your real one. This can happen if your phone automatically closes the GPS app to save battery, or if Tinder receives a strong conflicting signal from a nearby Wi-Fi network.
Why Fake GPS for Tinder Is Harder on iPhone
Attempting a Tinder location spoof on an iPhone is more challenging because of Apple’s strict security-first design. iOS tightly controls how apps access core system functions like GPS data. Unlike Android, there is no simple mock location setting available to users.
Since recent iOS versions, these privacy and security controls have become even more stringent. As a result, many GPS spoofing apps available on the App Store are ineffective for location-based dating apps like Tinder. They may show a different location inside their own interface, but Tinder may continue receiving accurate data from the iPhone’s real location services.
The few workarounds that exist for iOS are often complex or risky. Some require jailbreaking, which can void warranty and expose the device to security issues. For most iPhone users, the safest method remains Tinder Passport. For users who need more flexible GPS control without modifying the Tinder app itself, a desktop-based location changer can be another option.
Why Tinder Gets Stuck: Understanding How Location is Detected
Have you ever wondered why Tinder sometimes shows the wrong location even after you’ve moved? The answer lies in how the app verifies where you are. It does not rely on a single GPS reading. Instead, Tinder may use multiple data points, including GPS signals, Wi-Fi network information, and cellular tower data, to confirm your position.
This complex system improves dating app location accuracy, but it can also cause conflicts. Your location may remain stuck until Tinder receives strong, consistent signals from multiple sources that confirm you are genuinely in a new place.
This system is also one reason why sudden fake GPS jumps can look unnatural. If GPS says one city but Wi-Fi, cellular data, or cached app data suggests another location, Tinder may delay the update or revert to the old place.
How to Fix a Stuck Tinder Location
The “wait for the signals to be consistent” advice is not practical when you want to see relevant matches now. If your Tinder location is stuck, here are concrete steps you can take to force an update. This is the exact process our tester, Emma, used when her matches were appearing from a city she had visited weeks earlier.
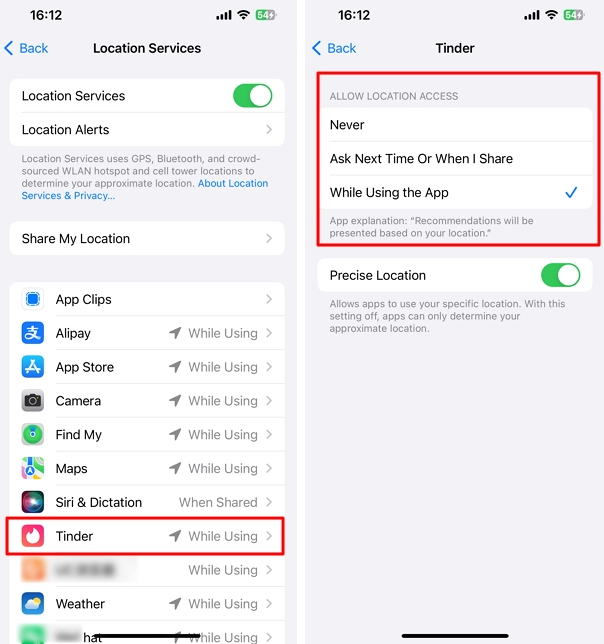
1. Check App Permissions
First, make sure Tinder has permission to access your location. Go to your phone’s Settings > Apps > Tinder > Permissions > Location and set it to While using the app.
2. Clear Tinder’s Cache
Cached data from old Wi-Fi networks can send conflicting signals. Clearing it can resolve the issue. Go to Settings > Apps > Tinder > Storage & cache and tap Clear cache.
3. Connect to a Different Wi-Fi Network
Connecting to a strong Wi-Fi network in your current location can provide the consistent signal Tinder needs to update.
4. Reinstall the App
As a last resort, deleting and reinstalling Tinder can reset its location services. When you log back in, it will be forced to request a fresh location reading from your device.
By following these steps, Emma was able to get her app to refresh its data properly, and her matches became local again.
This guide is regularly updated to reflect changes in Tinder’s location detection algorithms and the latest Android and iOS operating system updates to ensure our recommendations remain current.
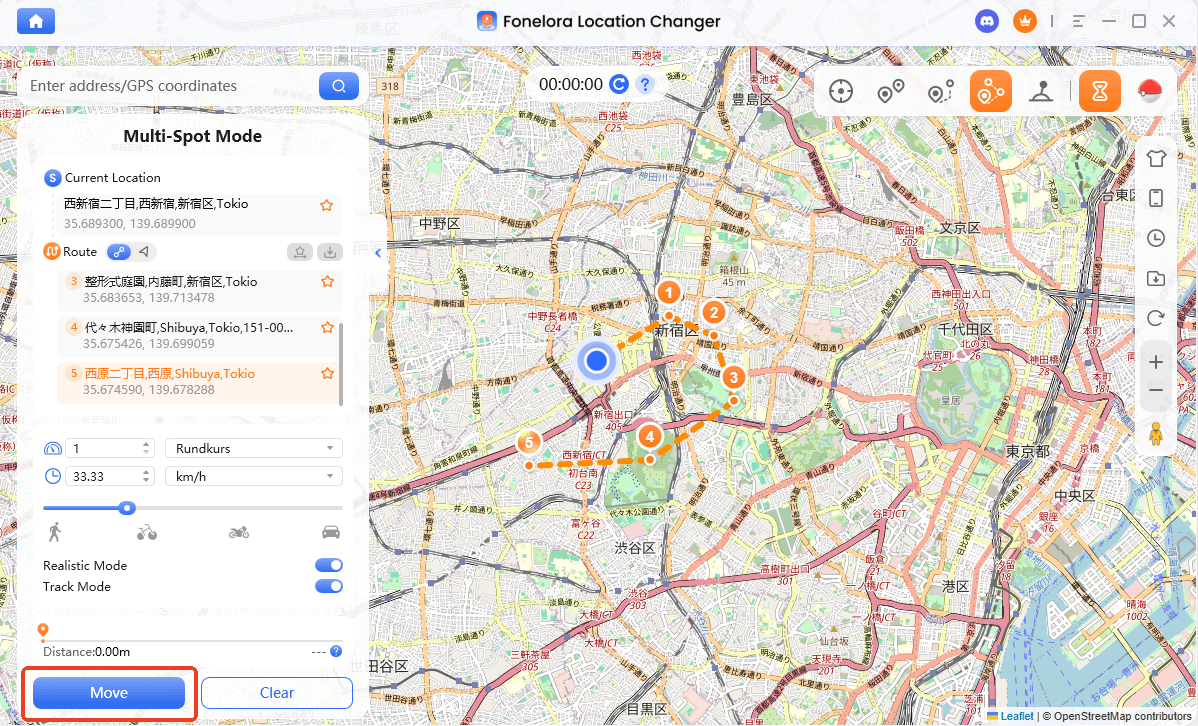
Alternative Tool Recommendation: Fonelora Location Changer
If you’re looking for a reliable and beginner-friendly way to fake your GPS location for Tinder, using a desktop-based solution is one of the more stable approaches. Tools like Fonelora Location Changer allow you to change your iPhone or Android location without modifying the Tinder app itself.
Unlike risky APKs or jailbreaking methods, this solution works with the official Tinder app, helping reduce compatibility issues. It is especially useful for users who want a stable and controlled way to match with people in different cities or countries.
Fonelora can be useful when you want to:
- Change Tinder location without relying on unstable mobile spoofing apps.
- Match with people in another city before traveling.
- Test how location-based apps respond to different regions.
- Control GPS location on both iPhone and Android from a computer.
- Use route or joystick movement instead of sudden location jumps.
How to Use Fonelora Location Changer for Tinder
Follow these simple steps to change your GPS location:
Step 1. Download and install Fonelora Location Changer on your computer, Windows or Mac.

Step 2. Select the Change Location mode from the main interface.

Step 3. Click Start to Modify to instantly change your GPS location.
Frequently Asked Questions About Tinder Location
Here are concise answers to the most common questions about managing your location on Tinder.
Q1. Is fake GPS for Tinder safe?
The safest method is Tinder Passport because it is an official feature. Third-party fake GPS methods may carry risk if they create unnatural location jumps or violate Tinder’s terms. To reduce risk, avoid rapid long-distance changes and use realistic location behavior.
Q2. Can I fake GPS for Tinder on iPhone?
It is harder on iPhone because iOS does not offer a simple mock location feature like Android. The safest option is Tinder Passport. For more flexible GPS control, desktop-based tools like Fonelora Location Changer may help change device-level location without modifying the Tinder app.
Q3. Can I fake GPS for Tinder on Android?
Yes. Android users can use Developer Options and select a mock location app. After choosing a mock GPS app, set your desired location and then open Tinder. However, use this carefully because sudden unrealistic jumps may be detected.
Q4. Why does my spoofed Tinder location keep reverting?
Your spoofed location can revert if Tinder gets a conflicting signal from a strong Wi-Fi network, if your phone closes the GPS app in the background, or if cached Tinder data still points to your old location. Make sure the GPS app can run in the background and try clearing Tinder cache.
Q5. Does changing my location affect match quality?
Using Tinder Passport should not negatively affect your visibility. However, when using third-party apps, your profile may be shown less if the algorithm detects suspicious location behavior. The key is to make your location changes appear natural.
Q6. Can unusual location behavior affect a Tinder account?
Yes. Using unauthorized third-party apps for GPS spoofing may violate Tinder’s terms of service. The platform’s systems can detect unnatural location jumps, such as appearing in different countries within minutes. This activity may flag your account and can lead to temporary or permanent restrictions. Using the official Passport feature avoids this risk.
Q7. Why is my Tinder location stuck in another city?
Your Tinder location may be stuck because of old cache, weak GPS signals, Wi-Fi location conflicts, denied app permissions, or delayed server updates. Check permissions, clear cache, connect to a local Wi-Fi network, restart the app, or reinstall Tinder if needed.
Q8. What is the best way to change Tinder location in 2026?
The best method depends on your goal. Tinder Passport is the safest official method. Android mock location is a free but riskier option. Desktop-based GPS tools provide more flexible control for users who want to change location across multiple apps.
Conclusion: Take Control of Your Location Safely
The frustration of being stuck with matches from the wrong city is a real barrier to making new connections. Now, you not only understand why it happens but also have a clear, actionable plan to fix it.
For absolute account safety and guaranteed results, the official Tinder Passport feature remains the best solution. It was designed to solve this exact problem without risk. For users who want more flexibility without modifying the app, desktop tools like Fonelora Location Changer provide a practical alternative, allowing you to change your GPS location while still using the official Tinder app.
For Android users comfortable with system settings, a mock location app offers a free option, provided it’s used carefully. By making an informed choice, you can confidently control where you appear and get back to discovering relevant matches wherever you want.

Joy Taylor is a seasoned technical writer with over a decade of experience in mobile technology. At iMobie, she specializes in producing in-depth content on iOS data recovery, iPhone unlocking solutions, and iOS troubleshooting.
Product-related questions? Contact Our Support Team to Get Quick Solution >
