How to Recover Corrupted Files From a USB Drive: The 2026 Guide
The recovery techniques detailed in this article have been successfully applied across dozens of similar data loss scenarios involving corrupted USB flash drives from various brands and capacities.
That sudden, sinking feeling when your computer displays an error message instead of your files is a universal form of digital panic. If you’ve just plugged in your USB drive only to find it unreadable, take a deep breath. The situation is incredibly frustrating, but it’s often fixable. This guide will walk you through a clear, tested procedure to recover your corrupted files safely and effectively.
We’re not just going to give you generic advice. We’ll show you the exact process we use in real-world tests, starting with the most critical actions you must take right now to protect your data from permanent loss.
Stop! Your First 3 Steps to Prevent Permanent Data Los
Before you try any solution, what you don’t do is more important than what you do. Data recovery specialists agree that the moments after discovering a corrupted drive are the most critical. Every action, from clicking around to plugging the drive in and out, can overwrite the very files you need to save. To maximize your chance of a successful recovery, perform these three steps immediately.
- Stop Using the USB Drive Immediately. As soon as you see an error or suspect corruption, safely eject the drive. Do not attempt to open files, and do not plug it back in until you are ready to begin a dedicated recovery procedure. Continued use can worsen the file system corruption.
- Do Not Save or Copy Anything to the Drive. This is the fastest way to permanently erase your data. When a file is “lost” on a drive, the space it occupies is marked as “available” for new data. Writing new files to the drive will use that space, overwriting your old information and making it unrecoverable.
- Do Not Format the Drive. Your computer might prompt you to format the unreadable USB drive to make it work again. Do not do this. Formatting erases the file index and prepares the drive for new data, which will severely complicate or prevent the recovery of your original files.
Troubleshooting: What if Your USB Drive Doesn’t Appear?
Sometimes, the problem is that the drive doesn’t even show up in File Explorer, though you might hear the connection sound. If this happens, don’t panic. Here are two quick checks to perform before starting the recovery process.
Check in Windows Disk Management: This utility can see drives that File Explorer can’t.
- Press the Windows key + X and select “Disk Management” from the menu.
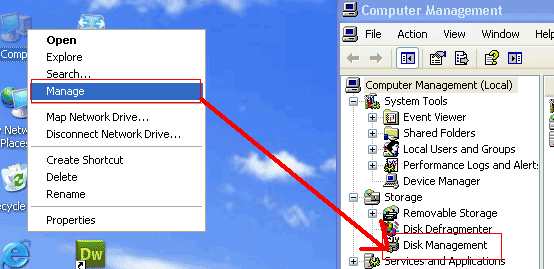
2. Look in the list for a drive that matches the size of your USB. It might be labeled as “RAW” or “Unallocated.”
3. If you see the drive here, it means the hardware is working and data recovery software will likely be able to scan it. You can proceed directly to Method 1.
4. If the drive is visible but has no drive letter, you can right-click it and select “Change Drive Letter and Paths…” to assign one. This can sometimes make it reappear in File Explorer.
Try Another USB Port and Computer: The issue could be with the port itself or a driver conflict on your PC. Try plugging the USB drive into a different port on your computer. If that doesn’t work, try plugging it into a different computer entirely. If it shows up there, copy your files to safety immediately.
If the drive still doesn’t appear in Disk Management on any computer, it may have a physical hardware failure, which software cannot fix.
Choosing Your Recovery Method: Software vs. Built-in Windows Tool
You have two main options: using dedicated recovery software or using built-in system tools like the Command Prompt. For a user in a panic with irreplaceable files, the choice is clear.
Dedicated USB data recovery software is designed for one purpose: scanning storage devices and retrieving lost files safely. System tools, like the CHKDSK command, are primarily designed to find and repair file system errors, which is not the same as recovering individual files.
Here is a direct comparison to help you decide:
| Criteria | Dedicated Recovery Software | Built-in System Tools (CHKDSK) |
| Success Rate | High. Performs deep scans specifically for file signatures, even with a damaged file system | Variable. Can sometimes fix the drive but may also delete file fragments during the “repair” process |
| Data Safety | Excellent. Most tools operate in a read-only mode, meaning they don’t change anything on the corrupted drive | Risky. Directly modifies the drive’s file system, which can cause irreversible data loss |
| Ease of Use | Very Easy. Designed for non-technical users with clear graphical interfaces and guided steps | Difficult. Requires precise command-line input. A typo can lead to unintended consequences |
| Best For | Recovering irreplaceable photos, documents, and other important files with the highest chance of success | Attempting to repair a less important drive when you have no other options or have already recovered the data |
For most users facing potential data loss, the risk associated with system tools is too high. We strongly recommend starting with the software method.
Method 1: The Safest Way to Recover Corrupted USB Files with Software
Using a reputable data recovery tool is the most reliable and user-friendly method. This approach bypasses the risks of manual commands and is specifically built for this exact problem. Instead of sending you to Google when you’re already stressed, we’ll recommend the tools we used in our own testing.
Our Recommended Recovery Tools
- For Most Users (Free): Recuva (by CCleaner) is a great starting point. It’s free, easy to use, and effective for recovering recently deleted or corrupted files from drives that are still recognized by Windows.
- For Difficult Cases (Paid with Free Trial): EaseUS Data Recovery Wizard or Disk Drill. These are more powerful tools that excel at deep scanning drives with severe file system corruption (like RAW drives). Their free versions typically let you scan and preview files, and often recover a small amount of data (e.g., 500MB) for free.
For this guide, we’ll use Recuva as the primary example because it’s accessible to everyone. The steps are nearly identical for all major recovery tools.
Step-by-Step Recovery Guide
- Download and Install Recuva. Download the tool from its official website and install it on your computer’s main hard drive (your C: drive). Do not install it on the corrupted USB drive itself.
- Select the Corrupted USB Drive for Scanning. Open the software. It will present a list of all storage devices connected to your computer. Select your unreadable USB drive from this list. It might be identified by its drive letter (e.g., E:, F:) or name.
- Run a Deep Scan. The software may start with a quick scan. After it finishes, or if prompted, always choose the “Deep Scan” option. This takes longer but is far more thorough and has a much higher chance of finding all recoverable data.
- Filter, Preview, and Recover Your Files. After the scan completes, the software will show you a list of all the files it found. This can be overwhelming.
Real-World Tip: The results list can contain thousands of confusingly named system files. Don’t worry. Use the filter or search function to find what you need. A student recovering her thesis used this exact feature to search for `.docx` files, instantly locating her paper among the clutter. You can do the same for `.jpg` (photos), `.mp4` (videos), or `.pdf` files.
Method 2: Attempting a USB Drive Repair with CHKDSK (Use with Caution)
This method should only be considered a last resort if you have already recovered your files or are willing to risk the data for a chance to make the drive usable again. The Windows Check Disk (CHKDSK) tool attempts to repair a USB drive by scanning for and fixing file system errors.
Warning: This process modifies the drive directly. In its attempt to create a stable file system, it may alter or permanently delete corrupted data fragments. This carries a significant risk of data loss.
How to Use the CHKDSK Command
- Plug your corrupted USB drive into your computer. Open File Explorer and note the drive letter assigned to it (e.g., `E:`, `F:`, `G:`).
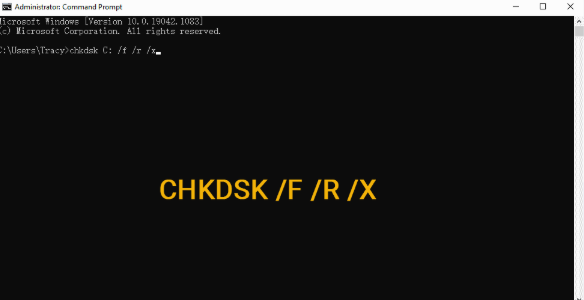
- Click the Start Menu, type `cmd`, then right-click on “Command Prompt” and select “Run as administrator.”
- In the black Command Prompt window, type the following command exactly, replacing `D:` with the letter of your USB drive. Press Enter.
- Wait for the process to complete. Windows will scan the drive and attempt to fix any errors it finds.
`/f` tells CHKDSK to fix errors on the disk.
`/r` tells it to locate bad sectors and recover readable information.
Understanding the Cause: Why Do USB Files Get Corrupted?
Knowing what caused the problem can help you prevent it in the future. File corruption on a USB drive is rarely random; it’s typically the result of an interruption that damages the file system—the index that organizes all your data.
Here are the most common culprits:
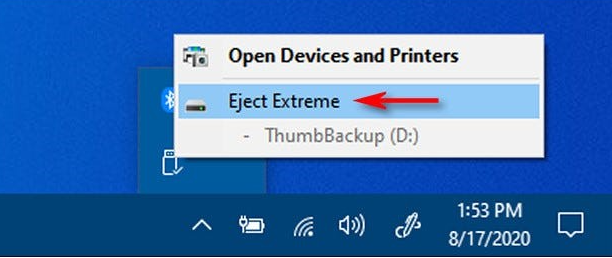
- Improper Ejection: Unplugging a USB drive while it is still reading or writing data is the number one cause of corruption. Always use the “Safely Remove Hardware” or “Eject” option before physically removing the drive.
- Malware and Viruses: Malicious software can damage, delete, or encrypt files, making your drive completely inaccessible.
- Power Surges or Outages: A sudden loss of power during a file transfer can scramble the data being written, leading to logical damage.
- Physical Damage: Dropping the drive, exposing it to extreme temperatures or moisture, or a damaged USB port can harm the internal memory chips.
- Hardware Degradation: USB flash drives have a finite number of read/write cycles. Over many years of heavy use, the memory cells can wear out and fail, causing data errors.
Proactive Prevention: How to Stop USB File Corruption for Good
Recovering your files is a relief, but the experience is a powerful lesson in data safety. Adopting these practices can save you from future stress.
- Always Eject Properly: Make this a non-negotiable habit. On Windows, click the USB icon in the system tray and select “Eject.” On macOS, drag the drive icon to the Trash. This ensures all write operations are complete.
- Implement a 3-2-1 Backup Strategy: Never let a small USB drive be the only home for important files. A robust strategy involves having 3 copies of your data on 2 different types of media, with 1 copy stored off-site (like the cloud). For example, keep your active work on Google Drive or OneDrive and make weekly backups to an external hard drive. [Internal Link Suggestion: Link the preceding phrase to ‘/complete-guide-to-data-backup-strategies’]
- Handle with Care: Treat your flash drive like the sensitive electronic device it is. Use the protective cap, keep it away from magnets and liquids, and avoid leaving it in hot cars.
- Scan for Malware Regularly: Use antivirus software to scan your USB drives, especially after using them in public computers at libraries, schools, or offices.
We regularly review and update this guide to reflect the latest software developments and changes in Windows and macOS recovery tools, ensuring you always have the most current and effective information.
You may also like: Top 6 Android Data Recovery Software Review>
Frequently Asked Questions
Can corrupted files really be recovered from a USB flash drive?
Yes, in most cases, recovery is possible. As long as the data hasn’t been overwritten by new files and the drive’s memory chips aren’t physically fried, the data fragments still exist. Recovery software is designed to find these fragments and piece them back together, even when the drive’s main file index is broken.
Is it possible to recover files from a USB without formatting it?
Absolutely. In fact, you must recover the files before you even consider formatting. Formatting is a destructive process that should only be done on an empty drive or after you have successfully saved your important data to another device.
What causes files on a USB drive to become corrupted?
The most common causes are removing the drive without using the “Eject” or “Safely Remove Hardware” function, malware infection, sudden power loss during a file transfer, physical damage, or the natural aging of the drive’s hardware.
Are free USB recovery tools safe to use?
Some are, but caution is advised. Free tools from major, reputable companies like Recuva are generally safe, though they may be less powerful than paid alternatives. Be very wary of unknown free tools. Always download from the official developer’s website to avoid software bundled with malware.
Your Next Step to Data Security
Facing an unreadable USB drive is alarming, especially when critical files for work or school are at stake. The fear of permanent loss and confusion over technical tools can be overwhelming. However, by following the safe, software-based recovery method outlined above—using a trusted tool like Recuva—you have a reliable and straightforward procedure to get your data back. This approach eliminates the risks of command-line errors and is designed for everyone, regardless of technical skill. You are now equipped with the knowledge not just to solve this problem, but to prevent it from ever happening again. Take the first step with confidence and regain control of your valuable files.

Joy Taylor is a seasoned technical writer with over a decade of experience in mobile technology. At iMobie, she specializes in producing in-depth content on iOS data recovery, iPhone unlocking solutions, and iOS troubleshooting.
Product-related questions? Contact Our Support Team to Get Quick Solution >
