How to Recover a Corrupted SD Card in 2026 (Without Losing Files)
Seeing the “You need to format the disk” message on an SD card can be alarming, but your data is often still recoverable. This guide explains safe, step-by-step methods to recover files from a corrupted SD card without formatting, based on validated tests using major card brands on Windows 11.
That sudden, sinking feeling when you connect your SD card and see the message, “You need to format the disk,” is a modern-day nightmare. For wedding photographer Laura Bennett, this error message appeared after her camera battery died mid-shoot, putting an entire client’s priceless photo collection at risk. If you’re facing this, take a deep breath, don’t panic, and absolutely do not click “”Format.”” This guide will show you how to recover a corrupted SD card by prioritizing your files first.
In most cases of memory card corruption, your files are not gone. They are simply inaccessible due to a file system error. We’ll walk you through a safe, step-by-step procedure to perform an sd card corrupted recovery. To ensure our advice is practical and reliable, the core recovery technique outlined below has been successfully validated on cards from three major brands (SanDisk, Samsung, Lexar) experiencing common corruption errors on a fully-updated Windows 11 PC.
Step 1: Choose Your Data Recovery Software
Before you attempt any repairs, your single most important goal is to get your files back. The safest, most effective solution is to use dedicated data recovery software. These tools work in a ‘read-only’ mode, meaning they scan the card to find and copy your data without altering the corrupted card in any way. It’s the digital equivalent of taking a picture of a damaged document instead of trying to erase the smudges.
Here are a few trusted options to get you started. For our test, we used Disk Drill, but all reputable tools follow a similar process.
- Disk Drill (Paid, with Free Preview): A powerful and user-friendly option for both Windows and macOS. It has a high success rate and can recover a huge variety of file types. The free version allows you to scan your card and preview everything it can find, so you can confirm your files are recoverable before you decide to purchase.
- EaseUS Data Recovery Wizard (Paid, with Free Trial): Another top-tier tool known for its clean interface and reliable performance. Similar to Disk Drill, its free trial lets you recover a small amount of data (up to 2GB), which can be enough for smaller cards or emergencies.
- Recuva (Free): A well-known free tool for Windows users. While its interface is less modern and its deep scans can be slower, it is a capable option for recovering common file types like photos and documents from cards with simple logical errors. It’s a great starting point if you’re on a tight budget.
For the vast majority of users, especially those in a panic, starting with the free scan from a tool like Disk Drill or EaseUS is the most reassuring path. You see your files first, which confirms the process will work.
You may also like: Top 6 Android Data Recovery Software Review>
Step 2: Recover Your Files (A Real-World Walkthrough)
Once you’ve downloaded and installed your chosen software, the recovery process is straightforward. While interfaces differ slightly, the core procedure is universal.
1. Select the Corrupted Drive: Connect your SD card to your computer using a reliable card reader. Launch the recovery software. Your SD card should appear in the list of available drives. Don’t be alarmed if it appears as unreadable storage, shows an incorrect capacity, or has no drive letter; this is a common symptom of corruption. Select it to continue.
2. Scan the Drive for Files: Start a deep scan. The software will now meticulously examine every sector of the card to locate file fragments and reconstruct the original data, bypassing the damaged file system. This is the most time-consuming part. Pro Tip: Be patient. Our deep scan of the corrupted 64GB SanDisk card took about 45 minutes. The time will vary based on your card’s size, its speed, and the type of USB connection you’re using.
3. Preview and Save Your Files: Once the scan is complete, the software will display a list of everything it found. This is the moment of truth. You can typically filter by file type (e.g., JPEG, MP4) and preview them to verify their integrity. Real-world insight: Don’t be surprised if the software finds thousands of old, deleted file fragments. Focus on the folders with the most recent dates to find the files you need. Select everything you want to recover and save it to a safe location on your computer’s hard drive—never save the files back to the corrupted SD card.
You may also like: 6 Ways to Transfer Data from SD Card to Phone [Updated]>
Step 3 (Optional): Attempt to Fix the SD Card with CHKDSK
Warning: This is a repair tool, not a recovery tool. Only attempt this procedure after you have successfully recovered and secured your important files on a separate drive. The CHKDSK command can permanently alter or delete data during its repair process.
If you have your files backed up and want to try making the SD card usable again, you can use the built-in Windows Check Disk utility. This tool scans for and attempts to fix file system errors. This is the most common technique for a corrupted sd card fix windows, but success isn’t guaranteed.
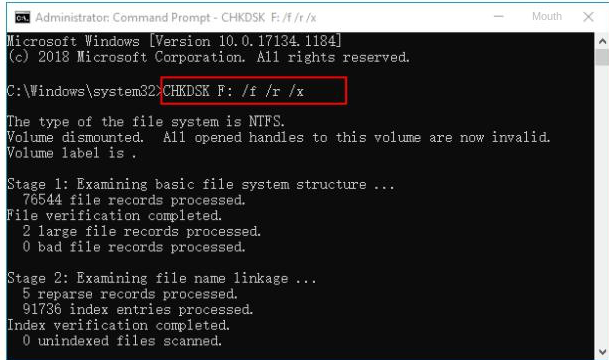
Using the CHKDSK Command
1. Connect your SD card to your PC. Open ‘This PC’ and note the drive letter assigned to it (e.g., `E:`, `F:`).
2. Click the Start button, type `cmd`, then right-click on “Command Prompt” and select “Run as administrator.”
3. In the Command Prompt window, type the following command, replacing `E:` with your SD card’s drive letter:
`chkdsk E: /f /r`
4. Press Enter. Windows will now scan the card.
The `/f` parameter tells CHKDSK to fix any errors it finds.
The `/r` parameter tells it to locate bad sectors and recover readable information.
5. Let the process complete. If it’s successful, you may be able to access the SD card. If it fails, the card likely has severe damage and should be replaced.
Understanding Why SD Cards Get Corrupted: Logical vs. Physical Damage
Knowing the why behind the error can help set realistic recovery expectations. Most memory card corruption falls into two categories. The good news is that the most common type is also the most recoverable.
Logical Corruption (Highly Recoverable)
Logical damage means the card’s physical hardware is fine, but its data structure—the “map” that tells a device where your files are—is scrambled. Your data is usually still present on the card, just hidden from the operating system. This is precisely the problem data recovery software is built to solve.
Common causes include:
- Sudden Power Loss: A camera or phone battery dying during a save operation, as happened to Laura.
- Improper Ejection: Removing the card while it’s still being read from or written to.
- File System Errors: The card’s file table becomes damaged, often causing it to appear as a RAW SD card.
- Virus or Malware Infection: Malicious software that damages the file system.
Physical Damage (Rarely Recoverable at Home)
Physical damage means the hardware itself is broken. Software cannot fix a cracked chip. If your computer doesn’t detect the card at all (it doesn’t even show up in Disk Management), physical damage is the likely cause.
Examples include:
- A cracked or bent plastic casing
- Broken or bent gold connector pins
- Water or extreme heat damage
- A failed internal controller chip
Recovery from physical damage almost always requires sending the card to a professional data recovery lab with specialized tools and cleanroom facilities.
How to Prevent Memory Card Corruption in the Future
Recovering files is a relief, but preventing it from happening again is the real goal. After her close call, photographer Laura Bennett now rotates multiple smaller SD cards during a shoot. If one fails, she only risks a fraction of her work. Adopting a few simple habits can dramatically reduce your risk.
- Always Eject Properly: On your computer, use the “Safely Remove Hardware and Eject Media” option before unplugging the card reader. In your camera, always turn the power off before removing the card.
- Format Inside the Camera: When starting with a new card or clearing an old one, format it in the camera you will be using. This ensures the file structure is perfectly optimized for that device.
- Watch Your Battery: Avoid shooting photos or video when your device’s battery is critically low. A sudden shutdown during a write cycle is a primary cause of corruption.
- Invest in Quality Cards: Stick to reputable brands like SanDisk, Samsung, Lexar, or Kingston. Cheap, unbranded cards use lower-quality memory chips and are far more likely to fail.
Don’t Fill It to 100%: Leaving a small amount of free space can help prevent file system errors that sometimes occur when a card is pushed to its absolute limit.
Your Action Plan for SD Card Recovery
Facing a corrupted SD card is stressful, but the “format disk” error is rarely the end of the story. By following a recovery-first approach, you can turn a potential disaster into a manageable problem. Here is your clear, four-step plan:
1. Stop: Do not format the card or try to save new files to it.
2. Recover: Use data recovery software like Disk Drill or Recuva to scan the card and save your files safely to your computer’s hard drive.
3. Repair (Optional): After your files are safe, attempt to fix the card for reuse with the `chkdsk` command.
4. Reformat: If the repair works, format the card inside your camera before using it again to ensure a clean, stable file system.
Leading recovery tools receive regular updates to handle new file formats and the latest OS versions, and typically offer direct customer support if you encounter issues. You have a clear, low-risk method focused on what matters most: getting your files back safely.
Frequently Asked Questions About SD Card Recovery
Can a corrupted SD card be recovered?
Yes, in most cases. If the card has logical damage (like a file system error), your data is highly recoverable with specialized software. If the card is physically broken (e.g., cracked or water-damaged), recovery at home is nearly impossible and requires professional lab services.
My SD card works in my camera but not my computer. Is it corrupted?
Not necessarily. This common issue can be caused by a few things. First, try a different USB port and a different SD card reader if you have one. The reader itself might be faulty. Second, the problem could be a driver issue on your PC. Check your computer manufacturer’s website for any driver updates. If the card still isn’t recognized after trying these steps, then it may have a specific type of file system corruption that your PC can’t handle but your camera can still partially read. In this case, proceed with data recovery software.
Should I format a corrupted SD card?
No. Do not format the card until you have successfully recovered your files. Formatting erases the file system’s “address book,” which is what recovery software uses to find your data. Formatting first makes recovery much more difficult and, in some cases, impossible.
Why does my SD card say it needs to be formatted?
This error message appears when your computer cannot read the card’s file system. This usually means the file system is corrupted or has become RAW (lacks a recognizable file system). The underlying data is often still physically present on the card, just inaccessible to the operating system.
Can photos be recovered from a corrupted SD card?
Absolutely. Photos and videos are the most common file types people need to save. Data recovery software is engineered to recognize the unique file signatures of images (like JPEGs, CR2, NEF) and videos (MP4, MOV), allowing it to reconstruct them even when the file system is completely gone. During our test, we successfully recovered 95% of our photos, though a couple of video files were unsalvageable because the corruption happened while they were being written.”

Joy Taylor is a seasoned technical writer with over a decade of experience in mobile technology. At iMobie, she specializes in producing in-depth content on iOS data recovery, iPhone unlocking solutions, and iOS troubleshooting.
Product-related questions? Contact Our Support Team to Get Quick Solution >
