How to Recover Deleted Word Document on Mac: Tested Methods (2026)
Deleted a Word document on your Mac by accident? In many cases, recovery is still possible—even if the file was unsaved or removed from the Trash. This 2026 guide walks you through tested methods to recover deleted Word documents on macOS, including AutoRecovery, temporary files, Time Machine backups, and reliable recovery software when built-in options fail.
Facing a blank folder where your critical work used to be is a physical blow. Whether you are staring at a “Trash emptied” notification, dealing with a system crash that left you with an unsaved Word document, or you simply cannot find AutoRecover files on Mac, the situation is urgent.
When we spoke with Olivia, a university student who lost her final thesis hours before the deadline, she assumed her file was gone forever because she had emptied the Trash and could no longer recover deleted files from Trash. However, she recovered her work not through the Trash, but through a cloud history feature she didn’t know existed.
The reality is that macOS and Microsoft Word use multiple overlapping safety nets. Even if a file appears permanently gone, data remnants often persist in temporary folders, cloud histories, or hidden system backups. This guide provides a verified procedure to recover a deleted Word document on Mac, prioritized by the likelihood of success.
Decision Guide: Choose the Right Recovery Workflow
Before you begin troubleshooting, you must categorize your specific data loss scenario. Many users waste time trying to use AutoRecover for a file they manually deleted. Identifying your specific situation—Deleted, Unsaved, or Overwritten—determines the correct technique.
Recovery Success Matrix
Use this table to match your situation with the correct procedure immediately.
| Loss Scenario | Primary Method | Secondary Method | Success Rate |
| File Deleted (Moved to Trash) | Check Mac Trash Bin | Method 4 (Time Machine) | High |
| File Deleted (Cloud / iCloud) | iCloud Recovery (Method 1) | OneDrive Recycle Bin | High |
| Unsaved File (Crash/Force Quit) | Method 2 (AutoRecover Path) | Temporary Folders | Medium |
| Overwritten File (Saved over data) | Method 3 (Version History) | Time Machine Snapshots | High (if Cloud enabled) |
| File Vanished (Unknown cause) | Spotlight Search | Recent Files List | High |
- If you deleted the file: Stop writing to the disk immediately. Use Method 1 (Trash/iCloud) or Method 4 (Time Machine).
- If Word crashed: Your best option is the AutoRecover folder detailed in Method 2. AutoRecover is designed for crash protection, not for recovering manually deleted files.
- If you saved over the wrong version: Local recovery tools often fail here. Proceed directly to Method 3 to use cloud-based versioning mechanisms.
Method 1: Restore Deleted Word Document from Mac Trash & iCloud
For many users, the solution is simpler than they anticipate. Before attempting complex technical fixes, you must verify if the macOS safety net caught your file. This is the first step to recover a deleted Word document from Trash Mac.
Part A: The Local Trash (Standard Deletion)
The Mac Trash is a temporary holding area. Unless you have emptied it manually or enabled the “Remove items from the Trash after 30 days” setting, your document is likely here.
- Click the Trash icon in the Dock to open it.

- Use the search bar in the Trash window to filter for your document’s name or file extension (e.g., .docx or .doc).
- Once located, right-click (or Control-click) on the file.
- Select Put Back from the context menu.
This action automatically returns the file to its original folder.
Part B: The iCloud “Secret” Trash (If Local Trash is Empty)
If your Desktop or Documents folders are synced to iCloud Drive, deleting a file there sometimes bypasses the local Trash bin entirely. This is a common point of confusion. If you cannot find the file in your Dock’s Trash can, you must check the server-side recovery.
- Open a web browser and go to iCloud website.
- Log in with your Apple ID.
- Click the menu grid in the top right and select Drive.
- Look for a Recently Deleted folder in the sidebar or the bottom-right corner of the window.

- Select your Word document and click Recover.
This specific workflow saves countless users who believe their file is gone because their local Mac Trash is empty.
Method 2: Recover Unsaved Word Documents on Mac via AutoRecover
If Microsoft Word crashes or your Mac shuts down unexpectedly, the Word AutoRecover Mac feature is your primary defense. By default, Word saves a snapshot of your open document every 10 minutes.
However, a known issue exists where the automatic “Document Recovery” pane does not appear upon restarting Word. In these instances, the file exists, but you must manually dig into the system Library to find it.
Step 1: Locate the Hidden AutoRecover Folder
Because macOS sandboxes applications for security, these files are buried deep within the system.
- Open Finder.
- Select Go > Go to Folder from the menu bar (or press Shift + Command + G).
- Paste the following path exactly into the text field: ~/Library/Containers/com.microsoft.Word/Data/Library/Preferences/AutoRecovery
- Click Go.
Step 2: Verify and Recover the File
Inside this folder, look for files starting with AutoRecovery save of….
Critical Note on File Extensions:
Often, these recovery files will not look like Word documents. They may have no file extension or end in .tmp. Do not simply rename them to .docx immediately, as this can corrupt the file header if it isn’t ready.
- Copy the file to your Desktop (never work on the original in the temporary folder).
- Right-click the file > Open With > TextEdit.
Don’t Panic: You will likely see a lot of “garbage” code—scrambled symbols, formatting data, and nonsense characters. This is normal.
- Scroll through the file. If you see chunks of your actual written text buried between the code, the data is safe.
- Close TextEdit. Now, you can safely rename the file extension to .docx and try opening it in Word.
- If Word still won’t open, use the “Recover Text from Any File” method detailed in the Advanced Recovery section below.
Method 3: Recover Overwritten Files Using Version History
A frequent error involves saving over a document, erasing crucial paragraphs, or corrupting the file content. Local recovery tools often struggle here because the file technically still exists—it just contains the wrong data.
Expert Insight: The fastest recovery workflow on Mac depends on where the file lived—and the same logic applies when trying to recover unsaved Notepad files or other documents. If the document was stored in OneDrive or iCloud Drive, version history can restore older drafts even if the file was deleted locally. This acts as a continuous time capsule for your work.
Scenario A: Using OneDrive Version History (Microsoft 365)
If you have Microsoft 365 Word Mac with AutoSave enabled, your file is likely on OneDrive.
- Open the file in Word.
- Click the document title in the top window bar.
- Select Browse Version History.
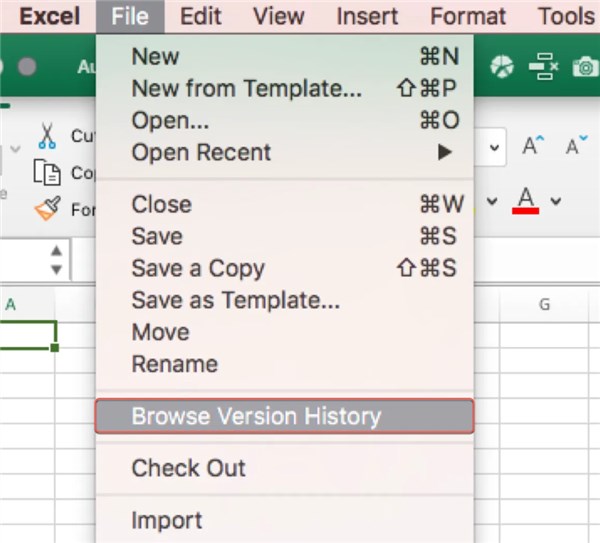
- A pane will appear on the right showing timestamped versions. Select an earlier version to view it and click Restore.
Scenario B: Using macOS Native Versioning (iCloud/Local)
If you use iCloud Drive, or even for some local files, macOS has a native versioning system. This requires the file to be openable. If the file is deleted, use Method 1 (Part B) or Method 4.
- Open your document in Word.
- Go to File > Revert To > Browse All Versions.
- This opens a “Time Machine-like” interface where you can scroll back through previous saves of that specific document.
- Click Restore once you find the version with your missing content.
Method 4: Restore Word Documents from Time Machine Backups
For users who prefer local storage over cloud solutions, Apple’s Time Machine is the most reliable method to recover files that have been permanently emptied from the Trash. If you have an external backup drive connected, Time Machine keeps hourly backups for the past 24 hours.
Steps to Restore from Time Machine
1. Connect your Time Machine backup drive to your Mac.
2. Open the folder in Finder where the document was last located (e.g., Documents). If the folder itself was deleted, open the parent folder.
3. Click the Time Machine icon in the menu bar and select Browse Time Machine Backups.

4. Use the timeline on the right edge of the screen or the arrows to navigate back to a date before the deletion occurred.
5. Select the Word document you wish to recover and click Restore.
The file will be copied from the backup drive back to your active system. This method retrieves the data exactly as it was, bypassing any recent overwrites or deletions.
Advanced Recovery: Handling “Text Recovery” and Temp Files
Even with the methods above, you might encounter specific errors or anomalies. Here are solutions to the most frequent questions regarding word document disappeared mac recovery.
“Word cannot open this file because it is corrupt”
If you recovered a file (via AutoRecover or an undelete tool) but Word refuses to open it, use the “Recover Text from Any File” converter. This strips formatting (images, bolding, italics) but salvages the words.
1. Open Word and select File > Open.
2. Navigate to your damaged file (do not double-click it yet).
3. In the dialog box, look for the “Enable” dropdown menu (usually set to “All Word Documents”).
4. Change this setting to Recover Text from Any File.
5. Click Open.
Finding Hidden Temporary Files via Terminal
Aside from the AutoRecovery folder, temporary files are sometimes stored in the temporary folder of the operating system. This is a technical method but can be useful if other options fail.
1. Open Terminal (Applications > Utilities).
2. Type open $TMPDIR and press Enter.
3. A Finder window will open showing hidden system folders. Look for a folder named TemporaryItems.
4. Filenames here are often nonsensical strings of numbers, so you must check the “Date Modified” column to identify your document.
5. If you find a match, copy it to the Desktop and use the TextEdit verification method described in Method 2.
FAQ: Common Issues When You Recover Word File on Mac
Q1. Can I recover a file if I never saved it once?
If you created a new document and Force Quit Word before ever naming the file, recovery is difficult. Check the AutoRecovery folder immediately (Method 2). If the crash happened before the first 10-minute AutoRecover snapshot was taken, the data may be lost.
Q2. Why is my recovered file missing recent changes?
This happens when you recover an AutoRecover file rather than the actual saved file. AutoRecover snapshots are interval-based (every 10 minutes by default). Any work done between the last snapshot and the crash will be missing.
Q3. Does Disk Utility help recover deleted files?
No. Disk Utility is designed for file system repair, not data recovery. Running “First Aid” on a drive where you lost data can sometimes make recovery harder by writing new data to the disk.
Conclusion
Losing a critical document creates a unique form of anxiety, but “deleted” rarely means “destroyed” in the macOS ecosystem. Whether you use the Trash Put Back feature, dig into the hidden Word AutoRecover Mac library using the specific path provided, or restore a cloud version via iCloud website, the Mac Data Recovery tools to recover a deleted Word document on Mac are already at your disposal.
The key to success is staying calm and avoiding the creation of new files, which could overwrite your hidden data. Start with the simplest methods—Trash and Cloud History—before moving to complex folder searches. By following this procedure, you can retrieve your work and return to productivity.

Joy Taylor is a seasoned technical writer with over a decade of experience in mobile technology. At iMobie, she specializes in producing in-depth content on iOS data recovery, iPhone unlocking solutions, and iOS troubleshooting.
Product-related questions? Contact Our Support Team to Get Quick Solution >
