Ultimate Guide on Putting Filters to a Video
The importance of filters in videos cannot be overemphasized. So, if you’re new to video content creation and wondering how to add filters to your videos, you’ve come to the right place.

Whether you’re looking to give your video a vintage look, or a cinematic feel, or you just want to enhance its visual quality, this post will show you the ultimate way to add filters to a video without losing quality. Let’s dive right in.
How to Add Filters to a Video
When it comes to adding filters to a video, you need a reliable video editing app – and the Movavi Video Editor is the best software that can help you make a difference.
With Movavi Video Editor, you get access to the best video filters you can ever think of. It does not matter whether you need adjustment filters, artistic filters, blur filters, color filters, or more, the good news is there are lots of filters available for you to choose from.
What’s more, Movavi video editor is not limited to just offering the best filters you need. It also provides features like overlay effects, stickers, frames, transition effects, etc., that enable you to take your video quality to the next level. And if you’re looking to perform other kinds of video editing operations, such as video, cutting, trimming, or splitting, it’s got you covered with the perfect tools for the job.
Key Features
- Add stylish transitions, filters, and effects to your videos without losing quality.
- Offers a library of free music and sound effects to enhance the audio aspect of videos. Or take audio out of the videos.
- Supports excellent AI features that facilitate background removal, motion tracking, and noise removal.
- Its drag-and-drop user interface makes video editing a breeze.
How to add filters to video using Movavi Video Editor
Free download Movavi Video Editor before using.
Step 1: Launch the “Movavi Video Editor” app and click on the “Add Files” button to upload the video clip you want to add filter to.
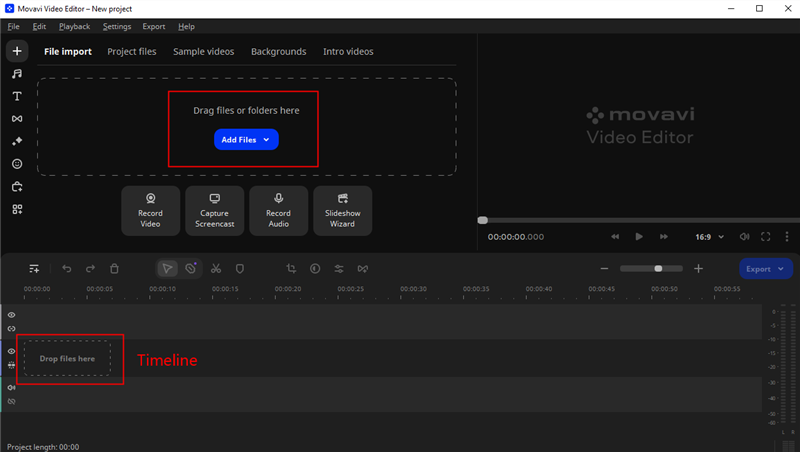
Add Files in Movavi Video Editor
Step 2: Drag and drop your video clip to the tool’s “Timeline” and click on the “Effects” tab at the left side of the interface.
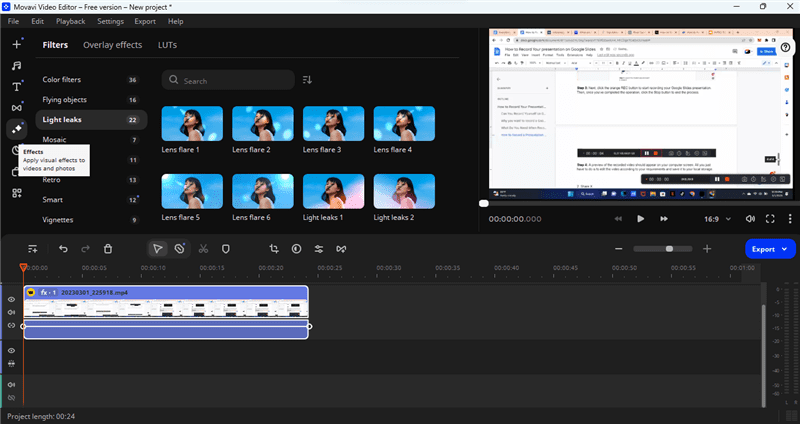
Choose Effects for the Video
Step 3: Click on the “Filters” tab and select the type of filter you’d like to use. Then, drag and drop the “Filter” effect on your video clip in the timeline.
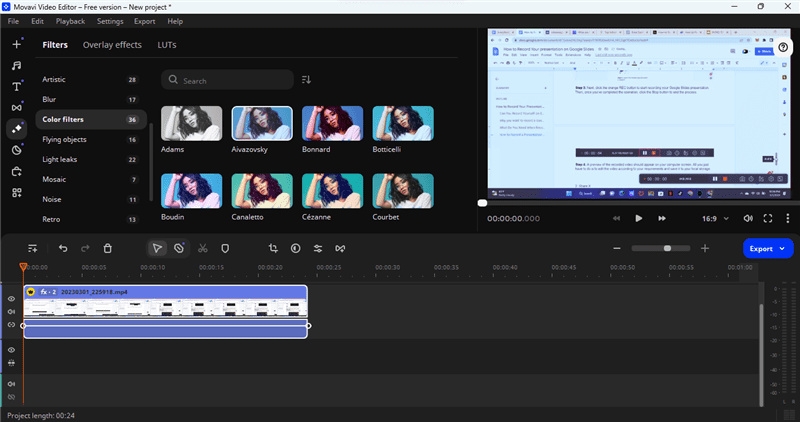
Add Effects to the Video
Step 4: Once you’ve added the filter, preview your video to ensure the output satisfies your requirement. Then, click the “Export” button right under the “Preview box” and select the relevant settings in the new window that pops up.
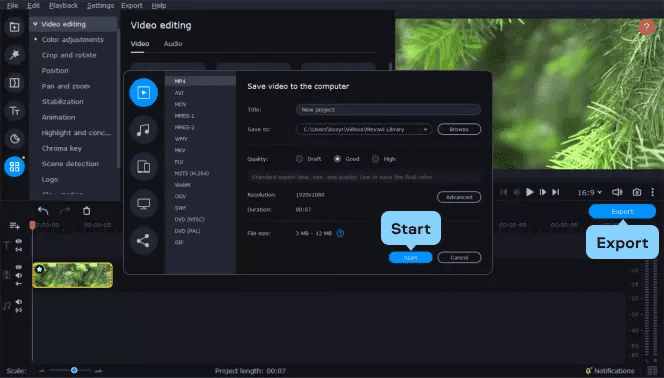
Preview & Export the Video
After that, click “Start” to start exporting the video file.
What Filters Does Movavi Video Editor Support?
Movavi Video Editor offers many filter effects that can be used to make your videos look more attractive. In this part, we’ve shared the types of filters available in Movavi Video Editor.
Adjustment Filters
The Movavi Video Editor is packed with many interesting adjustment filters that you can use for basic video enhancements. This set of video filters can be used to adjust brightness, contrast, saturation, and more to give your video the perfect balance and clarity. Some adjustment filters in Movavi Video Editor include Fish Eye – magnify, Fish Eye – reduce, Flip, Invert, etc.
Artistic Filters
Artistic filters transform your videos into visually stunning pieces. These filters contain watercolor, sketch, and oil painting effects, enabling you to turn ordinary footage into artistic creations. Examples of artistic filters on Movavi are brush sketch, brush saturation, Color burn, and Color mix.
Blur Filters
Blur filters are great for creating focus or depth. You can use these types of filters to blur backgrounds, make subjects stand out, or add a cinematic depth of field effect. This category includes Motion blur, Tilt-shift middle, and Bokeh blur.
Color Filters
Color filters adjust the overall color tone of your video. They can simulate different lighting conditions, time of day, or even seasons. For instance, a Gaugun filter can give your video a warm, vintage look, while the “Adams” filter can simulate nighttime.
Light Leaks
The Light Leaks filters in the Movavi Video Editor allow you to add a soft glow to your videos to make them look more authentic. These filters can help you create a nostalgic effect to add an artistic flare or warmth to your footage. They are great choices for music videos or memory compilations.
Mosaic Filters
The mosaic filters are a set of unique filters that pixelate a selected area of your video. These filters are useful for obscuring faces, license plates, or any sensitive information in your video.
Retro Filters
Retro filters in Movavi Video Editor make your videos look like they were shot in a different era. Examples include Old movie 70s, pop art, and Tube TV. These filters are great choices if you want to create videos that transport your audience back in time.
FAQs About Putting Filters on a Video
1. How do I add a filter to a video while recording?
Unfortunately, it is impossible to add filters to a video while you’re recording it. The only way to add a filter to the video is after recording, and you need a tool like the “Movavi Video Editor”, or your device’s built-in photo editor to be able to achieve this.
2. Can I put a face filter on a video?
The short answer is yes. Several tools for phones and computers allow you to add a face filter to your video, such as the Movavi Video Editor.
3. Will a filter influence the video quality?
Yes, filters can influence the quality of your video. If you effectively use filters on your video, it will efficiently enhance its quality, making your video look more captivating to viewers.
Conclusion
Adding filters to your videos shouldn’t be difficult when you have the right tool at your fingertips. And the Movavi Video Editor is one of the best software you can always count on for the job. Be sure to follow the steps we provided in the article correctly to avoid problems when adding filters to your video with Movavi.
Product-related questions? Contact Our Support Team to Get Quick Solution >
