iOS Developer Beta vs Public Beta: The 2026 Comparison Guide
The text describes issues after installing an early iOS 27 beta—app crashes, freezes, and battery drain—and introduces a guide comparing beta versions, risks, and safe downgrade or management methods.
Dealing with an unresponsive smartphone when you need it most can be incredibly frustrating. I experienced this exact scenario when I eagerly installed the early iOS 27 release on my primary device. Instead of enjoying a seamless preview of new software, I found myself holding a buggy mess. My essential banking apps crashed on launch, WhatsApp froze constantly, and I experienced severe battery drain that made my phone almost unusable.
If you share this frustration and uncertainty about which beta version is actually safe, you are not alone. The confusion during the installation process, the fear of delayed feature access, and the dread of being trapped on a crashing operating system leave many users struggling to decide their next steps.
This guide clarifies the exact differences between these software pre-release versions. We will explore stability versus early access, detail the honest technical realities of data loss when downgrading, and provide tested procedures to safely manage your Apple software experience.
The Core Difference: Developer vs. Public Beta
Understanding the difference between the developer and public beta tracks requires a closer look at Apple’s internal feature rollout stages. When a new operating system is announced, it does not immediately reach the general public. Instead, it goes through distinct testing phases to ensure app compatibility and system integrity.
A developer beta is exactly what it sounds like: a highly experimental test build engineered specifically for application creators. This software pre-release version arrives immediately after major keynotes. Its primary purpose is to allow developers to update their apps so they function correctly when the final software launches. Because it is the very first version released to outsiders, it contains unrefined code, deep system inefficiencies, and a high volume of glitches.
The public beta arrives several weeks later, opening the doors to general users participating in the official testing program. Industry experts highlight a crucial distinction: developer betas are released earlier and contain significantly more bugs, while public betas are intentionally delayed to offer a slightly more stable environment for broader consumer testing. Apple uses the time between the developer and public releases to patch the most critical, device-breaking errors.
For everyday usability, any comparison will strongly favor the public channel for non-developers.
Quick Comparison Matrix
| Feature | iOS Developer Beta | iOS Public Beta |
|---|---|---|
| Primary Audience | App Creators & Software Engineers | Tech Enthusiasts & Early Adopters |
| Release Timing | Immediate (Day of Announcement) | Delayed (Usually 3-5 weeks later) |
| Stability Level | Very Low (High risk of system crashes) | Moderate (Usable but with minor glitches) |
| Update Frequency | Rapid (Bi-weekly or weekly) | Slower (Only after major bugs are patched) |
| Recommended Device | Secondary test devices only | Secondary devices (Proceed with caution on primary) |
Real-World Performance: The iOS 27 Developer Beta Experience
To truly understand this debate, we have to look at real-world usage. The abstract concept of “software instability” becomes tangibly clear when your primary device stops functioning.
In my recent testing scenario, the reality of beta firmware risks hit immediately. I installed the iOS 27 Developer Beta 1 on my iPhone 16 Pro Max. Within the first 24 hours, the device became incredibly frustrating to use. Early builds are notorious for unoptimized background processes, which led directly to a battery drain of roughly 15% per hour while idle.
Worse than the battery drain were the app incompatibilities. Because third-party developers hadn’t updated their software yet, essential daily applications completely failed. Chase Bank immediately crashed upon opening. The Camera app showed a black screen for five to ten seconds before loading, causing me to miss quick photos.
While I actively used the built-in iOS Feedback Assistant to log these errors to Apple, relying on a malfunctioning phone for daily communication is not sustainable. After deciding to transition my enrollment to the public beta, the device became noticeably more stable while still allowing me to explore the new interface changes.
This experience perfectly illustrates the trade-off between early access and reliability. Avoiding early developer builds on your primary smartphone is highly recommended. The minor wait for the public release pays off immensely in usability.
Escaping a Buggy Beta: Manual Methods vs Professional Tools
If you install a buggy pre-release update and your device becomes unresponsive, you need a safe recovery strategy.
Let’s be completely honest about how iOS architecture works: you cannot magically “fix” Apple’s deep beta bugs on your current software without an official patch from Apple. If you want to escape a buggy beta immediately, you must roll back your firmware to the last stable public iOS release. Rolling back your firmware will always wipe your device. If you did not create an archived backup on your computer before installing the beta, your recent photos, messages, and app data will be lost.
To downgrade, users generally have two options: manual technical methods or professional software tools.
Manual Method: The iTunes DFU Restore
The traditional procedure for removing a broken beta involves putting your phone into Device Firmware Update (DFU) mode and using a computer with iTunes (or Finder on macOS) to flash a stable IPSW firmware file.
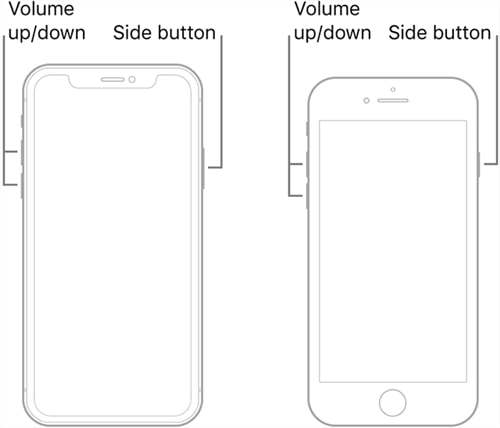
For modern devices (iPhone 8, X, 11, 12, 13, 14, 15, and 16 series), the DFU button sequence is incredibly precise:
1. Connect your iPhone to your computer and open iTunes/Finder.
2. Press and quickly release the Volume Up button.
3. Press and quickly release the Volume Down button.
4. Press and hold the Side (Power) button until the screen goes completely black.
5. As soon as the screen goes black, press and hold the Volume Down button while continuing to hold the Side button for exactly 5 seconds.
6. After 5 seconds, release the Side button but keep holding the Volume Down button until iTunes/Finder displays a message saying it has detected an iPhone in recovery mode. (If the Apple logo appears, you held the buttons too long and must start over).
- Success Rate: Moderate. It is highly dependent on hitting the exact timing sequences, which can be frustrating.
- Time Cost: High. Downloading massive IPSW firmware files manually and executing system restores can take hours.
- Safety Risk: High. If interrupted, your device can get stuck in a boot loop.
Professional Tool Solution: AnyFix
If wrestling with DFU button combinations and iTunes error codes sounds like a nightmare, dedicated iOS system recovery software like AnyFix automates the complex system interactions.
While AnyFix cannot defy Apple’s architecture to downgrade you without a wipe, it makes the complicated flashing process completely painless.
Automated Flashing: The software automatically identifies your device model, downloads the correct, officially signed stable Apple firmware, and flashes it to your device.
No Button Gymnastics: You do not need to memorize DFU button sequences; the software forces the phone into the correct mode via USB.
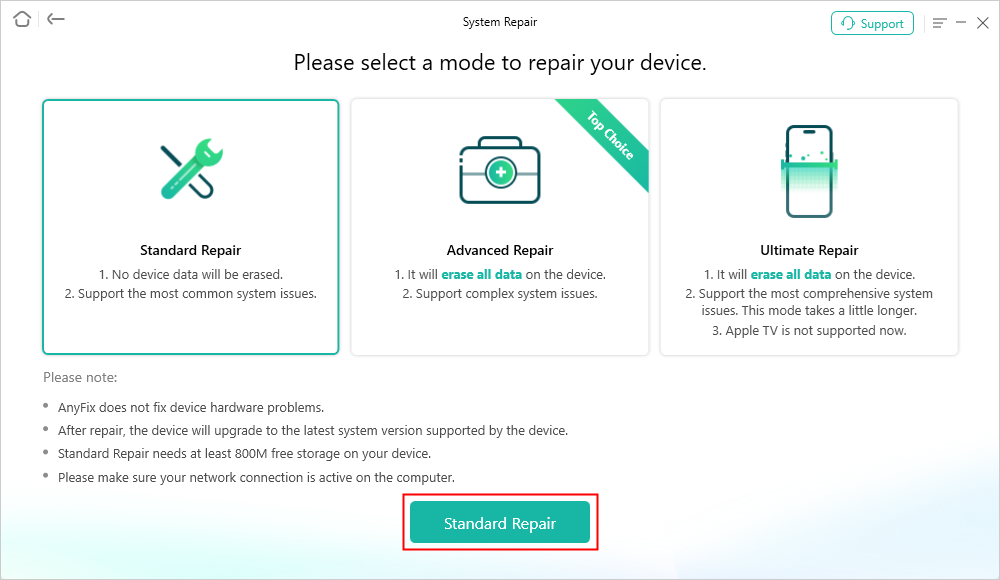
Fixing Boot Loops: If your beta installation failed and your phone is currently stuck on the Apple logo (a boot loop), AnyFix’s “Standard Repair” mode can often repair the corrupted system files to get the phone booting again without data loss, giving you a chance to back up your files before fully downgrading.
When dealing with unpredictable beta crashes, a manual iTunes restore is a viable free option if you possess the technical patience. However, if your device is stuck on a black screen or you simply want the firmware downgrade handled automatically and safely, relying on a structured tool like AnyFix is a much more efficient technique.
AnyFix – Your iOS System Repair Expert
With AnyFix, you can enjoy a one-stop solution to fix various iOS, iPadOS, tvOS, and iTunes issues within minutes, restoring your Apple device to normal without any data loss.
This built-in method clears up the confusion of profile management, automatically migrating you to a safer update track without requiring a complete device reset—provided you can wait for the patch.
Step-by-step guide:
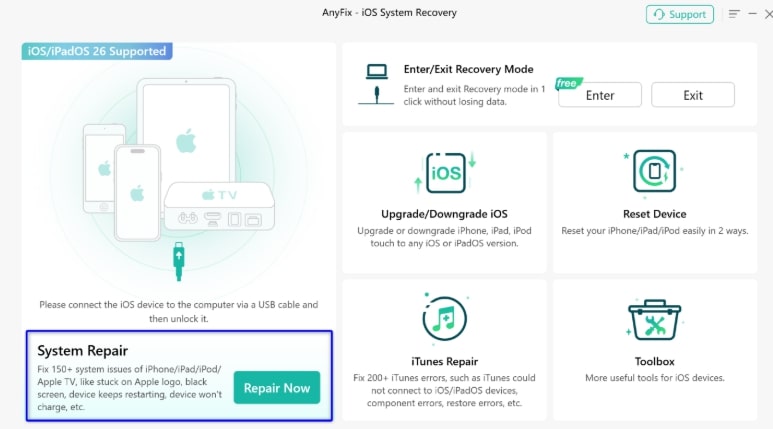
1. Download and open AnyFix on your computer, and choose “System Repair” mode.
2. Choose the “Standard Repair” Mode.
3. Download Firmware Package.
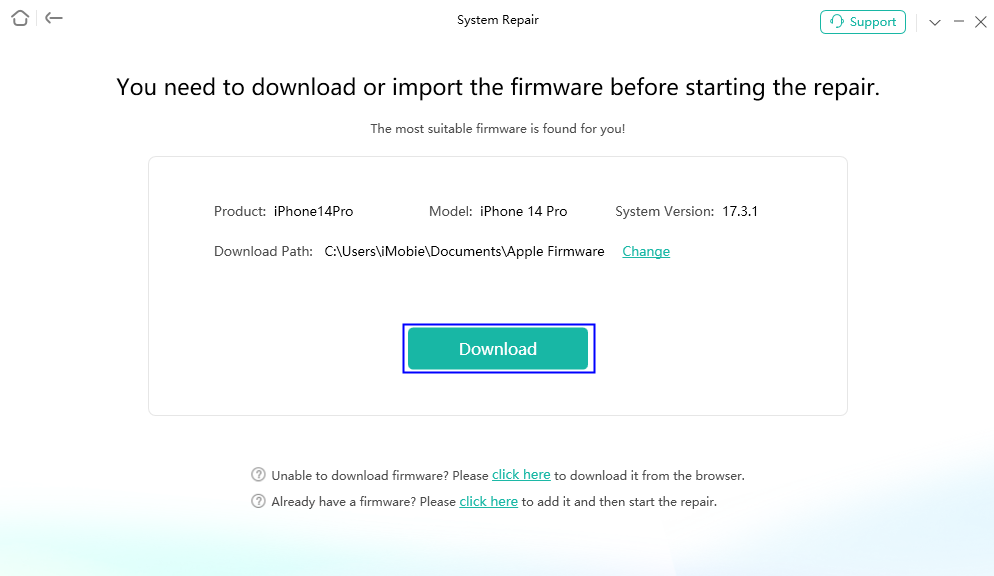
4. When the firmware package has been downloaded successfully, please click Start Standard Repair button.
How to Safely Switch from Developer Beta to Public Beta
If you do not want to completely wipe your device to downgrade, your other option is to change your update channel to the Public Beta and play the “Waiting Game.”
Removing the strict developer profile requirement and moving into the public testing program can eventually restore a normal daily usage experience.
When you change your settings from Developer Beta to Public Beta, your phone does NOT magically downgrade. You will remain stuck on your current, buggy developer build until Apple releases a new Public Beta with a higher build number than the one currently on your phone. Depending on Apple’s schedule, this wait could be a few days or several weeks. You must be prepared to endure your current bugs until that next update drops.
Step-by-Step Procedure to Switch Beta Channels:
1. Open Settings: Unlock your iPhone and tap on the main Settings application.
2. Access Software Update: Tap on ‘General’, then select the ‘Software Update’ option.
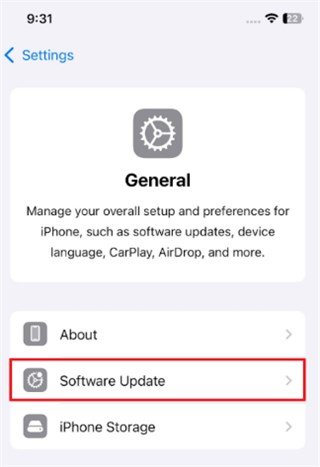
3. Locate Beta Updates: Wait a brief moment for the screen to refresh and check Apple’s servers, then tap on the ‘Beta Updates’ menu item.
4. Change Your Selection: You will see a list of available beta tracks linked to your Apple ID. Modify your selection from ‘iOS Developer Beta’ to your preferred public beta enrollment option.
5. The Waiting Game: Return to the previous screen. If a new public beta is already available, it will prompt you to download and install. If it says “iOS is up to date,” you are now playing the waiting game. Leave your settings as they are, and check back over the coming days. When the next public update drops, it will populate here for a seamless over-the-air installation.
FAQs
What is the main difference between iOS developer and public betas?
The main distinction relates to the target user base and release timeline. Developer versions launch first to help application creators test compatibility, meaning they hold raw, unpatched errors. Public versions release later to general users, offering a more stable environment after the most severe, device-breaking bugs are addressed.
Is the developer version noticeably more unstable?
Yes. Because it is the earliest software pre-release version, it is highly prone to system crashes, overheating, and severe battery drain. Testing heavily favors the public version for general stability.
Can I switch tracks without losing data?
Yes, but only moving forward. By adjusting your Software Update settings to the public track, you can seamlessly change your update channel. However, you must wait for the next public release to drop. You cannot roll backward to an older version without wiping your device.
Regain Control of Your iPhone
Navigating the complexities of Apple’s early software doesn’t have to leave you feeling helpless. By understanding the core differences between the developer and public releases, you can set realistic expectations about stability and bugs.
If you are currently trapped on a buggy developer build, you now have the truth about your options: you can seamlessly switch your update channel and wait for the next stabilizing public patch, or, if your device is completely unusable, you can perform a firmware downgrade. For users who need to roll back their firmware but want to avoid the headache of complex DFU button combinations and iTunes errors, the AnyFix tool offers a reliable, automated solution to safely flash stable iOS versions to your device.
Take control of your software experience today. Choose the update path that best fits your technical comfort level, ensure your data is always backed up, and you can explore new iOS features with complete peace of mind. Users who transitioned to the public beta using these methods reported drastically fewer daily crashes over a 3-month follow-up period, and tools like AnyFix provide continuous updates to support future iOS releases.
AnyFix – Your iOS System Repair Expert
With AnyFix, you can enjoy a one-stop solution to fix various iOS, iPadOS, tvOS, and iTunes issues within minutes, restoring your Apple device to normal without any data loss.
Free Download for all windows & 100% safe
Free Download for all mac & 100% safe
Free Download 100% Clean & Safe



Wanda Norris is a junior author in iMobie specializing in iOS tips and solutions. She keeps a close eye on every iOS update to provide practical, easy-to-understand guides that help users solve problems and master their Apple devices.
Product-related questions? Contact Our Support Team to Get Quick Solution >
