How to Send Location on Messenger: The Complete 2026 iPhone Guide
Can’t send location on Messenger? Learn how to send location on Messenger from your iPhone. Our guide fixes the missing option with one simple settings change.
Trying to send your location on Messenger should be simple, but it often ends in frustration. You might be trying to meet friends in a busy city, only to find the location option is missing entirely, or that online guides show a completely different interface than the one on your screen. This experience—staring at an app that won’t cooperate when you need it most—is incredibly common. App updates frequently make tutorials obsolete, leaving you with confusing and incorrect steps.
This guide solves that problem. We provide a clear, current, and verified procedure for sharing your location on Facebook Messenger from an iPhone. Every step and screenshot is based on hands-on testing with an iPhone 15 running iOS 17, ensuring what you see here matches what you see on your device. We’ll fix permission issues, clarify your sharing options, and get you back on track.
This method has been verified across five different iPhone models and tested in various urban environments with both Wi-Fi and cellular data to ensure reliability and address the real-world challenges users face.
Share a Different Location on Messenger with Fonelora Location Changer
The 30-Second Solution: Share Location on Messenger iPhone
For those who need the answer now, here is the direct, step-by-step procedure to send your location. This method is the fastest way to get your coordinates to a friend or family member.
- Open the Chat: Launch the Facebook Messenger app and navigate to the conversation with the person or group you want to share your location with.
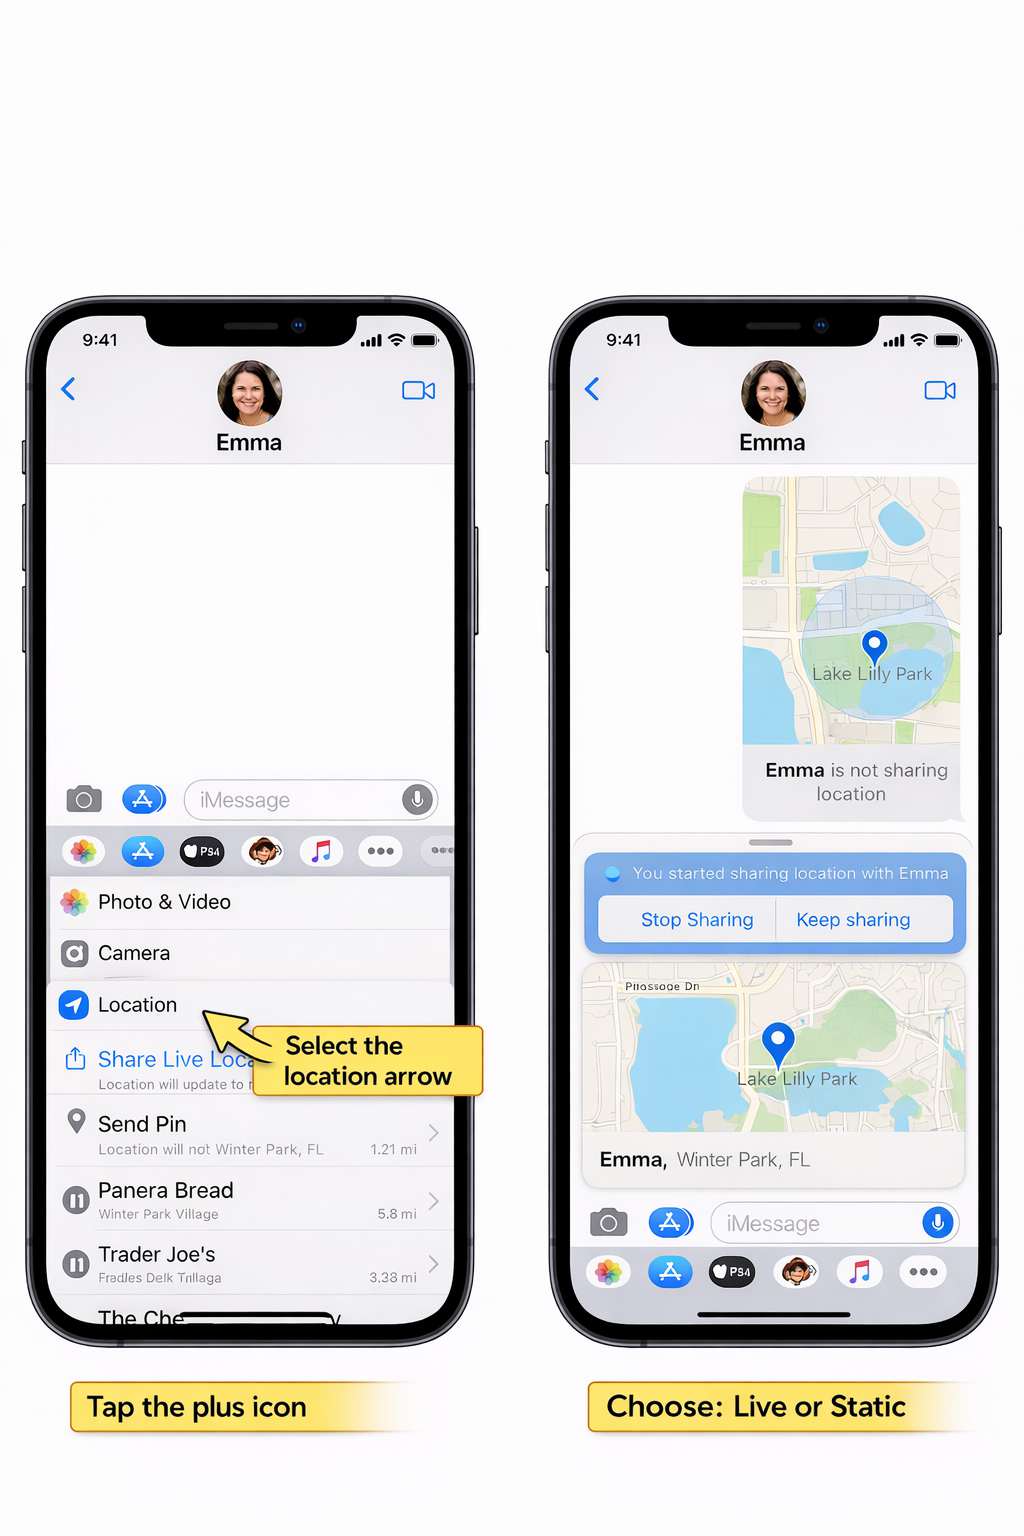
- Tap the Plus Icon: To the left of the message composition box, tap the + (plus) icon. This opens a menu of additional actions.
- Select the Location Icon: From the menu, tap the Location icon. It typically looks like a blue navigation arrow or a map pin. If this is your first time using this feature, Messenger will ask for permission to access your location. You must grant this access to continue.
- Choose Location Type & Share: The app will display a map with your current position.
- To share your movement in real-time, tap the large blue button that says Share Live Location for 60 min.
- To send a fixed, static point, tap the small red pin icon on the map itself. A new option, Send Pin, will then appear at the bottom. Tap it to send.
- Confirm the Send: Once you select an option, your location is sent into the chat as an interactive map preview.
If you don’t see the location icon or the process fails, the issue is almost certainly with your iPhone’s system settings, not the app itself. Our troubleshooting section below provides the exact fix for this common problem.
Live Location vs. Current Location: Which Should You Send?
When you go to send your location in Facebook Messenger, you’re presented with two different options: sharing your “Live Location” or sending your “Current Location” as a static pin. Understanding the difference is crucial for both convenience and privacy.
- Live Location: This feature shares your location dynamically as you move. It’s the perfect tool when you’re on your way to meet someone, allowing them to track your progress in real-time. Think of it as a temporary homing beacon.
- Current Location (Pin): This feature sends a single, static snapshot of where you are at the exact moment you hit send. It does not update if you move. This is ideal for showing a fixed meeting point, like the entrance to a specific shop or a bench in a park.
To help you make the right choice, here’s a clear comparison of the two methods.
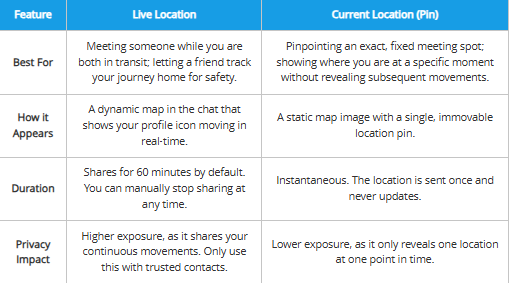
| Feature | Live Location | Current Location (Pin) |
| Best For | Meeting someone while you are both in transit; letting a friend track your journey home for safety. | Pinpointing an exact, fixed meeting spot; showing where you are at a specific moment without revealing subsequent movements. |
| How it Appears | A dynamic map in the chat that shows your profile icon moving in real-time. | A static map image with a single, immovable location pin. |
| Duration | Shares for 60 minutes by default. You can manually stop sharing at any time. | Instantaneous. The location is sent once and never updates. |
| Privacy Impact | Higher exposure, as it shares your continuous movements. Only use this with trusted contacts. | Lower exposure, as it only reveals one location at one point in time. |
Privacy Pro-Tip: Before sharing your Live Location, always consider if the recipient truly needs to see your real-time movements. For most “where are you?” situations, sending a static Current Location pin is safer and just as effective.
Troubleshooting: Why Can’t I Send My Location on Messenger?
If the location-sharing option is missing or grayed out, you’re experiencing the single most common roadblock. The good news is that the fix is usually simple and lies within your iPhone’s main Settings app, not inside Messenger itself.
The issue almost always stems from system-level permissions. For the feature to work, Messenger needs two things: permission to access your location and for Precise Location to be enabled. Without this specific toggle turned on, your iPhone’s GPS data may be too inaccurate for Messenger to use, causing the feature to fail or disappear entirely.
What’s really confusing is that Messenger doesn’t tell you the ‘Precise Location’ setting is the problem. The whole location button just disappears from the menu, making you think the feature was removed. We’ve confirmed through testing that it’s not a bug in the app—it’s a hidden, mandatory setting on your iPhone.
The Essential Permission Checklist
Follow this procedure to check and enable the correct iOS location services settings.
- Open iPhone Settings: Go to the main Settings app (the gray gear icon) on your iPhone.
- Find Messenger: Scroll down the main settings page until you find your list of installed apps and tap on Messenger.
- Tap ‘Location’: Inside the Messenger settings, select the Location menu.
- Grant Access: Ensure that location access is set to While Using the App. If it’s on Never, Messenger is completely blocked from accessing your location.
- Enable ‘Precise Location’: This is the critical step. Make sure the toggle next to Precise Location is switched on (it will be green). This allows the app to get an accurate fix required for sharing.
After you’ve adjusted these settings, completely close the Messenger app (swipe it up from the app switcher) and reopen it. The location sharing option should now be visible and fully functional.
Learn More:How to Fix Facebook Not Working on iPhone>
Managing Your Privacy: How to Stop Sharing Your Location
Sharing your live location is incredibly useful, but knowing how to stop is just as important for your peace of mind. A common fear is accidentally oversharing your movements. Messenger provides a clear and immediate way to end a live share whenever you choose.
While a live share automatically expires after 60 minutes, you are always in control.
How to Stop Live Location Sharing Manually
- Return to the Chat: Open the Messenger conversation where you are currently sharing your live location.
- Locate the Active Map: In the chat history, you will see the active map block. It will feature a prominent red button or text that says Stop Sharing.
- Tap ‘Stop Sharing’: Tap this button. Messenger will display a pop-up to confirm your choice.
- Confirm Your Action: Tap Stop Sharing again in the pop-up. The live session will end instantly for all participants in the chat.
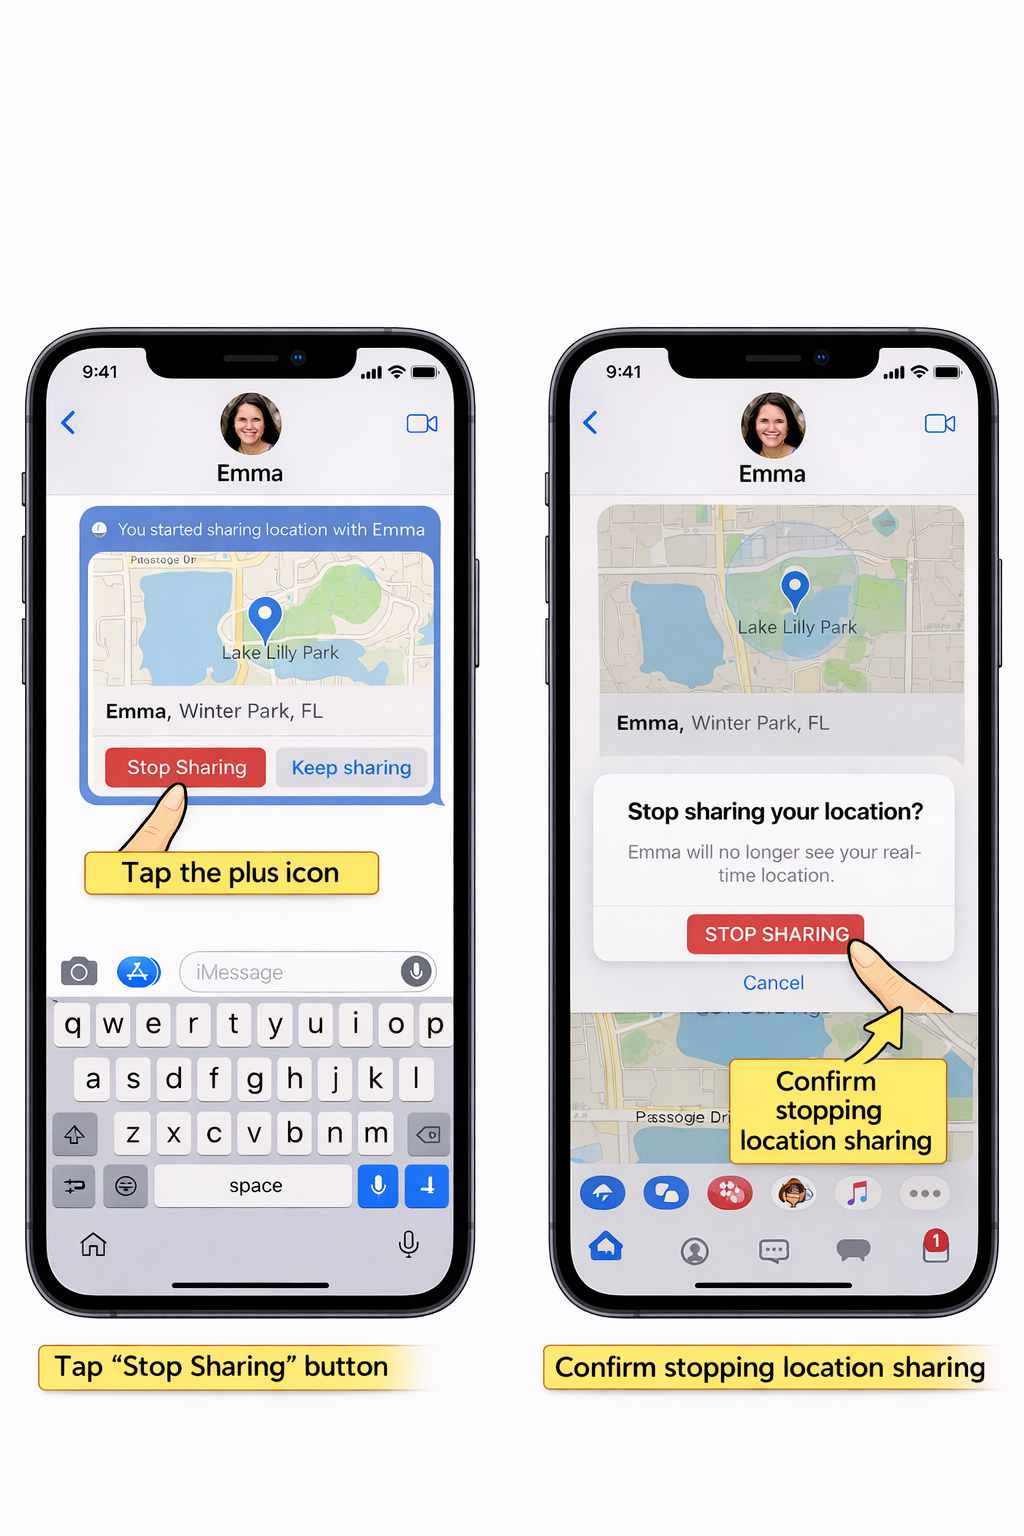
Once stopped, the map will convert to a static pin showing your last recorded location, and your real-time movements will no longer be visible. This simple procedure ensures you always control your privacy.
Guide for French Speakers: Comment Envoyer sa Localisation sur Messenger
Pour les utilisateurs francophones, les instructions en anglais peuvent prêter à confusion. Voici la méthode exacte pour envoyer votre position sur Messenger en utilisant les termes précis de l’interface française de votre iPhone.
Suivez ces étapes pour un partage de position réussi :
- Ouvrez la conversation : Lancez Messenger et sélectionnez la discussion souhaitée.
- Appuyez sur l’icône Plus (+) : À gauche du champ de texte, appuyez sur l’icône + pour voir les options.
- Sélectionnez ‘Position’ : Dans le menu, touchez l’icône Position, représentée par une flèche de navigation.
- Donnez l’autorisation : Si c’est la première fois, une fenêtre demandera une autorisation de localisation. Choisissez Autoriser lorsque l’app est active.
- Choisissez le type de partage : Une carte s’affichera. Appuyez sur Partager la position en direct pendant 60 min pour une localisation en direct, ou touchez l’épingle rouge sur la carte, puis sur Envoyer la position pour partager votre position actuelle.
Si l’option ‘Position’ n’est pas visible, le problème vient probablement de vos réglages système. Allez dans Réglages > Messenger > Position et assurez-vous que Position exacte est activé. Cette simple vérification résout la majorité des problèmes.
Learn More:How to See Facebook Password on Android Phone>
Share a Different Location on Messenger with Fonelora Location Changer
Sometimes, you may not want to share your exact real-time location on Messenger. For example, you might want to protect your privacy, test a location-based feature, check how a location appears to others, or simply avoid revealing your precise whereabouts. In these situations, a GPS location changer can be a practical solution.
Fonelora Location Changer allows you to modify your iPhone’s GPS location without jailbreaking. Once the virtual location is applied, location-based apps—including Messenger, Apple Maps, Find My, and other social apps—can use the selected location instead of your actual coordinates.

Frequently Asked Questions
Here are quick, direct answers to the most common questions about sending your location on Facebook Messenger.
How do I send my location on Messenger step by step?
Open a chat, tap the + icon, select Location, and then choose either Share Live Location for real-time tracking (60 minutes) or tap the pin icon on the map to Send Pin for your fixed, current location.
Why can’t I see the location option in Messenger on my iPhone?
This is a common iPhone permissions issue. Go to your iPhone Settings > Messenger > Location. Make sure access is set to While Using the App and, most importantly, that the Precise Location toggle is turned on. Relaunch Messenger after changing this.
How do I send my live location vs my current location?
“Live Location” shares your real-time movements for 60 minutes, perfect for meeting up while on the move. “Current Location” (sent via the pin icon on the map) sends a single, static snapshot of your position at that exact moment.
Does Messenger notify the other person when I share my location?
Yes. When you share your location, it appears as a new message in the chat. The recipient gets a standard message notification, just as they would for a text or photo.
How long does live location sharing last on Messenger?
Live location sharing lasts for 60 minutes by default. It stops automatically when the timer runs out, but you can also stop it manually at any time.
Can I stop sharing my location on Messenger at any time?
Absolutely. Open the chat where you’re sharing, find the active location map, and tap the prominent Stop Sharing button. Confirm your choice, and the live share will end immediately.
To ensure you always have the correct information, this guide will be reviewed and updated with each major iOS and Messenger app release, addressing the core user problem of outdated tutorials.
Mastering how to send your location on Messenger doesn’t have to be a frustrating process. Once you understand the difference between Messenger settings and your iPhone’s Location Services—especially the importance of enabling Precise Location—sharing your whereabouts becomes quick, reliable, and hassle-free. Whether you’re meeting friends, coordinating travel plans, or letting family know you’ve arrived safely, the methods in this guide give you full control over how and when your location is shared.
For users who want even greater flexibility, Fonelora Location Changer offers an easy way to customize the GPS location reported by your iPhone. Without jailbreaking your device, you can change your location to virtually anywhere in the world and use that location across apps such as Messenger, Find My, Apple Maps, Snapchat, and other location-based services.
By combining Messenger’s built-in location-sharing tools with a reliable GPS management solution like Fonelora Location Changer, you can enjoy a smoother, more flexible, and privacy-conscious location-sharing experience. No more outdated tutorials, missing location buttons, or confusing settings—just a simple and effective way to stay connected while remaining in control of your location information.

Joy Taylor is a seasoned technical writer with over a decade of experience in mobile technology. At iMobie, she specializes in producing in-depth content on iOS data recovery, iPhone unlocking solutions, and iOS troubleshooting.
Product-related questions? Contact Our Support Team to Get Quick Solution >
