How to Recover Deleted Facebook Photos: 3 Verified Methods (2026 Guide)
Accidentally deleted Facebook photos? In many cases, you can still recover them depending on where the photos were originally stored and how they were removed. This guide covers 3 verified methods, including restoring from Facebook archives, checking synced backups, and recovering photos saved on your device.
Accidentally deleted a photo? You have exactly 30 days to recover it from the Trash before it is permanently removed from Facebook’s servers.
If you are staring at your screen, wondering if your content is gone forever, pause for a moment. Whether you are dealing with album photos removed accidentally or photos disappeared after account changes, the situation is rarely permanent if you act quickly. In most cases, your content is not erased immediately; it is simply held in a temporary state, waiting for you to retrieve it.
This guide clarifies the Facebook UI different on app vs desktop and provides verified solutions. We will walk you through the exact steps to recover deleted photos on Facebook, addressing the specific needs of both personal profile users and Business Page admins.
Method 1: Restore Deleted Facebook Photos from Trash (Mobile & Desktop)
Your photos likely aren’t gone—they are sitting in the Facebook Trash folder waiting for a single click. Facebook implements a safety net: when you delete content, it moves to the Trash, where it remains for 30 days before automatic permanent deletion. This is the first place you must check for deleted posts recovery.
Accessing Trash via Mobile App (iOS & Android)
The mobile interface hides the Activity Log within the settings menus. Because the app caches data to save battery, the Trash folder sometimes appears empty even when it contains files. Follow this procedure carefully:
1. Navigate to Profile: Go to your main profile page.
2. Open Profile Settings: Tap the three horizontal dots (…) next to the “Edit Profile” button.
3. Enter Activity Log: Select Activity Log from the menu list.
4. Locate Trash: Tap the Trash button located near the top of the Activity Log menu.
If the screen says “No Content,” pull down on the screen to refresh. The app often lags in syncing deleted items. A quick refresh usually forces the deleted photos to appear.
5. Restore: Select the photos or albums you want to keep and tap Restore.
Note for Page Admins & Content Creators:
If you manage a Business Page, the interface differs. You must switch into your Page’s profile first. Then, go to Settings & Privacy > Settings > Page Settings. Scroll down to the “Facebook Page Information” section to find the Activity Log. From there, the Trash icon functions identically to a personal profile.
Finding Specific Timeline Photos:
If you cannot find a specific photo, it may be categorized as a “Post” rather than a photo. Inside the Activity Log, look for the Manage your posts button (usually at the very top). Use the “Filters” option to sort by “Date” to find older timeline uploads efficiently.
Accessing Trash via Desktop Browser
The interface differs on a computer, often causing confusion for users switching between devices:
1. Click your profile picture in the top right corner.
2. Select Settings & privacy > Activity Log.
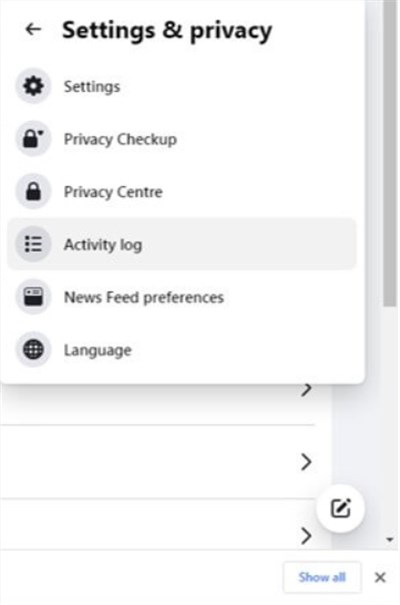
3. In the left sidebar, scroll down to find the Trash button.
4. Locate your missing content, check the box next to it, and click Restore.
If you act within the 30-day window, this method restores the content to your timeline exactly as it was, with likes, comments, and captions intact.
You may also like: How to Remove Recycle Bin From Desktop on Windows 11 & 10 >
Recovery Options Compared: Trash vs. Archive vs. Data Download
If the Trash folder is truly empty (even after a refresh), you must evaluate your remaining options. There is no external software solution that can access Facebook’s internal servers; you must rely on native tools. Understanding the difference between the Facebook Trash folder, the Facebook archive, and the download your Facebook information tool will save you time.
We analyze the three primary recovery methods based on their specific utility below.
| Feature | Best For | Time Limit | Success Rate | Recovery Outcome |
| Restore from Trash | Recent deletions (under 30 days). | 30 Days | High | Content returns to profile publicly with engagement stats. |
| Unarchiving | Photos that “disappeared” but were not intentionally deleted. | Indefinite | 100% (if archived) | Photos become visible on the profile again immediately. |
| Data Download | How to retrieve deleted pictures from Facebook when the post is gone. | Varies | Moderate | You receive a file containing the image data, but the post remains deleted. |
Strategic Advice: Always check the Archive before attempting a Data Download. The Archive is often where Facebook photos disappeared recovery cases are solved, as users frequently tap “Move to Archive” (the top option) when they intended to tap “Move to Trash.”
Method 2: Check the Archive for Disappeared Facebook Photos
A frequent scenario involves users confusing “deleting” with “archiving.” If you or a co-manager of the account tapped “Move to Archive” instead of “Move to Trash,” the photos are safe. They are merely hidden from the public eye, stored indefinitely in your private Facebook archive.
This distinction is critical because the Archive does not have a 30-day expiration date. To check if your missing photos are here:
How to Check Your Archive
1. Go to your profile and tap the three dots (…) to access profile settings.
2. Select Archive (sometimes found under Activity Log depending on your OS version).
3. Tap Archive at the top of the screen.
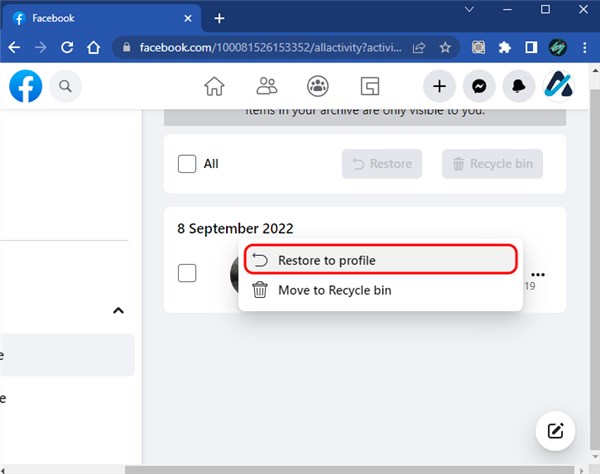
4. Review the list for your missing content. If found, select the photo or album and choose Restore to Profile.
Using the Manage posts tool within your Activity Log is often the fastest way to sift through years of content to see what has been hidden. Always verify this folder before assuming data is lost.
Method 3: How to Retrieve Deleted Pictures via Facebook Data Download
If the Trash is empty and the Archive is bare, there is one final technical fallback: the download your Facebook information tool. This method initiates a Facebook data export directly from Meta’s servers.
Is this a guaranteed fix?
No, but it is your best remaining option. While the frontend interface (what you see on your app) may say a photo is “deleted,” the backend database sometimes retains image references longer than the profile displays them. We have seen cases where the “photos_and_videos” folder in a data download contained images that were removed from the timeline weeks prior. It is not a perfect solution, but it is worth the attempt if the photo is valuable to you.
Requesting Your Data Copy
This process allows you to perform a deep search for how to recover deleted photos on Facebook from years ago by accessing the raw data associated with your account.
1. Access Settings: Go to Settings & privacy > Settings.
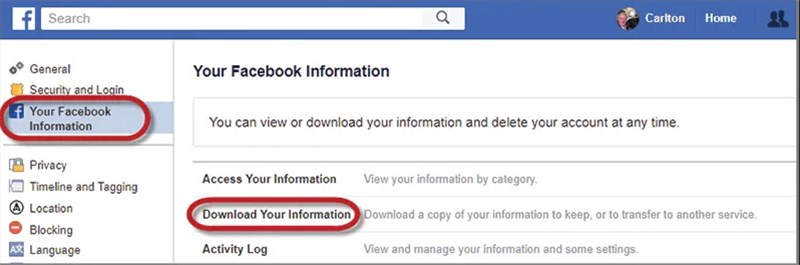
2. Navigate to Information: Scroll to Your Information (or access Accounts Center on mobile).
3. Initiate Download: Click Download your information and select Request a download.
4. Filter Content: Select the specific profile. When asked what information to download, choose Select types of information.
5. Crucial Step: Check Posts, Photos and Videos. Do not download the entire history unless necessary, as it increases processing time significantly.
6. Format Settings:
- Format: Select HTML (this allows you to view the data easily in a browser).
- Quality: Select High (to ensure you get the best resolution available).
- Date Range: Select All time if you are unsure when the deletion occurred.
Once Facebook compiles the data (which can take several hours), you will receive a notification. Download the ZIP file, extract it, and manually browse the photos_and_videos folder. You may find the image files you need, allowing you to re-upload them manually.
Troubleshooting: Why Can’t I Find My Deleted Photos?
To avoid frustration, it helps to understand why photos might seem unrecoverable.
The “Permanently Deleted” Reality
Users often ask how to recover deleted photos on Facebook from years ago. If the photos were deleted years ago and never archived, they are likely overwritten. Once the 30-day Trash retention period expires, a server-side script purges the data.
Ghost Photos and Tags
Sometimes, removing a tag from a photo removes it from your timeline, making it look like it was deleted. However, that photo still exists on the uploader’s profile or in the original album.
Action: If you were tagged in a photo but did not upload it yourself, you cannot recover it via your Trash. You must ask the friend who originally posted it to re-tag you or send you the file.
Mobile App Glitches
The Facebook UI is different on app vs desktop causes significant confusion. If your Activity Log crashes or refuses to load:
1. Update your Facebook App to the latest version.
2. Clear the app cache (Settings > Apps > Facebook > Storage > Clear Cache on Android).
3. Log in via a mobile browser (Chrome/Safari) instead of the app to bypass interface bugs. [Internal Link Suggestion: Link the preceding phrase to ‘/best-practices-for-cloud-backup-security’]
FAQs: Common Issues with Facebook Photo Recovery
Q1. Can you get back deleted photos on Facebook after 30 days?
Generally, no. Once the 30-day Trash retention period expires, the server permanently purges the data. The only exception is if a backup via the Facebook data export tool or free recovery software retains a cached copy, but this is rare.
Q2. If I restore a “Post,” does the photo come back too?
Yes. When you restore a post from the Trash, it restores the container and all media attached to it. However, if you deleted a single photo from inside a multi-photo album, you need to restore that specific image file, not just the album container.
Q3. Why is the Trash folder empty?
If you cannot locate the Trash folder, or it appears empty:
- Refresh: Pull down on the screen to force a server sync.
- Check Context: Ensure you are not viewing the Activity Log as a “Page” if you are trying to find personal photos (and vice versa).
- Time Limit: If it has been more than 30 days, the folder automatically empties itself.
Q4. How can I download my Facebook photos as a backup?
To prevent future loss, regularly use the Download Your Facebook information tool. Select “Photos and Videos,” set the date range to “All time,” and export. Store these files on an external hard drive or a cloud service like Google Photos for redundancy.
Conclusion
Losing digital memories is stressful, but you have options. By immediately checking the Facebook Trash folder (and refreshing it if it looks empty), verifying your Archive, and utilizing the Data Download tool as a final measure, you have a systematic path to recovery. You can also use silimar methods to recover deleted YouTube videos.
The key is timing. Act within the 30-day retention window to ensure the highest success rate. Log in to your Activity Log now—using the specific steps for your device—and scan for your missing files. To ensure this never happens again, consider setting up a routine backup of your social media data.

Joy Taylor is a seasoned technical writer with over a decade of experience in mobile technology. At iMobie, she specializes in producing in-depth content on iOS data recovery, iPhone unlocking solutions, and iOS troubleshooting.
Product-related questions? Contact Our Support Team to Get Quick Solution >
