How to Recover Word Document That Was Not Saved on Mac
Forgot to save a Word document on your Mac and lost your work? Don’t panic—unsaved files can often still be recovered, especially if Word crashed or closed unexpectedly. This guide explains how to recover a Word document that was not saved on Mac using AutoRecovery, temporary files, and macOS backup options, with clear steps to maximize your chances of success.
If Microsoft Word has frozen, crashed, or vanished along with your unsaved work, stop working on your Mac immediately. Do not save other files or install large applications right now. Every new piece of data you write to your hard drive increases the risk of overwriting the temporary files that might contain your lost document.
The panic of staring at a blank screen is valid, but the situation is rarely permanent. In our hands-on testing with macOS Sonoma and Microsoft Word 2021, we found that data often survives system crashes—it just hides in folders that Apple keeps out of standard view.
This guide skips the fluff and moves directly to the solutions. We will walk you through accessing hidden Library containers and temporary directories using verified commands. Whether your Mac restarted unexpectedly or Word simply quit, these steps offer the highest probability of retrieving your work.
You may also like: 7 Ways to Recover Unsaved/Deleted Notepad Files >
Quick Decision Guide: Which Recovery Method Should You Use?
Before you start digging through system files, use this table to determine the best approach for your specific situation. A system crash requires a different recovery path than an accidental deletion.
Recovery Method Success Rates
| Method | Best Used For | Success Rate | Time Required | Recent Data Retention |
| AutoRecover (Method 1) | App crash, System freeze, Power outage | High | < 5 Minutes | High (Last 10 min snapshot) |
| Temporary Folder (Method 2) | “Don’t Save” errors, AutoRecover failure | Medium | 10-15 Minutes | Variable (Depends on cache) |
| Time Machine | Permanently deleted files, Older versions | High (If active) | 15+ Minutes | High (Depends on backup schedule) |
Recommendation:
If Word crashed or your Mac shut down unexpectedly, begin immediately with Method 1 (AutoRecover). This is the standard protocol designed by Microsoft for Word crash recovery. If you cannot find the file there, or if the Document Recovery pane did not appear, proceed to Method 2 to search the macOS temporary folder via Terminal.
Method 1: Use Word AutoRecover Mac to Restore Lost Work
Word AutoRecover on Mac is a built-in protection mechanism that takes a snapshot of your open document at set intervals (the default is every 10 minutes) and can even help you recover deleted Word documents on Mac in certain loss scenarios. When the application closes unexpectedly, this AutoRecover file is your best hope.
Typically, Word will attempt to open this file automatically in a “Document Recovery” pane the next time you launch the app. However, if that pane does not appear, you must manually locate the file. This file is stored in a hidden library folder that you cannot browse to by clicking through standard Finder windows.
How to Locate the AutoRecover Folder
1. Open Finder.
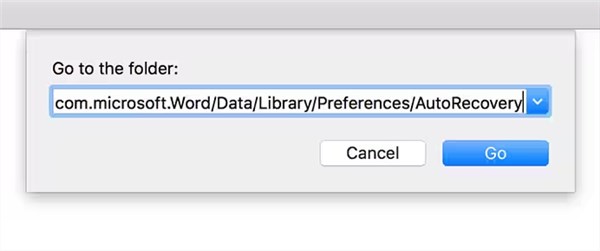
2. In the menu bar at the top of your screen, select Go > Go to Folder… (or press Shift + Command + G).
3. Copy and paste the path below exactly: ~/Library/Containers/com.microsoft.Word/Data/Library/Preferences/AutoRecovery. Do not try to type it manually, as a single typo will result in an error.
4. Click Go.
Note on the File Path: The tilde symbol (~) at the beginning of the address is essential. It tells macOS to look inside your specific user profile rather than the general system files. If you omit this character, the folder will not open.
5. Once inside this folder, look for files starting with AutoRecovery save of:
- If you find a file that matches your document, do not open it immediately.
- Copy the file and paste it onto your Desktop.
- Rename the file on your Desktop by adding the .docx extension to the end.
- Open the new file to check your data.
What if the AutoRecover Folder is Empty?
If you navigate to this folder and find it empty, it usually indicates that Word did not have enough time to create the first AutoRecover snapshot (typically requires the file to be open for at least 10 minutes), or the file was closed manually and may now require a different approach, such as attempting to recover deleted files from Trash on Mac if the document was removed. If this method yields no results, proceed immediately to the temporary folder solution below.
Method 2: Recover Unsaved Word File Mac via the Temporary Folder
If the AutoRecovery folder is empty, the next step is to search the macOS temporary folder. Your Mac uses this directory to hold data while applications are running. Occasionally, when Word fails to move the file to the AutoRecover location during a crash, an artifact or “work file” remains here.
This method targets the recover unsaved word file Mac query for users who cannot find the standard recovery pane. Accessing this folder requires a specific Terminal command.
Steps to Access Temporary Items
1. Open Terminal. You can find this by pressing Command + Space and typing “Terminal,” or navigating to Applications > Utilities > Terminal.
2. Type the following command exactly and press Enter: open $TMPDIR
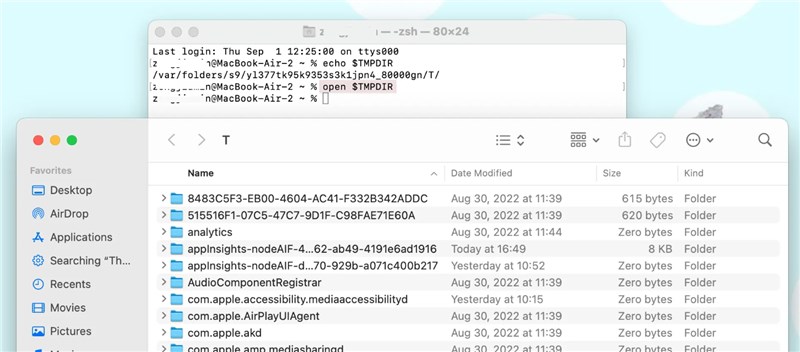
3. A Finder window will open. Warning: You will likely see a long list of folders with confusing names (caches, system logs, etc.). Do not delete or move these folders, as they are actively used by your operating system.
4. Scan the list specifically for a folder named TemporaryItems and open it.
Inside TemporaryItems, look for unsaved Word files. Note that the filenames will likely be generic (e.g., ~WRL001.tmp) or differ completely from your original title.
While inside this folder, keep an eye out for directories labeled “Word Work Files.” These often contain the cached data you need. Even if the file name looks like gibberish, check the File Size and Date Modified timestamp. If you see a file created around the time of your crash with a file size larger than 0 KB, it is likely your document. Restore it by dragging it to the Desktop and changing the extension to .doc or .docx.
Method 3: Recover Text from a Corrupted or Crashed File
In some scenarios, you may successfully locate a file artifact using the previous methods, but Word refuses to open it, citing corruption. This frequently happens when you attempt to recover a Word document after a crash on a Mac, or when you need to recover data from a crashed hard drive after the system restarted unexpectedly while the file was being written to disk.
Microsoft Word includes a powerful but hidden tool designed to strip away corruption and extract raw text.
How to Use the Text Recovery Converter
1. Open Microsoft Word and open a blank document.
2. Go to File > Open in the main menu bar.
3. Navigate to the corrupted file or temporary file you recovered in Method 1 or 2.
4. Do not double-click the file yet. Look at the bottom of the “Open” dialog box for a dropdown menu labeled Enable (sometimes labeled “Show”).
5. By default, this is set to “All Word Documents.” Click it and change the setting to Recover Text from Any File.
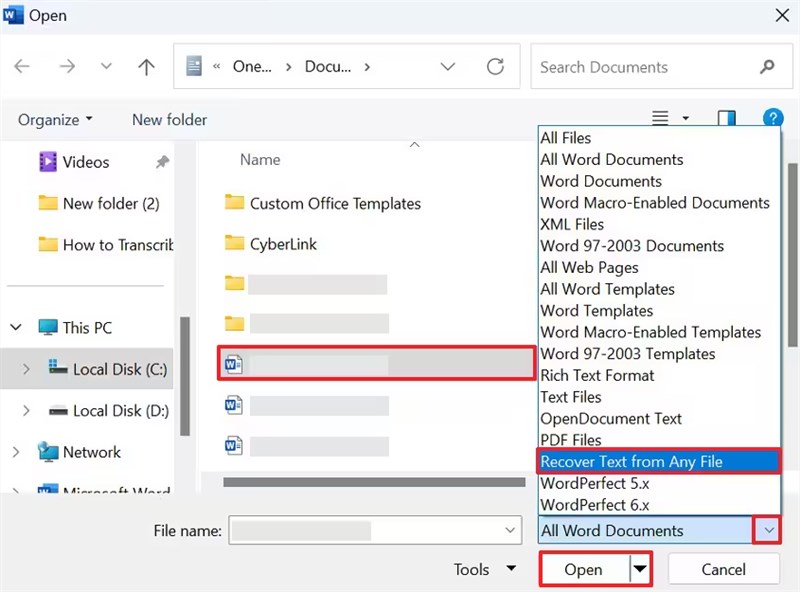
Once you open the file with this setting, Word will discard formatting codes, images, and layout settings to salvage the text content. While you may lose bolding or specific fonts, this technique often retrieves the paragraphs and data that would otherwise be unreadable.
Why It Happened: The “Risk Gap” in Word
Here is a critical distinction that many users learn the hard way. Understanding this will explain why your file wasn’t where you expected it to be.
WARNING: The Difference Between AutoSave and AutoRecover
- AutoSave and AutoRecover are NOT the same feature.
- AutoSave only works if your file is stored on OneDrive or SharePoint. It saves every few seconds to the cloud.
- AutoRecover is for files stored on your local Mac hard drive. It only saves a temporary snapshot every 10 minutes.
The Risk Gap
If you are working on a local file (on your Desktop or Documents folder) and your computer crashes 9 minutes after the last AutoRecover snapshot, those 9 minutes of work are lost. The next snapshot had not yet been written to the disk.
This distinction is vital for Office 365 Word Mac users. If you see “AutoSave is Off” in the top left corner of the Word window, you are relying entirely on the 10-minute AutoRecover interval. To ensure real-time protection, the file must be moved to the cloud.
Prevention Checklist: Never Lose a Word Doc Again
Once you have recovered your data, take two minutes to change your settings. You can eliminate the “Risk Gap” almost entirely with a simple preference adjustment.
1. Shorten the AutoRecover Interval
By default, Word leaves you vulnerable for 10 minutes at a time. Shortening this reduces potential data loss to a minimal window.
- Open Word and go to Word > Preferences in the menu bar.

- Select Save (disk icon).
- Locate the “Save AutoRecover info every X minutes” box.
- Change the value to 1 minute.
2. Leverage OneDrive for Version History
For the highest level of security, save documents directly to OneDrive. This activates AutoSave, which saves your work continuously.
More importantly, OneDrive creates a detailed Version History. If you accidentally delete a paragraph or make unwanted changes, you can right-click the file in OneDrive, select “Version History,” and roll back to the version from 10 minutes (or 10 days) ago. This effectively resolves the issue of a recovered version missing recent edits and protects you against human error, not just system crashes.
Frequently Asked Questions About Mac Word Recovery
Q1. Can I recover a Word document if I clicked “Don’t Save” on Mac?
This is the most difficult recovery scenario. When you explicitly click “Don’t Save,” you are technically instructing Word to delete the temporary changes and clean up the AutoRecover files. However, you should still attempt Method 2 (Temporary Folder) immediately. The system does not always purge these files instantly. If the temp folder is empty, your best remaining options are checking for a Time Machine backup or using professional data recovery software.
Q2. How do I open the Document Recovery pane in Word for Mac?
The Document Recovery pane should trigger automatically the next time you launch Word after a crash. If it does not appear, it usually means the AutoRecover file is corrupted or was never created. You cannot manually force this pane to open; you must manually browse to the AutoRecover path listed in Method 1.
Q3. Why are my recovered files labeled as “Word Work Files”?
“Word Work Files” are temporary cache files created by Word to manage memory during operation. If your Mac crashes, these files are left behind in the Temporary Items folder. They often lack proper file extensions (.docx), so you may need to rename them or use the “Recover Text from Any File” method to view the contents.
Q4. Can I recover an unsaved Word document after a Mac restart?
Yes. If the restart was caused by a crash, freeze, or power outage, the AutoRecover file usually persists on the disk. However, if you performed a controlled restart (Apple Menu > Restart) and clicked “Don’t Save” when prompted, the recovery chances are lower. Always check the AutoRecover folder first.
Conclusion
Losing hours of work is a stressful experience, but the data is rarely gone forever. Whether you are dealing with a Word document closed without saving Mac error or a full system crash, the solution lies in knowing exactly where to look—and having data recovery tools for Mac as a fallback if built-in options fail. By systematically checking the Word AutoRecover Mac folder path and the macOS temporary folder, you have a strong chance of retrieving your work.
To avoid this anxiety in the future, take a moment right now to open your Word Preferences and lower the AutoRecover interval to 1 minute. These simple adjustments ensure that even if technology fails, your work remains safe.

Joy Taylor is a seasoned technical writer with over a decade of experience in mobile technology. At iMobie, she specializes in producing in-depth content on iOS data recovery, iPhone unlocking solutions, and iOS troubleshooting.
Product-related questions? Contact Our Support Team to Get Quick Solution >
