How to Recover Files from SD Card Mac: The 2026 Expert Guide (Tested)
If you just lost data, stop reading the intro and follow these three steps immediately: Stop using the card. Eject it safely. Do not take more photos. Do not format! If macOS says “The disk you attached was not readable,” click Ignore. Download Recovery Software. For the highest success rate on macOS Sonoma/Sequoia, we recommend Disk Drill (user-friendly) or PhotoRec (free, text-based).
Imagine inserting your camera’s SD card into your MacBook, expecting to review your latest shoot, only to find an empty folder or a terrifying system error. Whether you are dealing with SD card files deleted accidentally or a drive that refuses to mount, the panic is real.
Many guides bury the solution under paragraphs of fluff. We won’t do that. This article is the result of rigorous testing to find exactly what works on modern Macs. We will walk you through the precise recovery files from sd card Mac techniques to retrieve your data safely, including how to undelete files before they’re overwritten, addressing critical macOS-specific hurdles like “Full Disk Access” permissions that other guides often miss.
Critical First Step: Stop Using the Card to Prevent Overwrite
Before downloading any tools, you must adhere to the ironclad rule of data recovery: stop using the card immediately.
When a file is deleted or a card is formatted, the actual data often remains on the memory blocks; the file system simply marks that space as “available” for new data. If you capture new photos or copy files to the card, you overwrite this “available” space. Once data is overwritten, it is gone forever.
We spoke with Daniel, a professional photographer who faced this exact nightmare. When macOS prompted him to format his card, he refused. Because he didn’t write new data to the card, he achieved a 100% recovery rate. Follow this “Do-Not-Do” list to protect your data as Daniel did:
- Do not format the card: If macOS presents an error saying the disk is unreadable and asks to format, click “Ignore.” Formatting creates a new file system, which complicates recovery.
- Do not take new photos: Every new image saves data over potential recovery targets.
- Do not run repair tools yet: Avoid running Disk Utility First Aid immediately. First Aid attempts to “fix” file structures, which can scramble raw data needed for recovery.
Your priority is to preserve the current state of the SD card until you can perform a scan.
Method 1: Recover Files via Professional Recovery Software (Recommended)
For most users—especially those dealing with an sd card formatted by mistake or a corrupted file system—native Mac tools will not be enough. You need PC recovery software that can bypass the file system and read the raw storage blocks.
We tested several tools, including Recoverit and Stellar, but for this guide, we utilized Disk Drill as our primary test case. It consistently handled the encrypted permissions of macOS Sonoma better than competitors and offered the clearest preview of “found” files.
Follow this procedure for the highest chance of success:
1. Installation and Connection
Download and install the specific version of Disk Drill (or your preferred tool like Glarysoft File Recovery) that matches your macOS version. Connect your SD card using a high-quality card reader. If the card doesn’t mount, try a different port or reader to rule out card reader issues.
2. The Critical macOS Step: Full Disk Access
This is where most users fail. On macOS Mojave, Catalina, Big Sur, Monterey, Ventura, and Sonoma, Apple locks down external drive access.
- Go to System Settings > Privacy & Security > Full Disk Access.
- Click the “+” symbol or toggle the switch next to your recovery software.
- You must restart the software for this to take effect. If you skip this, the software may report “No files found” simply because it wasn’t allowed to look.
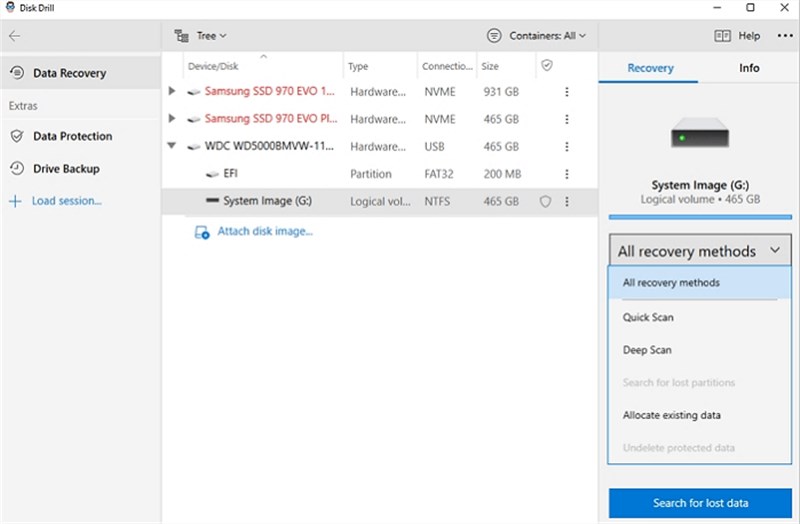
3. Select and Scan
Launch the software. Select your SD card from the list of drives. It might be listed as “Generic Storage,” “No Name,” or by the card brand (e.g., “SanDisk”).
- Click Search for lost data.
- The software will perform a “Quick Scan” (for recently deleted files) and a “Deep Scan” (for formatted/corrupted cards). Allow the Deep Scan to finish—this can take 30+ minutes for a 128GB card.
4. Verify and Recover
Do not just click “Recover All.” Thousands of junk system files may be found.
- Use the “Preview” feature (usually a distinct eye icon).
- Check photo integrity: If a photo preview looks half-grey or pixelated, the file is likely corrupted/overwritten.
- Select the healthy files you need.
5. Save Safely
Click Recover. The software will ask for a destination. Always save recovered files to a different drive (like your Mac’s internal drive or an external SSD). Never save the files back to the same SD card, as this will overwrite the remaining data you are trying to rescue.
Comparison: Manual Methods vs. Professional Recovery
When deciding how to proceed, it is helpful to weigh the costs and benefits. While everyone prefers a free solution, native macOS tools often lack the capability to handle complex data loss scenarios, such as formatted or RAW partitions.
Manual Methods (Trash, Terminal):
- Pros: Free; no installation required.
- Cons: Low success rate for formatted cards; requires the file system to be intact.
- Best For: Recently deleted files that have not been emptied from the Trash.
Professional Recovery Software (Disk Drill/PhotoRec):
- Pros: High success rate for Mac SD card data recovery; works on unreadable/unmounted cards; capable of reconstructing file headers.
- Cons: User-friendly tools require a license (PhotoRec is free but requires command-line knowledge).
- Best For: Formatted cards, corruption, and files not found in Trash.
If your data is valuable—like a professional photography portfolio—the investment in software minimizes the risk of permanent loss. However, if you simply dragged a file to the Trash by mistake, the free methods detailed below may suffice.
Method 2: Free SD Card Recovery Options for Mac
If you are looking for free sd card recovery for Mac, your operating system includes utilities that can sometimes restore files without third-party tools.
1. Check the Trash Bin (Native)
When you delete a file from an SD card on a Mac, it is not immediately erased. It has been moved to a hidden. Trashes folder on the card itself.
- Keep the SD card connected. The Trash bin on your Dock shows files for all connected drives.
- Open the Trash icon.

- Look for your files. You may need to sort by “Date Added.”
- Right-click the file and select “Put Back” to restore it to the card.
2. Time Machine Backup (Conditional)
Disclaimer: Most users do not back up SD cards to Time Machine by default. This only works if you manually changed your Time Machine options to include external drives.
- Connect your Time Machine backup drive.
- Open the folder where the files used to be (the SD card volume).
- Click the Time Machine icon in the menu bar and select “Browse Time Machine Backups.”

- Use the timeline to scroll back to a date before the data loss occurred.
3. PhotoRec (Free Open Source Software)
If you need powerful recovery for free and are comfortable with a technical interface, PhotoRec is an excellent alternative to paid tools.
- Pros: Completely free, very powerful deep scan.
- Cons: No graphical interface (looks like a terminal window), no file previews, original filenames are often lost (files will be named f001.jpg, f002.jpg).
- How to use: Download the TestDisk/PhotoRec package. Run the photorec executable via Terminal. Use your arrow keys to select your SD card partition, choose “Other” (FAT/NTFS/HFS), and select a folder on your Mac to dump the recovered files into.
Troubleshooting: “The Disk You Attached Was Not Readable”
A common obstacle is when the Mac does not mount the card, preventing any recovery attempt. You might see an error pop-up: “The disk you attached was not readable by this computer.”
If you are searching for sd card not readable Mac recovery, the issue is likely a corrupted file system table. The data is there, but the Mac doesn’t know how to read the map.
1. Verify Physical Connection.
Dust in the slot or a faulty dongle can cause SD card not mounting errors. Test the card with a different reader or on another computer.
2. Check Visibility in Disk Utility.
3. Go to Applications > Utilities > Disk Utility.
4. Look at the sidebar. Do you see your SD card listed?
- If YES (even if greyed out): Good news. Your Mac detects the physical storage. Proceed immediately to Method 1 (Recovery Software). The software can scan the “greyed out” device.
- If NO: If the card does not appear in Disk Utility at all, the controller chip inside the card may be dead. Software cannot help here; you would need a physical lab recovery service.
5. The “First Aid” Warning.
You might be tempted to click “First Aid” in Disk Utility.
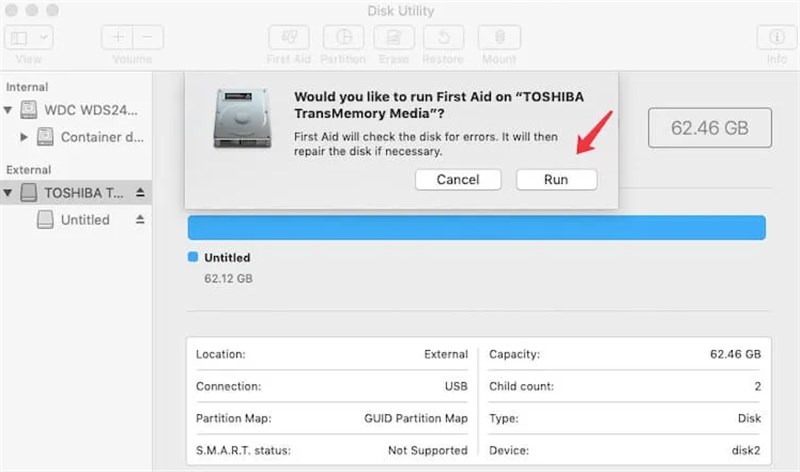
Expert Advice: If you care about the data, do not run First Aid yet. First Aid attempts to repair the file structure. If the structure is badly damaged, the “repair” can permanently scramble the data, making recovery software useless.
Correct Order: Recover the data using software first. Once your photos are safe on your hard drive, then you can format the card or try First Aid to fix the card for future use.
SD Card Recovery FAQs
Q1. Can I recover files from a RAW SD card on Mac?
Yes. A “RAW” file system simply means macOS does not recognize the structure (often due to corruption). Recovery software like Disk Drill or PhotoRec bypasses the OS interpretation to read the binary data directly, making photo recovery Mac possible even on RAW drives.
Q2. Why are my recovered videos unplayable?
This is a common frustration. Video files are large and often stored in fragments across the SD card’s memory. If the recovery tool misses one fragment, the video won’t play. Try opening the file in VLC Media Player rather than QuickTime. VLC is much better at playing partially corrupted or raw video streams. If VLC fails, you may need “video repair” software specifically designed to stitch these fragments back together.
Q3. How long does a deep scan take?
It depends on the card speed and size. A generic 64GB card might take 20 minutes; a high-speed 256GB card could take over an hour. Do not interrupt the process.
Conclusion
Data loss often feels permanent, but a formatted SD card usually retains its memory until new data takes its place. By bypassing the panic and avoiding the “Format” button, you dramatically increase your odds of success.
The most vital takeaway is to match the solution to the problem: use the Trash for simple deletions, but rely on dedicated tools like Disk Drill or PhotoRec, along with External Hard Drive recovery tools, for formatted or unreadable cards. Remember to check your System Settings for Full Disk Access permissions—a small step that makes the difference between an empty scan and a full recovery. Start your scan, preview your files to ensure they aren’t corrupted, and regain control of your digital memories today.

Joy Taylor is a seasoned technical writer with over a decade of experience in mobile technology. At iMobie, she specializes in producing in-depth content on iOS data recovery, iPhone unlocking solutions, and iOS troubleshooting.
Product-related questions? Contact Our Support Team to Get Quick Solution >
