How to Recover Lost Partitions on Windows 10 & 11: The Safe Recovery Guide (2026)
Whether a partition disappeared after an update, power outage, or accidental deletion, recovery may still be possible. This 2026 guide covers the safest workflow to recover lost partitions on Windows 10 and 11, plus tips to protect your data before making changes.
Editor’s Note: This guide references hands-on testing conducted on standard Windows 10 and 11 workstations using both SSD and HDD configurations. We simulated partition deletion and table corruption to verify the safety and efficacy of the recovery methods described below, specifically testing tools like TestDisk, EaseUS Partition Master, and MiniTool Partition Wizard.
Connecting a storage device only to find your critical work files missing is a moment of pure dread. You plug in your external drive, expecting to see your folders, but instead, you see an empty bar or a prompt asking you to format.
If you are staring at a blank screen and facing the panic of potential data loss, take a deep breath. The situation is rarely permanent. When a partition disappears, the actual data usually remains on the disk; it is merely the “map” (the Partition Table) to that data that has been misplaced.
In this guide, we will walk you through how to safely restore your access without Hard Drive recovery software. We prioritize methods that protect the integrity of your drive, specifically helping you recover a lost partition on Windows 10 or 11 without making the situation worse.
We have validated these steps across multiple scenarios, including accidental deletion via Disk Management and corruption caused by improper drive ejection.
Stop! Do Not Format or Initialize
If Windows prompts you to format the drive immediately after you connect it, or if Disk Management asks to “Initialize Disk,” you must stop immediately.
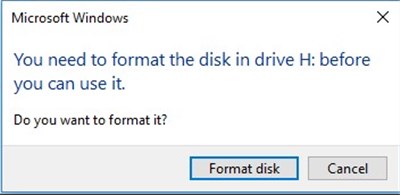
Do not click “Yes,” “OK,” or “Initialize.”
The Expert Insight: The Risk of User Overwrite
The single biggest risk to your data right now is not the initial error, but what you do next.
- Formatting writes a new file system structure over your old data.
- Initializing the disk writes a new partition table signature, erasing the breadcrumbs recovery software needs.
- Creating a new partition in the unallocated space overwrites the specific sectors where your old file headers resided.
When a partition disappears, the file system metadata (the map telling Windows where files are) is damaged, but the files themselves are likely untouched. Treat the drive as fragile and read-only until the partition structure is restored.
Diagnosis: Is Your Partition Unallocated, RAW, or Hidden?
To select the correct solution, you must first identify exactly how Windows views the problem drive. We will use the built-in Windows tool, Disk Management, to diagnose the specific error state.
How to Check Your Partition Status
1. Right-click the Start button and select Disk Management.
2. Locate your external hard drive or SSD in the list (identify it by the disk capacity, e.g., “Disk 1 – 931 GB”).
3. Observe the status block representing your partition.
The Three Common Error Scenarios
You will likely see one of three distinct conditions. Each requires a specific fix.
1. Unallocated Space (Black Bar)
If the block representing your drive is black and labeled “Unallocated,” the partition table entry for that volume has been deleted or corrupted. Windows sees this as empty space available for use.
- Status: Critical (Partition Table Loss).
- Solution: You must use Partition Recovery Software (See Section 4).
2. RAW Partition (Blue Bar)
If the bar is blue but the file system is listed as “RAW” rather than NTFS, exFAT, or FAT32, the partition exists, but the file system is corrupted. Windows cannot read the internal structure.
- Status: File System Corruption.
- Solution: Requires Recovery Software or careful repair (See Section 4 or 6).
3. No Drive Letter (Hidden)
If the bar is blue and reads “Healthy (Primary Partition)” but has no letter (like D: or E:) assigned to it, the partition is simply hidden.
- Status: Minor Configuration Error.
- Solution: Easily fixed via Windows settings (See Section 6, Method 1).
Recovery Options: Choosing the Right Tool
When your partition is “Unallocated” or “RAW,” Windows cannot fix it natively without destroying data. You need third-party PC reocvery tools to rebuild the partition table.
Option A: Professional GUI Tools (Recommended for Most Users)
For most users, we recommend EaseUS Partition Master or MiniTool Partition Wizard.
- Why: They offer a “Partition Recovery Wizard” that visually scans the drive and rebuilds the map without requiring command-line knowledge.
- Cost: Most offer a free trial to scan and preview data, though restoring the partition usually requires a license.
- Safety: They operate in “Read-Only” mode during the scan, preventing accidental data overwrites.
Option B: TestDisk (Free & Open Source)
- Why: It is completely free and very powerful.
- Cost: $0.
- Difficulty: High. It runs in a command-line interface (DOS-style) and lacks a mouse cursor.
- Risk: Higher risk of user error. If you accidentally select the wrong cylinder or head geometry, you can render the drive unreadable. Recommended only for the “DIY Fixer” comfortable with text interfaces.
The Reliable Fix: How to Restore Partitions with Software
If your drive shows as Unallocated or RAW, this is the standard recovery workflow. For clarity, we will describe the process using the interface logic common to tools like EaseUS Partition Master or MiniTool Partition Wizard, as these provide the safest user experience.
Step 1: Select the “Partition Recovery” Tool
- Download and launch your chosen software (e.g., MiniTool Partition Wizard or EaseUS). Do not install the software on the same drive you are trying to recover.
- Look for a feature explicitly named “Partition Recovery” or “Partition Recovery Wizard.” Do not simply run a “Data Recovery” scan yet—we want to restore the whole partition structure first.
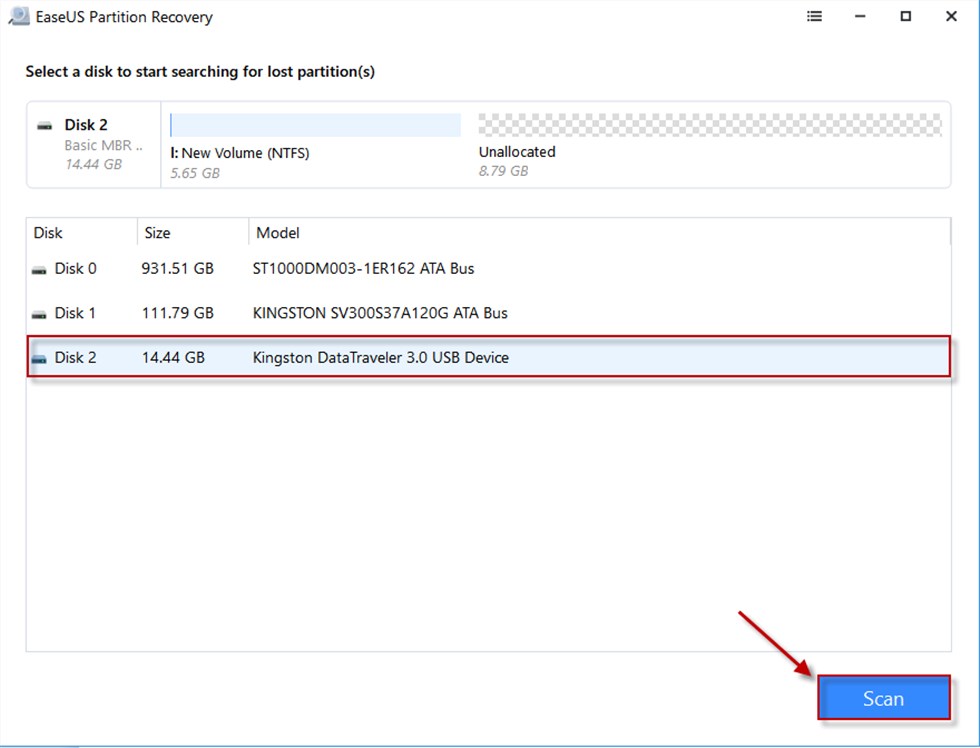
Step 2: Scan the Target Disk
- Select the physical disk (e.g., Disk 2) that contains the lost partition.
- Choose a scanning range (usually “Full Disk”).
- Select a scanning method (start with “Quick Scan”; if that fails, use “Deep Scan”).
Step 3: Preview the Partition (Critical Step)
- Once the scan finishes, the software will list “Lost Partitions” it found. Do not click Recover yet.
- Double-click the listed partition to open the file browser.
Verify Integrity: Can you see your folder structure? Are your photos labeled correctly (e.g., “Vacation.jpg” vs “FILE0025.jpg”)?
The “Garbled” Warning: If the file names appear as strange symbols or generic alphanumeric strings, the file system is heavily damaged. Restoring this partition might result in unreadable data. In this case, you may need to switch to “Data Recovery” mode to extract files individually rather than restoring the partition table.
Step 4: Restore and Apply
If the preview looks correct, select the partition and click “Finish” or “Recover.”
Crucial Final Step: Most of these tools require you to click an “Execute Operation” or “Apply” button in the main toolbar to actually write the changes to the disk. Once applied, the disk should reappear in Windows File Explorer immediately.
Manual Fixes for the “DIY Fixer” (CMD & DiskPart)
If you identified your issue as a simple missing drive letter (Section 3, Case 3) or if you are attempting to repair a RAW file system, you can try these manual Windows methods.
Method 1: Assign a Drive Letter via DiskPart
Use this only if the partition is “Healthy” but hidden.
1. Press Win + R, type diskpart, and hit Enter.
2. Type list volume and identify your hidden partition by its size.
3. Type select volume X (replace X with your specific volume number).
4. Type assign letter=Z (replace Z with an available letter like K or L).
5. Type exit to close the tool. Check File Explorer to see if the drive has reappeared.
Method 2: Fix RAW Partitions with CHKDSK
Use this with extreme caution for RAW drives.
⚠️ CRITICAL WARNING: Destructive Action
The chkdsk command attempts to repair logical file system errors by moving data and “fixing” orphans. If your drive is failing physically, or if the corruption is severe, CHKDSK can permanently destroy data by converting your files into .chk fragments.
Recommendation: We strongly advise cloning your drive or recovering your data to a backup location before running this command.
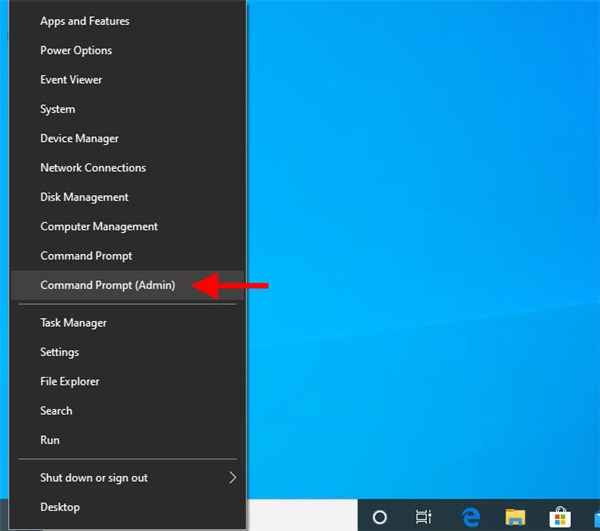
1. Open Command Prompt as Administrator.
2. Type chkdsk X: /f /r (replace X with your RAW drive letter).
3. Press Enter.
If chkdsk reports “The type of the file system is RAW” and refuses to run, stop immediately. The damage is too severe for CMD. You must return to the software methods in Section 4 to extract your data.
Why Partitions Disappear: MBR, GPT, and SSDs
Understanding why this happened can help you prevent a recurrence.
The Table of Contents is Missing
Think of your hard drive as a massive book. The data (your photos) are the pages, and the Partition Table (MBR or GPT) is the Table of Contents. When a partition is “lost,” the Table of Contents has been torn out. The pages are still there, but Windows doesn’t know where they start or end.
- MBR (Master Boot Record): Older standard, highly susceptible to corruption from improper ejection.
- GPT (GUID Partition Table): Modern standard. It stores redundant copies of the partition headers, making it more resilient to corruption.
A Critical Note on SSDs and TRIM
If you are trying to recover data from SSD after a lost partition, speed is essential. Modern SSDs use a command called TRIM to wipe blocks of data marked as “deleted” to maintain performance.
While losing a partition is technically different from deleting a file, some drive controllers may interpret the “Unallocated” status as a signal to TRIM those sectors. If this happens, the data can become unrecoverable. If you’re on an SSD, don’t leave the drive idle for days—run your recovery scan immediately.
Final Advice: Secure Your Data Today
Data loss is stressful, but panic leads to mistakes. By prioritizing read-only recovery tools like EaseUS or MiniTool—and avoiding destructive actions like Format or Initialize—you maximize your chances of success when trying to recover deleted YouTube videos, files, and other valuable data before it gets overwritten.
Once your partition is restored:
- Backup Immediately: Copy your critical files to a cloud service or a secondary physical drive.
- Check Drive Health: Use a tool like CrystalDiskInfo to check the S.M.A.R.T. status of your drive. If the drive health is “Caution” or “Bad,” the partition loss was a symptom of hardware failure. Replace the drive immediately.
Don’t wait for the next crash. Regain control of your digital life by verifying your drive health today.

Joy Taylor is a seasoned technical writer with over a decade of experience in mobile technology. At iMobie, she specializes in producing in-depth content on iOS data recovery, iPhone unlocking solutions, and iOS troubleshooting.
Product-related questions? Contact Our Support Team to Get Quick Solution >
