How to Screen Record on Android Phones
This article provides a complete guide on how to screen record on Android using various methods. It covers screen recording using built-in features, Google Play Games, Screenify, and ADV Screen Recorder. Now you can record what is happening on your screen.
Ever wished you could share your gaming victory or create a tutorial for a new app with friends? How would you capture it all? The simple answer is screen recording. It allows you to record what’s happening on your screen. If you don’t know how to do it. Don’t worry! This guide will explore how to screen record on Android using different methods.
Whether you’re a Samsung phone user, prefer Google Play Games, or want to explore third-party apps like Screenify and ADV Screen Recorder, we have all the information you need. So, are you ready to record your screen? Let’s get started!
Can You Screen Record on Android?
Yes! You can record your screen on an Android device. Most newer Android devices come with a built-in screen recording feature. This is usually found in the Quick Settings menu that you access by swiping down from the top of your screen.
You can use a third-party app if your device does not have a built-in screen recording feature. It is important to note that the exact steps can vary depending on the Android device model and the version of the OS you are using. So let’s discuss methods on how to screen record on Android.
How to Screen Record on an Android/Samsung Phone via Screen Recorder
Do you want to record the screen on your Android or Samsung device? With your Samsung phone’s built-in Screen Recorder feature, capturing your screen is as easy as a few taps. This feature allows you to record your on-screen activities along with audio. And save it as a video file for future reference or sharing.
Here are the easy steps to help you record the screen on a Samsung phone using a screen recorder.
Step 1. First, swipe down to access your Quick Panel and select Screen Recorder.
Step 2. Choose your preferred Sound Settings. Then tap on Start recording.
Step 3. After selecting Start Recording, your screen recording starts.
Recording Screen
Step 4. Tap the Stop Button when you are ready to stop the video.
It is one of the simplest ways to record Android/Samsung phone screens. However, if it doesn’t work out for you, we have enlisted another method.
How to Screen Record on Andriod Device via Google Play Games
Google Play Games is not just for gaming. This handy app also has a screen recording feature to capture your gameplay. Thus, it is ideal for gamers who want to share their gaming achievements or tutorials.
But did you know you can also use Google Play Games to record the screen for non-gaming apps? Yes, it’s possible! You can use it as a general screen recording tool. Though, it can only record in 480p SD or 720p HD.
Here is a detailed guide on how to screen record on Android with the help of Google Play Games.
Step 1. First, download and install the Google Play Games from the Play Store.
Step 2. Open the Play Games application. Choose a game.
Step 3. At the top of the game details page, Click Record gameplay. Select a video quality setting and then Next.
Step 4. Next, tap Launch. A floating video bubble will appear with recording settings. Click Start Recording.
Step 5. After 3 seconds, the recording of your game will start.
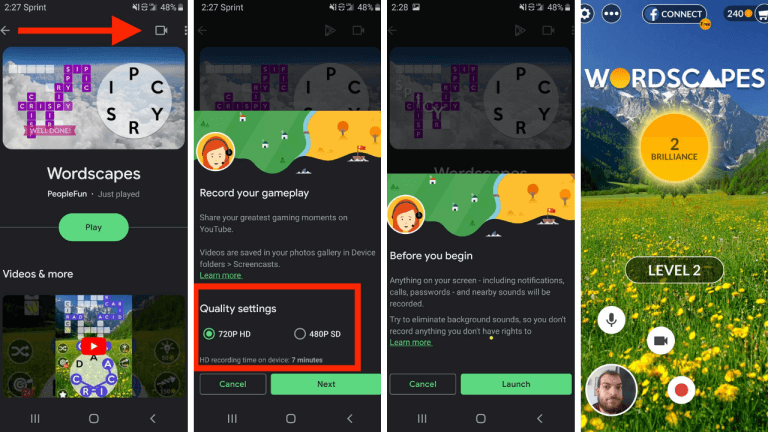
Screen Recording
Step 6. Drag the floating video bubble towards the center of the screen to stop recording and hold it over Close.
You don’t need any technical knowledge to follow these steps. But if you are unsatisfied with this method, you can try the next one.
How to Screen Record on Andriod via Screenify
Are you still wondering how to screen record on Android? Here is an easy solution for you: Screenify. The powerful screen and video recording tool allows you to record screen, webcam, and audio effortlessly. You can record full screen or any part on your computer screen in 1080p HD/4K hassle-free.
The best part is that Screenify records your screen without any time limit or watermark. Besides, you can blur, remove, or change the video background while recording the screen. Also, it enables you to save unlimited recordings locally as you want. So it is a good option to record the screen on Android without any hassle. Let’s have a look at how to use this amazing tool.
Get Screenify free to record your Android screen without limitations.
Free Download * 100% Clean & Safe
Step 1. Download and Install Screenify on Computer.
Step 2. Launch Screenify on your computer, and select Record screen mode.
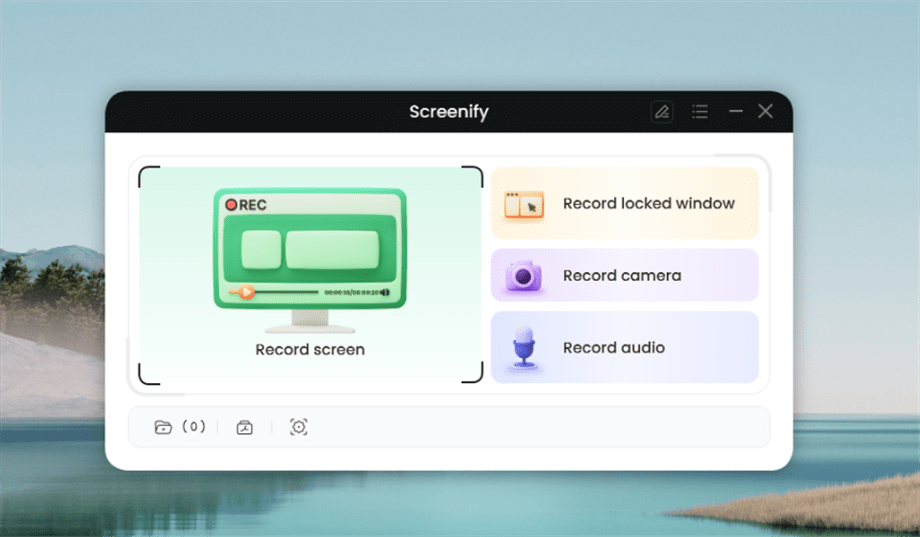
Select Record Screen Mode
Step 3. Configure Recording Settings aims to configure settings like system audio before recording.
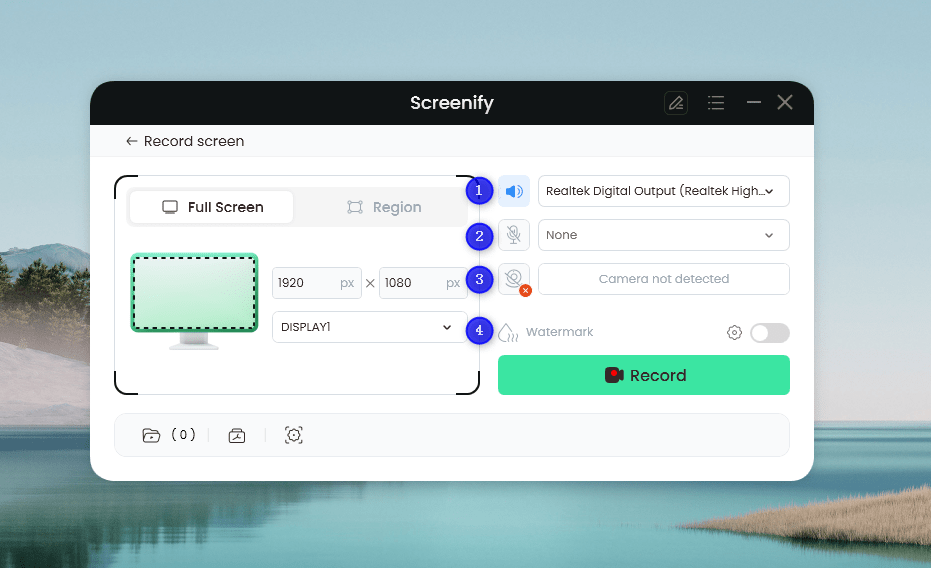
Set Configure Recording Settings
In this setting menu, you can:
1 Choose the System audio.
2 Choose the Microphone you want to record.
3 Choose the Camera you want to use.
4 Choose whether to add a watermark.
Step 4. Select Recording Screen.
Option 1. Full Screen Record
Please select Full Screen mode and choose the display you need to record. Hit Record button to initiate recording.
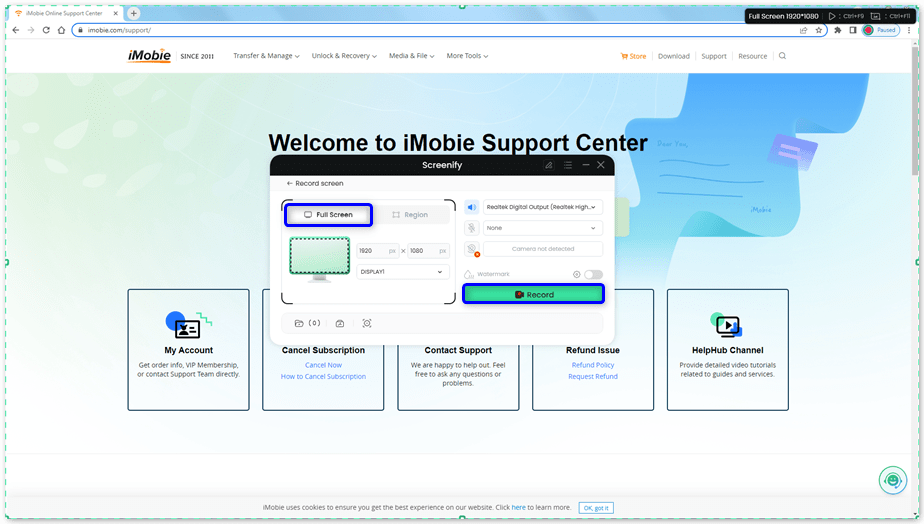
Select Full Screen
Option 2. Region Record
To record region, you need to manually select the recording area. After selection, you can still adjust the selected area. It supports customize selection, full screen, and proportional selection based on common social media dimensions.
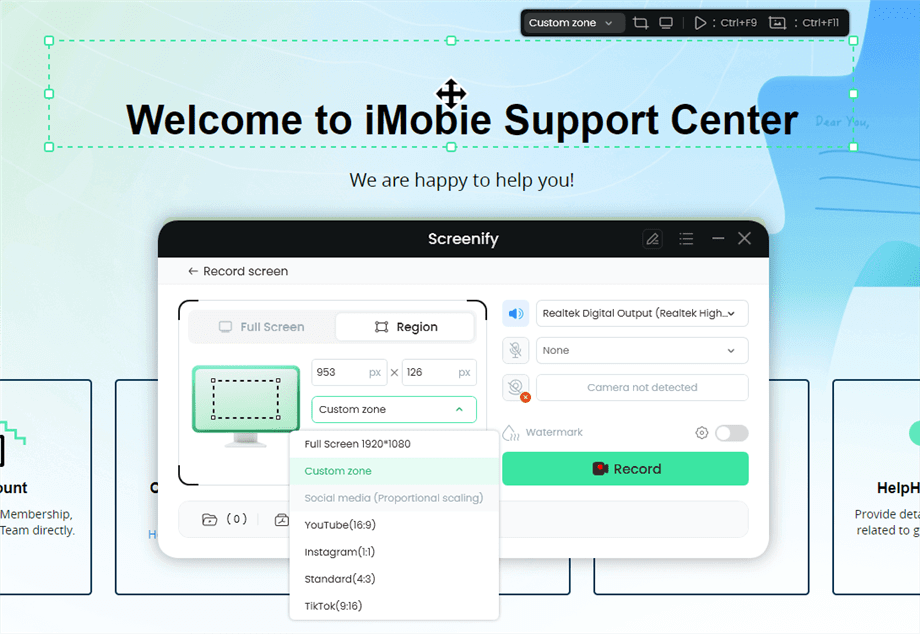
Record Region
Step 5. Wait for the Recording Countdown.
There is a 3-second countdown to help you prepare the recording after you are ready to start recording.
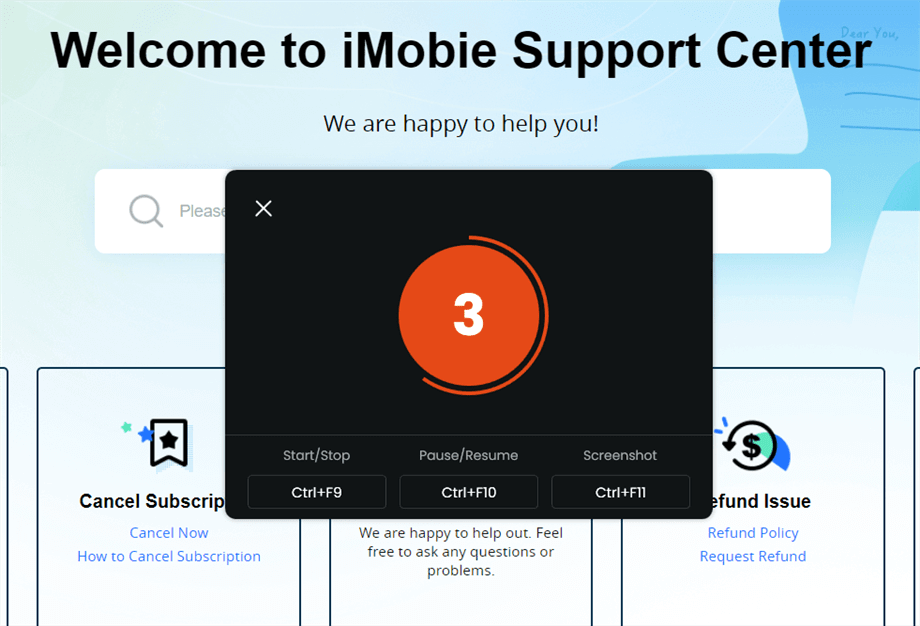
Wait for the Recording Countdown
If you would like to see a recording countdown before your recording starts, you can enable the countdown option. Or you can tap it off. View this post to know how to set the countdown option.
Step 6. Start Recording.
The recording will begin after a 3-second countdown. You can make annotations on the recording interface during the recording.
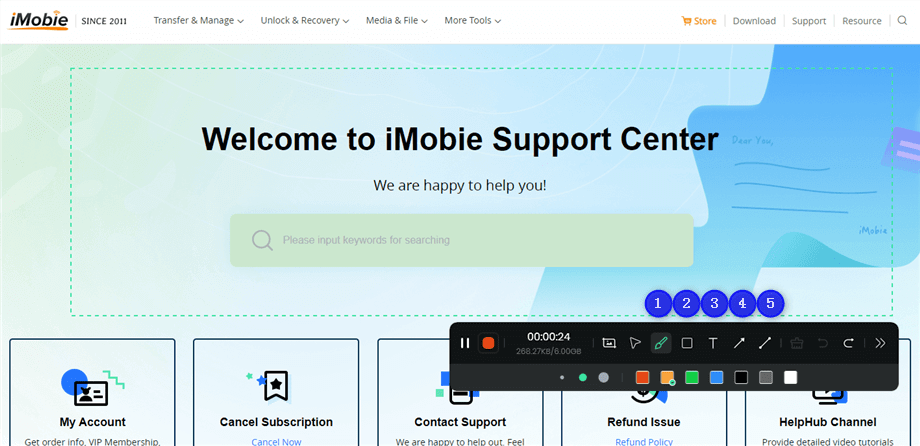
Annotate the Screen during Recording
With the toolbar, you can add the annotation in the screen:
1 Brush: Draw freehand on the screen recording interface to highlight or illustrate specific areas during the recording.
2 Rectangle: Draw rectangular shapes on the screen recording interface.
3 Text: Add written notes or labels directly onto the screen recording interface.
4 Arrow: Draw arrows on the screen recording interface to point out and emphasize specific areas.
5 Line: Draw straight lines on the screen recording interface to underline or connect specific points.
Step 7. Record Screen Process Completed.
When the recording is completed, you can click the red Stop button to end the recording. Your recorded files will be displayed. From here, you can preview and manage the recorded content as needed.
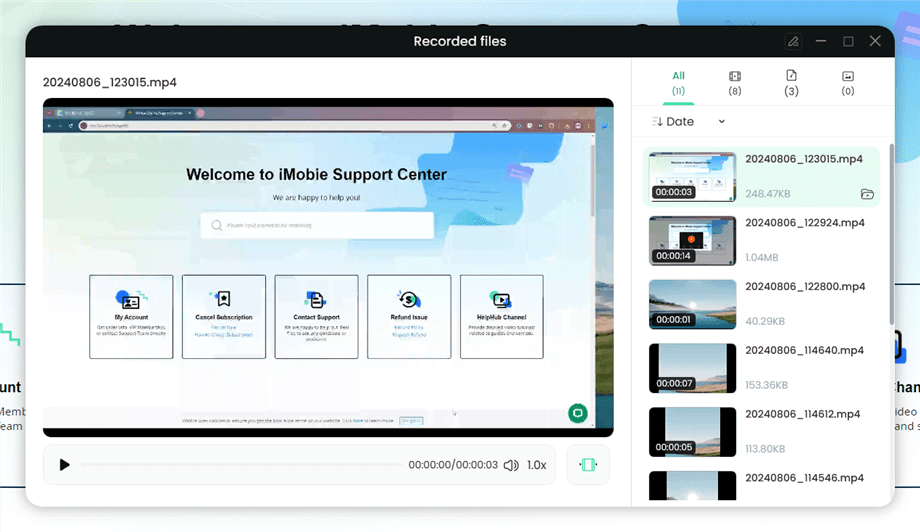
Preview the Recording
You may also want to know: How to screen record protected videos
How to Screen Record on Andriod via ADV Screen Recorder
Are you seeking an easy-to-use tool to record your Android screen? ADV Screen Recorder is the answer. It’s easy to use and works great. You can use it to record tutorials, games, and more. With this app, you can choose from two recording modes.
You can also pause and resume recording. Another fun feature is drawing on the screen while you record. This tool is great for devices without a built-in recorder. Here is a simple step-by-step guide on how to screen record Android using ADV Screen Recorder.
Step 1. Download and install ADV Screen Recorder from the Google Play Store.
Step 2. Open the app and see a small toolbar on your screen. Tap the record button on the toolbar.
Step 3. You will see a three-second countdown before the recording starts.
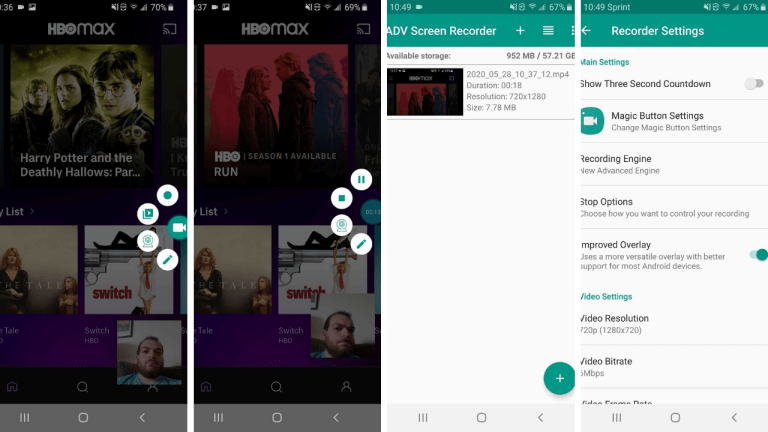
ADV Screen Recorder
Step 4. Pull down the notification shade to stop the recording and tap on the ‘Stop’ button.
Your recording will be saved in your device’s gallery or the app, where you can view, edit, and share it.
Frequently Asked Questions
Can you screen record on Samsung?
Yes! You can screen record on Samsung using the built-in Screen Recorder feature. It allows you to capture your screen effortlessly. You can record the screen and audio and save it as a video file for sharing.
Why can’t I record my screen on Android?
You might face issues while recording screen on Android due to the following reasons:
- Your Android phone runs on Android versions older than 5.0 (Lollipop).
- Some apps, especially streaming services, block screen recording.
- Your Android device doesn’t have enough free storage space for video files.
- The third-party app you’re using is outdated to work with your Android version.
- Your device doesn’t come with a built-in screen recording feature.
How can I record my Samsung screen without a power button?
You can record your Samsung screen without a power button using a third-party app like Screenify. The app offers an on-screen record button. You won’t need the power button to start or stop your recordings.
The Bottom line
So, that’s how to screen record on Android. Whether it’s your Samsung phone’s built-in feature or apps like Google Play Games, Screenify, or ADV Screen Recorder, you have options. With these tools, you can share your screen activity with anyone. If your phone doesn’t have a power button, don’t worry. Apps like Screenify help you record without it. So go ahead, try Screenify free, make those tutorial videos, or capture your gaming wins. Happy screen recording!
Free Download * 100% Clean & Safe

Senior writer of the iMobie team as well as an Apple fan, love to help more users solve various types of iOS & Android-related issues.
Product-related questions? Contact Our Support Team to Get Quick Solution >
