Latest Guide on Fixing iPhone Ear Speaker Not Working Issues
iPhone ear speaker not working? This is an annoying problem. But no worries, we will introduce some effective ways to fix ear speaker not working on iPhone. Try them out and bring your ear speaker back to normal.
AnyFix – Fix Ear Speaker Not Working on iPhone
AnyFix can help check and fix iPhone ear speaker not working issues quickly and securely without data loss. The advanced system repairing technique makes it easier to locate the problem and make a solution. Download AnyFix now and bring your iPhone ear speaker back to normal.
Why My iPhone Ear Speaker Is Not Working?
There are numerous reasons why iPhone ear speaker not working issues could stem up. Below, we have the list of why your iPhone ear speaker isn’t working:
1. Low Volume: Your iPhone volume has a significant effect on whether or not you can hear your respondent during a voice call. If you have a low volume the audibility falls and you may think your iPhone speaker isn’t working.
2. Presence of Dirts in Speaker: The ear speaker which is usually situated at the top of the phone could be filled with dirt that blocks the transmission of sound from the respondent thereby causing the underlying issue.
3. Connectivity Issues: Are you a fan of headphones such as AirPods, earbuds, and others? If so, and you are experiencing ear speaker not working issues on your iPhone, then it could be a connectivity issue. It’s either you’ve made the wrong connection or the headphones aren’t in proximity to your iPhone.
4. Software Issues: Here is another common reason your iPhone ear speaker isn’t working. When you run your iPhone on obsolete iOS or damaged firmware, it displays several issues and ear speaker not working is one of them.
5. Use of Unfitted Accessory: Certain accessories like screen protectors and others that don’t fit your iPhone could also be the reason why you are faced with ear speaker not working issues.
7 Ways to Fix Ear Speaker Not Working on iPhone
With any of the 7 troubleshooting solutions recommended below, it’s possible to fix ear speaker not working on iPhone issues from the comfort of your home:
1. Exit Headphone Mode
Did you connect your headphones to your iPhone and forget to disconnect it before using the ear speaker for your voice call? This could result in the underlying issue as audio will only be transmitted to the headphones. However, you can resolve the problem by simply exiting the headphone mode on your iPhone.
A simple guide to complete this is shared down here:
- Launch Settings on the iPhone.
- Locate the Airplane Mode feature and toggle the slider to turn green. Once Airplane Mode is enabled, connections such as cellular network, WiFi and Bluetooth that are responsible for connecting headphones to an iPhone are automatically turned off.
- After a while, tap on the Airplane Mode slider again, then try hosting a voice call and you will see that the ear speaker not working issue is resolved.
2. Turn Off Noise Cancellation
Noise cancellation is an advanced feature integrated into an iPhone to reduce the ambient noise from the surroundings during a voice call. Though this is good, it might not be needed at some point. In case you have the feature enabled on your device, you should turn it off to fix the ear speaker not working problem encountered on your iPhone.
Follow these steps to turn off noise cancellation on your iPhone:
- Firstly, navigate to the Settings panel by clicking the gear icon on your home screen.
- Tap on Accessibility when the subsequent screen appears.
- Swipe down the options that pop up and select Audio & Visual under the HEARING tab.
- Hit the slider beside Phone Noise Cancellation to show a green color. Afterwards, noise cancellation is turned off and the problem with your ear speaker is fixed.
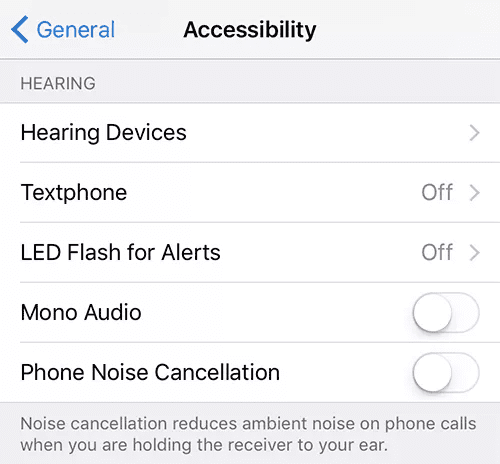
Turn Off iPhone Noise Cancellation in Settings
3. Repair iOS System to Resolve Ear Speaker Not Working Issues
For those ear speaker not working issues caused by system crashes, it’s better to check and fix with AnyFix – iOS system repair tool. It’s skilled in fixing any system-related issues such as iPhone dictation not working, ear speaker not working on iPhone, and more. The software powers a brilliant system repair algorithm that focuses on the underlying issue and not your iOS or data. Thus, you need not worry about data loss when using AnyFix.
Key Features
- 1-click to fix ear speaker not working and 150+ more issues on any iPhone, iPad and Apple TV model.
- Clear more than 200+ iTunes errors and reinstate the operations of your iPhone back to normal.
- It’s readily available for installation on Windows and macOS.
Free Download * 100% Clean & Safe
Stepwise Guide to Repair iOS System to Resolve Ear Speaker Not Working on iPhone:
Step 1: Launch AnyFix. Navigate to where you have System Repair and hit Repair Now.
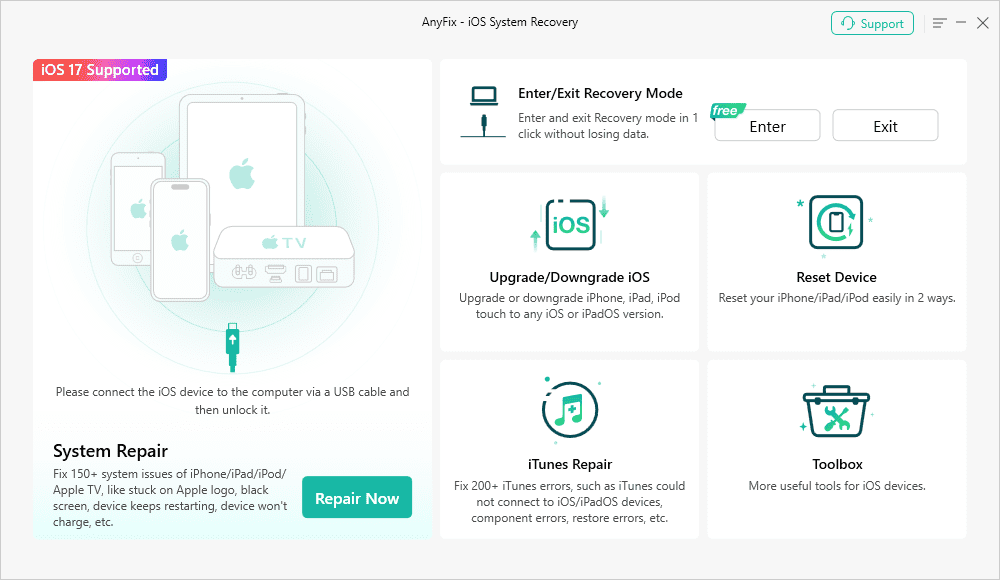
AnyFix Main Screen
Step 2: Proceed to link your faulty iPhone to the computer with the aid of a USB cable. If the connection is done properly, the following screen will come up:
Select Device Bug on the left sidebar and click on Start Now.

AnyFix System Repair Device Bug
Step 3: Choose a repair mode from the 3 options provided on the subsequent screen. Select Standard Repair mode.
Head to the bottom of the screen and click on Standard Mode.
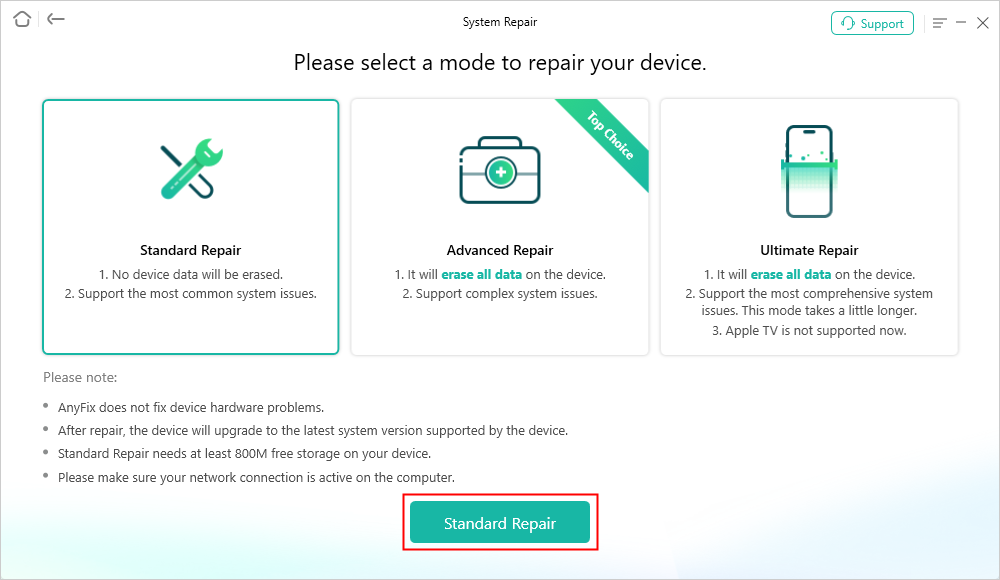
AnyFix Standard Repair
Step 4: Next, your iPhone will be scanned and a suitable firmware package will be recommended. Tap on Download to proceed.
Wait until the download is over, then click on Start Standard Repair when the next screen appears.
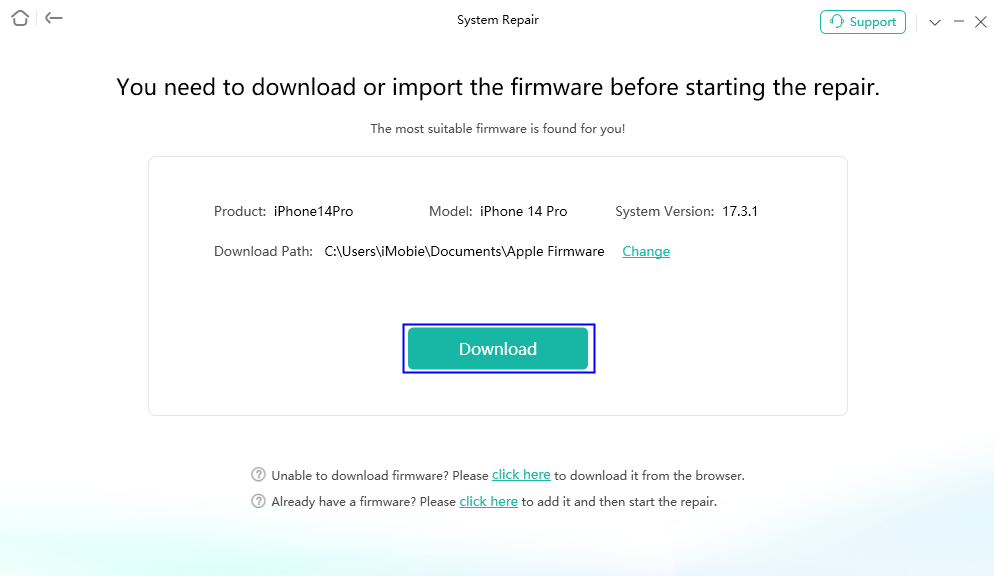
AnyFix System Repair Firmware Download
When the firmware is downloaded, you can click Fix Now. AnyFix will start checking your iPhone and resolve the ear speaker not working issues quickly.
4. Select Ear Speaker as Audio Destination
Flexibility in usage is one of the great qualities of an iPhone and one way to experience this is in the selection of your audio destination. You are allowed to select where your audio should be transmitted, whether via ear speaker, headphone or microphone. Since the underlying issue deals with the ear speaker, you should select ear speaker as your preferred mode audio destination.
To do this, here’s the quick guide you should follow:
- Swipe from the top right corner of your screen to access the Control Centre. Here’s a visual representation of this step to help you understand better:
- Tap on the Audio Card panel to proceed.
- If you are connected to a headphone, click on the Bluetooth icon and a screen similar to the one below will pop up:
- Choose iPhone as your preferred audio destination to complete the guide.
5. Force Restart Your iPhone
Force restart is one of the basic solutions often used to clear the errors and bugs that are causing it to malfunction. It refreshes the entire system and improves the RAM thereby optimizing its functioning.
To do a force restart on your iPhone, you know what model you are using as the procedure differs. Use one of the following illustrative guides that suit you from the procedures below:
iPhone 8/X and Later Model
- Press the Volume Up button and release it.
- Hold the Volume Down button, then release also.
- Now, long press the Side key.
Your iPhone screen will quickly go blank and then display the Apple logo afterward which signals that you’ve successfully force restarted the device.
iPhone 7 series
- Long press the Volume Down and Power buttons together.
- Release both buttons when you see the Apple logo pop up on your screen.
iPhone 6/5 and Older Models
- Hold the Home and Power buttons together at the same time.
- Keep holding until your screen displays the Apple logo.
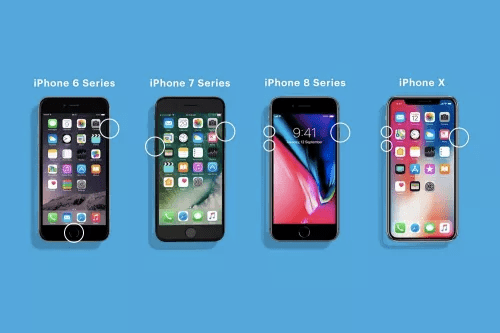
Force Restart iPhone of Multiple Models
6. Clean iPhone Ear Speaker
As previously mentioned, when dirt is trapped in the ear speaker of your iPhone, the audibility is affected. Checking and cleaning the ear speaker from time to time is an effective solution to fix the issue.
To do this, follow the step-by-step guide below:
- Grab a soft-bristled toothbrush or Q-tip and move it across the surface of the speaker gently to remove oil and any other visible dirt.
- Once done, clean the surface of the speaker with a lint-free cloth.
Note: This operation can be performed at any time to avoid future occurrences of ear speaker not working issues.
7. Factory Reset iPhone
With factory reset all wrong custom settings and harmful apps that might be responsible for ear speaker not working problem will be removed as your iPhone is returned to factory mode just like when you newly bought it.
To avoid data loss, we strongly suggest that you backup your device before performing a factory reset on it. Follow these steps if you’ve done this:
- Launch Settings and hit the General tab from the menu of options displayed.
- Scroll down to the new screen that appears and hit the Transfer or Reset iPhone button.
- Tap on Erase All Content and Settings and a screen showing the consequence of your action will appear.
- Select Continue and provide your screen passcode to successfully reset your iPhone.
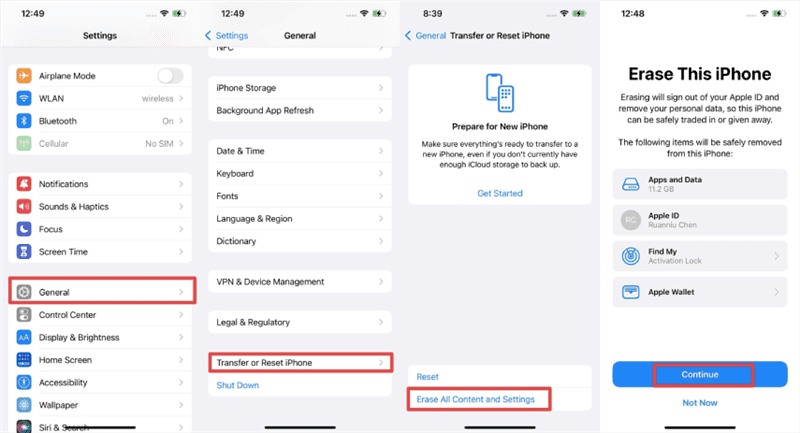
Factory Reset iPhone with Erase
You may also like: How to Factory Reset iPhone Without Passcode
Conclusion
Now you know why your iPhone ear speaker may fail to emit sound properly and the best solutions to reinstate its operation. This post presented 7 free ways to resolve iPhone ear speaker not working issues, choose and apply the one that’s easiest for you. However, our most preferred solution is the one requiring an iOS system repair tool- AnyFix. The software handles this type of problem excellently without causing any damage to any of the data you have in your storage.
Free Download * 100% Clean & Safe

Senior writer of the iMobie team as well as an Apple fan, love to help more users solve various types of iOS & Android-related issues.
Product-related questions? Contact Our Support Team to Get Quick Solution >
