How to Transfer Files from USB or Flash Drive to iPhone/iPad
Want to transfer files from a USB or flash drive to iPhone or iPad? Learn how to copy files directly with the Files app, use AnyTrans for iOS content transfer, or move files through iCloud Drive.
You can transfer files from a USB flash drive directly to an iPhone or iPad without using a computer. On current iOS and iPadOS versions, the Files app can access compatible USB drives, external drives, and SD cards connected to the device.
If you have a USB-C iPhone or iPad, a compatible USB-C flash drive can often connect directly. Lightning models may need an appropriate adapter. If you prefer to move music, videos, books, or other supported content into their iOS content categories instead of simply copying files into Files, you can also use a computer-based transfer tool such as AnyTrans.
Quick answer: Connect the USB drive, unlock your iPhone or iPad, open Files > Browse, select the drive under Locations, then copy or move the files to On My iPhone, On My iPad, or iCloud Drive. USB-C devices can often connect directly; Lightning models may require an adapter.
Transfer Files from USB to iPhone/iPad without Computer
For most users, the Files app is now the easiest and most direct method. Apple currently supports external storage devices such as USB drives and SD cards on both iPhone and iPad.
What Do You Need?
| Your Device | Typical Connection |
| USB-C iPhone | Compatible USB-C flash drive or USB-C adapter |
| USB-C iPad | Compatible USB-C flash drive, hub, or adapter |
| Lightning iPhone/iPad | Compatible Lightning-to-USB adapter; some drives may need additional power |
You normally need to unlock the iPhone or iPad before a newly connected wired accessory can communicate with it.
Supported USB Drive Formats
Apple currently supports external storage with a single data partition in formats including:
- APFS;
- APFS (encrypted);
- Mac OS Extended (HFS+);
- exFAT;
- FAT32 / FAT.
If the drive does not appear in Files, the format, partition structure, adapter, or power requirement may be the reason.
How to Copy Files from USB to iPhone or iPad
Step 1. Connect the flash drive or external USB storage to the charging port on your iPhone or iPad.
Step 2. Unlock the device.
Step 3. Open the Files app and tap Browse.
Step 4. Under Locations, tap the name of the connected USB drive.
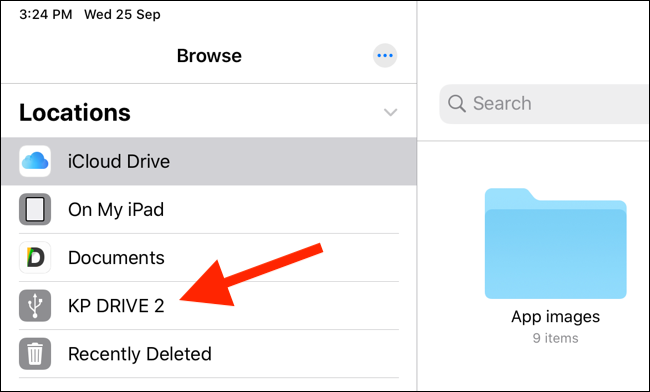
Open the connected flash drive under Locations in the Files app.
Step 5. Touch and hold a file, or use Select to choose multiple files.
Step 6. Choose Copy or Move.
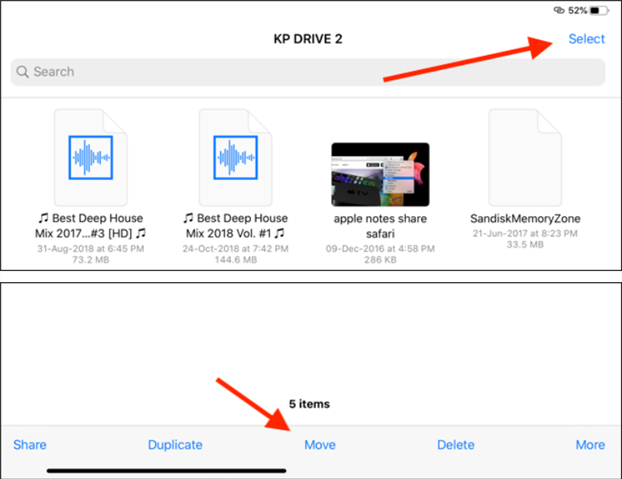
Select the USB files you want to copy or move.
Step 7. Choose a destination such as On My iPhone, On My iPad, or iCloud Drive.
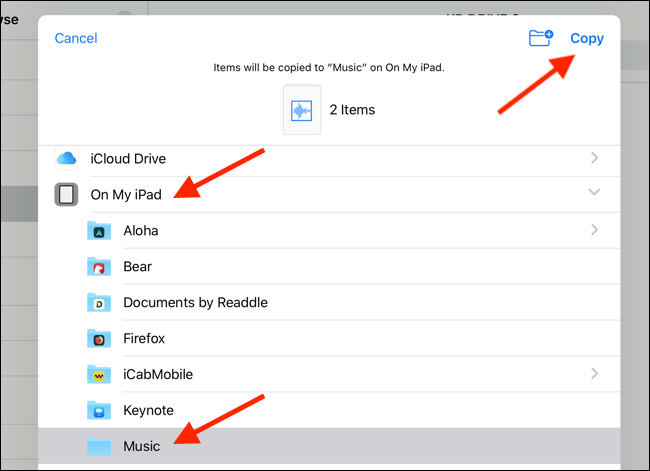
Choose the destination where you want the copied files to appear.
Step 8. Wait until the copy finishes before disconnecting the USB drive.
If you want to keep the original files on the flash drive, choose Copy rather than Move. After confirming the copied files open correctly on the iPhone or iPad, you can safely disconnect the drive.
Do You Need to Create a New Folder First?
No. The older version of this guide made creating a new folder sound mandatory. It is optional.
You can copy the files into an existing folder in On My iPhone, On My iPad, or iCloud Drive, or create a new folder if that makes the files easier to organize.
Can You Import Photos and Videos from USB?
Yes. For normal files, Files is the most flexible option. Apple also supports importing compatible photos and videos from connected cameras, memory cards, and external storage into the Photos app in supported scenarios.
If your goal is simply to keep images as ordinary files rather than add them to the Photos library, copy them through Files instead.
Transfer USB Files to iPhone/iPad with AnyTrans
The Files app is ideal when you want to copy ordinary documents and folders. But some users want music, videos, books, or other content managed through the corresponding iOS content category rather than stored only inside a Files folder.
For that workflow, AnyTrans provides computer-based content transfer between an iPhone/iPad and storage that the computer can access.
AnyTrans – Transfer USB Content to iPhone or iPad
- Select files from a USB flash drive connected to your PC or Mac.
- Transfer supported content to a connected iPhone or iPad.
- Manage supported categories such as music, videos, books, photos, and other iOS content.
- Useful when you want content managed by an iOS category rather than only copied into a Files folder.
How to Transfer Files from a Flash Drive with AnyTrans
Step 1. Connect both the USB flash drive and the iPhone or iPad to your Windows PC or Mac.
Step 2. Launch AnyTrans and wait for the iOS device to be recognized.
Step 3. Open Device Manager and choose Add Content, or open the specific content category you want to manage.
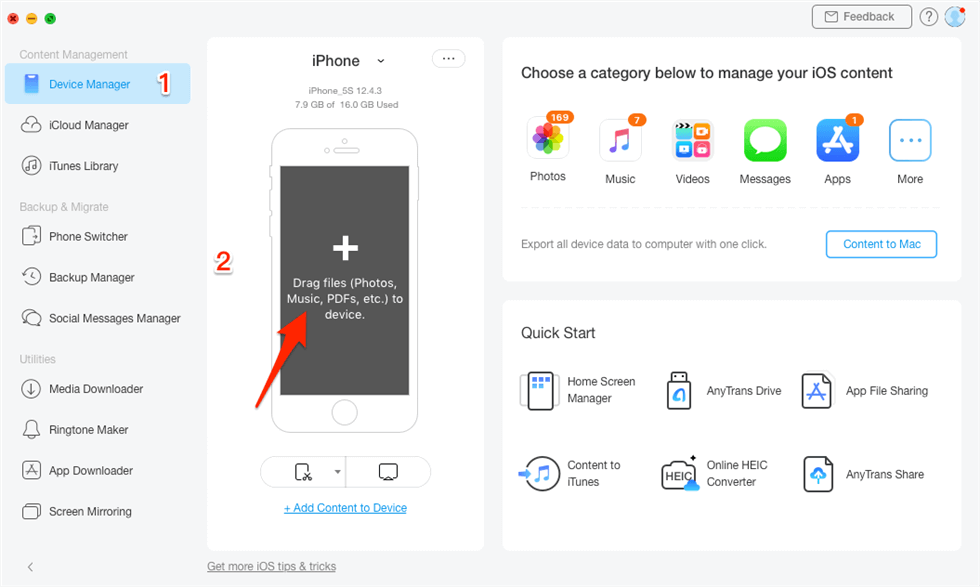
Choose Add Content for the connected iPhone or iPad.
Step 4. In the file-selection window, open the connected USB drive.
Step 5. Select the supported files you want to add and click Open.
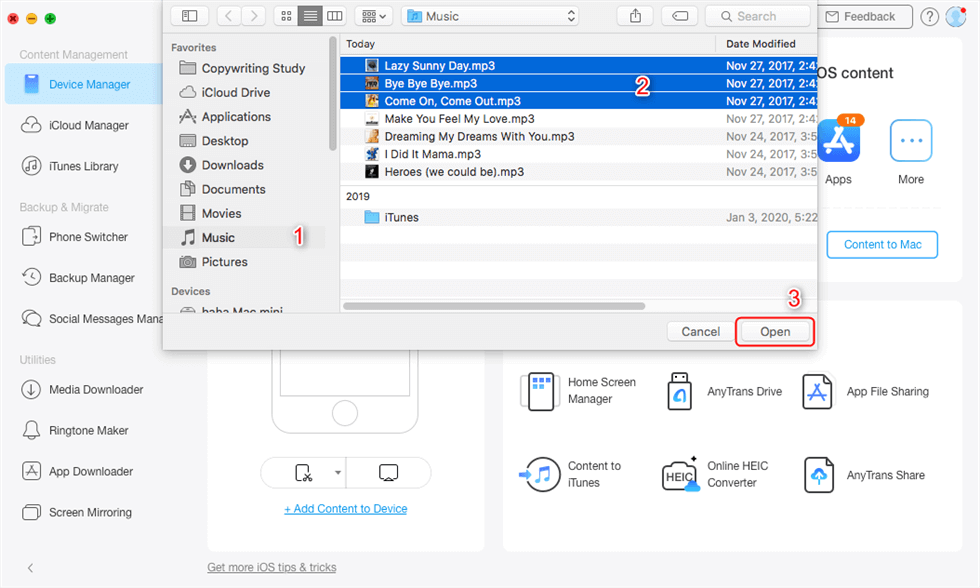
Choose the files stored on the USB drive.
Step 6. Keep the iPhone or iPad connected until the transfer finishes.
Transfer a Specific Type of Content
If you know exactly what you are moving, opening the corresponding category can be clearer than using the general Add Content button.
For example, for compatible books:
Step 1. Open the content-management categories in AnyTrans and choose Books.
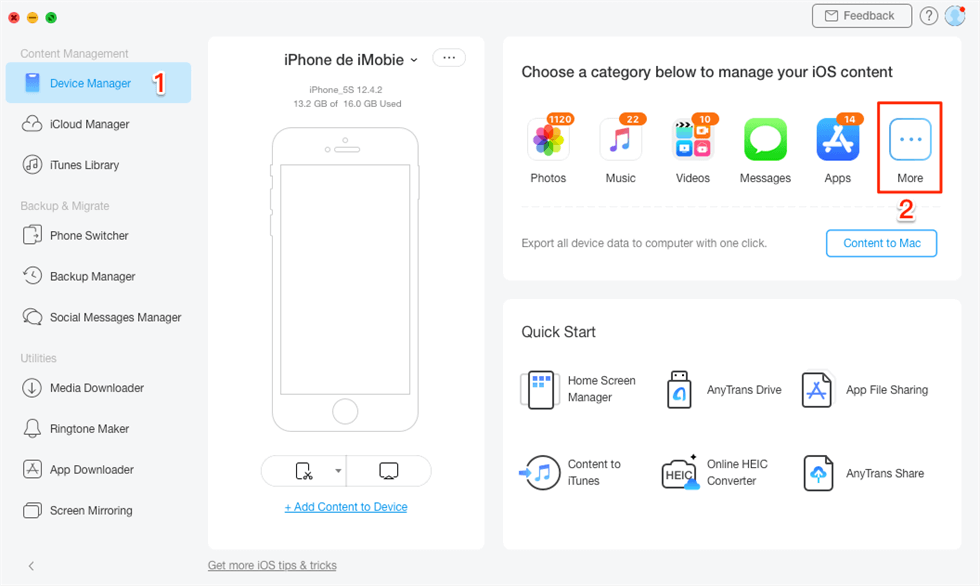
Open the appropriate content category before adding files.
Step 2. Click the Add button, select compatible book files from the USB drive, and open them.
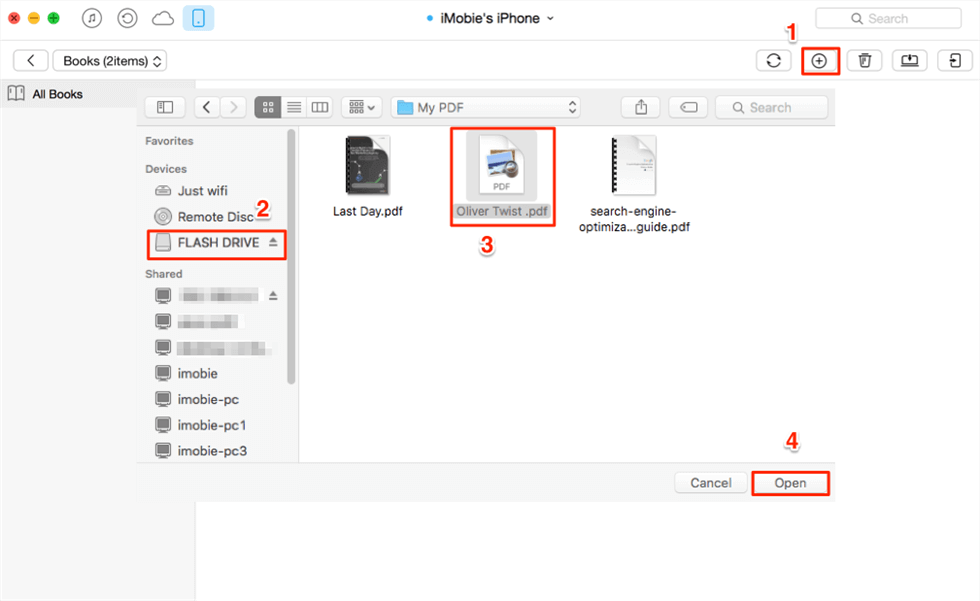
Select supported content from the flash drive and add it to the device.
Not every arbitrary desktop file belongs in an iOS media or app category. If you only need to store a PDF, ZIP, document, or other ordinary file on the device, the Files app is usually simpler.
Transfer USB Files with iCloud Drive
iCloud Drive is useful when the USB drive is connected to a computer but you do not want to connect the iPhone or iPad to that computer.
The basic workflow is:
USB drive → computer → iCloud Drive → Files on iPhone/iPad.
Option 1. Upload through iCloud.com
Step 1. Connect the USB drive to your Mac or Windows PC.
Step 2. Open iCloud Drive on iCloud.com and sign in to the Apple Account used on the iPhone or iPad.
Step 3. Upload the files from the USB drive to iCloud Drive.
Step 4. On the iPhone or iPad, open Files > Browse > iCloud Drive.
Step 5. Open the uploaded files or download them locally when needed.
Option 2. Use iCloud Drive on Windows
If iCloud for Windows is already configured, Apple allows you to add files by dragging them into iCloud Drive in File Explorer.
After the files finish syncing, they appear in iCloud Drive in the Files app on your iPhone or iPad.
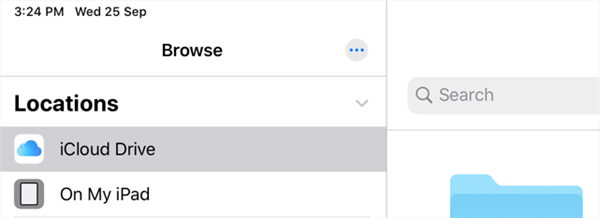
Upload USB files to iCloud Drive, then access them in Files.
iCloud Drive requires sufficient iCloud storage and an internet connection. If the USB drive can already connect directly to your iPhone or iPad, the Files method avoids uploading and downloading the same files through the cloud.
Why Is the USB Drive Not Showing Up?
1. Unlock the iPhone or iPad
Apple normally requires the device to be unlocked before a newly connected wired accessory can communicate with it.
If the USB drive is not recognized, disconnect it, unlock the iPhone or iPad, and reconnect it.
2. Check the Drive Format
A drive using an unsupported file system or partition setup may not appear in Files. Apple currently requires a single data partition and supports common formats including APFS, HFS+, exFAT, and FAT.
3. Check the Adapter
USB-C and Lightning models do not necessarily use the same adapter. Make sure the connector supports both the physical drive and your specific iPhone or iPad.
4. The Drive May Need More Power
Some external drives consume more power than the iPhone or iPad supplies directly.
For higher-power storage, Apple recommends an externally powered drive or an appropriate powered USB hub/adapter. Lightning devices may need the Lightning to USB 3 Camera Adapter connected to power.
5. Check for the Drive under Locations
Open Files > Browse. If you are already inside another folder, tap Browse again until you can see the Locations section.
6. Check the File Type
The drive itself may be recognized even when a particular app cannot open a file. Copy the file with Files first, then open it with an app that supports that format.
7. Avoid Disconnecting During a Copy
Wait until the operation finishes before removing the USB drive, especially when copying large videos, ZIP archives, or multiple folders.
Frequently Asked Questions
1. Can I connect a USB flash drive directly to an iPad?
Yes. Current iPads can access compatible USB drives through the Files app. USB-C iPads can often connect directly to USB-C storage, while Lightning models may require a compatible adapter.
2. Can I connect a USB flash drive directly to an iPhone?
Yes. Apple supports external USB storage on iPhone. USB-C iPhones can use compatible USB-C storage directly, while Lightning iPhones may need a Lightning-to-USB adapter.
3. How do I transfer files from USB to iPad without a computer?
Connect the USB drive to the iPad, unlock it, open Files > Browse, choose the drive under Locations, select the files, then copy or move them to On My iPad or iCloud Drive.
4. Do I need a Lightning-to-USB adapter for every iPad?
No. USB-C iPads do not require a Lightning adapter. The correct connector depends on the iPad model and the USB drive you are using.
5. Can iPhone or iPad read an exFAT flash drive?
Yes. Apple currently lists exFAT among the supported external-storage formats, provided the drive meets the required partition conditions.
6. Why does my USB drive not appear in Files?
Check that the device is unlocked, the drive has a supported format and single data partition, the adapter is compatible, and the drive does not require more power than the iPhone or iPad can provide.
7. Can I transfer photos from USB to the iPhone Photos app?
Compatible photos and videos can be imported through supported Apple workflows. If you only want to store them as normal files, copy them to the device through Files instead.
8. Is iCloud Drive required to transfer files from USB?
No. If the USB drive connects directly to the iPhone or iPad, Files can copy the data without iCloud. iCloud Drive is useful when the flash drive is connected to another computer or when you want the files synchronized across devices.
9. What is the difference between Files and AnyTrans?
Files is Apple’s built-in file manager and is usually best for ordinary documents, folders, ZIP files, and external-storage access. AnyTrans provides a computer-based content-management workflow for supported iPhone and iPad content categories.
10. Does copying files from USB erase anything already on my iPhone or iPad?
A normal copy operation in Files does not require erasing the device. However, make sure you have enough free storage and avoid replacing an existing file with the same name unless that is what you intend.
The Bottom Line
The easiest way to transfer files from a USB drive to a current iPhone or iPad is usually the built-in Files app. Connect the compatible drive, unlock the device, open the USB location, and copy the required files to local storage or iCloud Drive.
If you want music, videos, books, or other supported content managed through iOS content categories rather than only copied as files, AnyTrans provides a computer-based alternative. iCloud Drive is another useful option when the flash drive is connected to a different computer and you want the files available across Apple devices.
More Related Articles



Joy Taylor is a seasoned technical writer with over a decade of experience in mobile technology. At iMobie, she specializes in producing in-depth content on iOS data recovery, iPhone unlocking solutions, and iOS troubleshooting.
Product-related questions? Contact Our Support Team to Get Quick Solution >
