iOS Software Upgrade Guide: How to Safely Install and Troubleshoot
The text describes an iPhone 16 Pro Max iOS upgrade failure (stuck on “Update Requested”) caused by OTA update issues, and explains that the problem was resolved by switching to a manual installation via Mac instead of OTA, aiming to recover the device safely without data loss.
Facing a locked, unresponsive device when you need it most is a massive roadblock. For many users—myself included—a software upgrade can occasionally fail midway or freeze, turning an exciting new update into a deeply stressful ordeal.
Recently, I decided to upgrade my daily-driver iPhone 16 Pro Max to the iOS 27 beta. I knew the risks, but I was eager to test the new file architecture. Unsurprisingly, I encountered repeated installation failures. Jumping directly from iOS 18 to iOS 27 via an Over-the-Air (OTA) update almost always fails because of massive underlying changes to how the operating system handles baseband data and storage indexing. My phone became stuck on the dreaded “Update Requested” screen, leaving it totally unusable.
If you are experiencing similar difficulties upgrading to newer versions, or if you are staring at a frozen screen because insufficient storage blocked your installation, I know exactly how frustrating it is. I managed to resolve my issue safely by abandoning the OTA method, connecting my device to a Mac, and forcing a manual installation. This guide breaks down the exact technical methods to regain control of your device without losing your mind—or your data.
Decision-Making Guide: Choosing Your Upgrade Path
Before executing a major system update, it is crucial to evaluate your available options. You can update your iPhone using three primary techniques: Over-the-Air (OTA) updates, computer-based manual updates via Finder/iTunes, or third-party system repair tools.
When analyzing an OTA update versus a manual computer update, OTA is certainly the most convenient, but it carries a significantly higher risk of stalling if your network drops or your storage is constrained. Manual updates via a Mac or PC offer vastly superior stability. This is because your computer downloads the massive firmware file (IPSW) directly, handles the complex file extraction, and pushes the completed package to your phone via a stable wired connection. This is highly recommended when jumping across multiple iOS versions, as it seamlessly handles bridging firmware and baseband updates that OTA methods struggle with.
| Upgrade Technique | Success Rate | Technical Skill | Best Use Case |
|---|---|---|---|
| Over-the-Air (OTA) | Moderate | Beginner | Routine, small patch updates on highly stable Wi-Fi. |
| Computer (Manual) | High | Intermediate | Major version jumps (e.g., iOS 18 to iOS 27) and recovery. |
| System Repair Tool | Very High | Beginner | Fixing a stuck update loop if Apple’s native tools fail. |
The Official Route: Manual iOS Software Upgrade via Computer
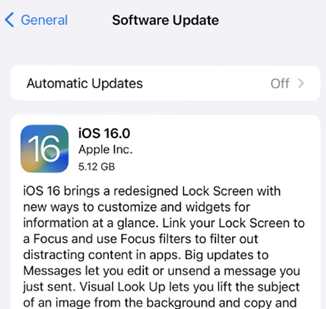
For major version jumps or when your device is already acting up, executing a manual upgrade via a computer is the most dependable method. In my recent test, relying on Wi-Fi for an 8GB beta firmware file proved disastrous. Switching to a manual upgrade via my MacBook allowed the process to complete successfully.
Before you begin, always perform a complete local backup to your computer or iCloud.
Standard Manual Installation Steps:
1. Prepare Your Equipment: Connect your iPhone to your Mac or Windows PC using an official Apple or MFi-certified cable to prevent mid-transfer disconnections.
2. Access Your Device: Open Finder (on macOS Catalina or newer) or iTunes (on Windows or older macOS versions).
3. Locate the Phone: Select your iPhone from the sidebar menu under “Locations” or the device icon in iTunes.
4. Execute the Update: Click the ‘General’ tab, then click ‘Check for Update’. Follow the on-screen prompts to download and install.
Real-World Friction: What if the Manual Update Fails?
The steps above assume Apple’s software works perfectly. But any tech enthusiast knows that isn’t always the case. Here is how to handle the real-world hurdles:
- Finder Hangs on “Preparing iPhone for software update”: This usually means a corrupted download cache or a USB bus timeout. Do not unplug the phone immediately. First, force-quit Finder (or Task Manager for iTunes). Unplug the cable, wait 10 seconds, plug it into a different USB port directly on the computer (no hubs), and try again.
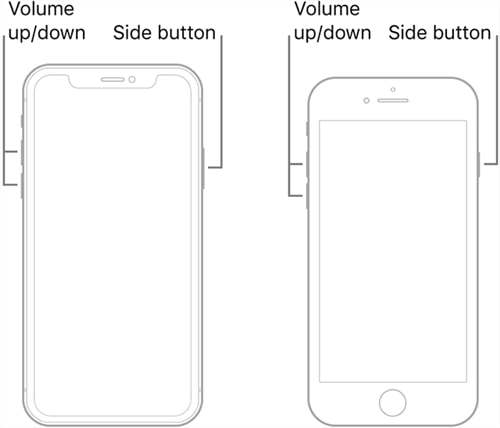
- Insufficient Storage During a Boot Loop: If your phone is stuck in an update loop with the Apple logo, you can’t just casually open Settings and delete apps. In this crisis state, you must put the phone in Recovery Mode (connect to computer -> press Vol Up, Vol Down, hold Side Button until the connect to computer screen appears). When Finder prompts you, choose Update (NOT Restore). This forces the computer to clear temporary OS caches and push the update without deleting your personal data.
Decoding Apple Update Error Codes
When an update fails via a computer, Apple usually throws a cryptic error code. These aren’t just random numbers; they pinpoint the exact point of failure in the installation sequence.
- Error 9: A hardware security check failed, or the USB connection dropped mid-transfer. Check your cable, use a different port, and ensure your computer’s firewall isn’t blocking Apple’s signing servers.
- Error 14: The most common storage error. It means the IPSW firmware file extracted correctly on your computer, but your iPhone lacks the physical storage space to receive it. You will likely need to perform a Recovery Mode update (as mentioned above) or a full restore.
- Error 4000: Often caused by passcode lock interference. If your phone locks itself during the “Extracting Software” phase on your Mac, it can block the installation. Unlock your phone and keep the screen awake as the update begins.
- Error 4013: A severe hardware disconnect, often occurring during the baseband flash. This usually indicates a severely faulty cable or a hardware issue with the phone’s NAND storage.
Stable vs. Beta: Understanding iOS 27 Installation Risks
For early adopters, the temptation to access experimental features—like the advanced on-device AI indexing introduced in iOS 27—is incredibly strong. However, understanding the difference between stable and beta tracks is vital.
Stable versions undergo months of rigorous testing to ensure broad app compatibility and reliable battery management. Betas are unfinished, diagnostic builds. When I installed the developer beta on my primary iPhone 16 Pro Max, the new AI indexing protocols ran constantly in the background. This not only drained the battery from 100% to 20% in under four hours, but it caused essential two-factor authentication apps to crash instantly upon opening.
If you want to test beta features, always install them on a secondary, non-essential testing device to safeguard your daily workflow.
Fixing Post-Update Lags and App Crashes
Even after a completely successful installation, you might find your device is painfully slow or laggy.
Do not panic. This is almost always due to the new operating system re-indexing your files, photos, and machine-learning databases in the background. Depending on your storage size, this indexing can take up to 48 hours. To accelerate this process, simply leave your phone plugged into a charger overnight while connected to a strong Wi-Fi network.
If specific apps are crashing due to compatibility issues with the new iOS, open the App Store and update all installed applications. If an app still crashes, delete it entirely and reinstall it. This clears out deprecated local cache files and forces the app to pull fresh assets compatible with your new system.
The Nuclear Option: Safely Rolling Back via DFU Mode
If your new installation is completely broken, you may need to reverse the update process. Rolling back requires executing a DFU (Device Firmware Update) restore. This is a diagnostic state that allows your computer to interface directly with the iPhone’s bootrom hardware without loading the operating system first.
CRITICAL WARNING: A DFU restore will completely erase all data on your device. You must have a backup created prior to your current installation to retrieve your files. Furthermore, Apple uses a “signing window” for its firmware. You can only downgrade to an iOS version that Apple is currently signing (usually only the immediate previous release). You cannot roll back to iOS 16 if Apple has stopped signing it.
How to Execute a DFU Rollback:
1. Connect your iPhone to your computer using a certified cable and open Finder or iTunes.
2. Execute the precise button combination for your specific model. For iPhone 8 and newer: Quick-press Volume Up, quick-press Volume Down, then press and hold the Side Button until the screen goes completely black.
3. The tricky part: The moment the screen goes black, hold the Volume Down button while continuing to hold the Side Button for exactly 5 seconds. Let go of the Side Button but keep holding Volume Down for another 10 seconds.
Timing for DFU mode is incredibly strict. If you see the Apple logo, you held a button too long. If you see the “Connect to Computer” screen, you are in Recovery Mode, not DFU. Don’t be discouraged if it takes five or six attempts to get the screen to stay completely black while showing up in Finder.
Once detected in DFU mode, select the ‘Restore iPhone’ option in Finder to wipe the device and install the latest stable, signed firmware.
When Apple’s Tools Fail: Using System Repair Software
If you have tried Recovery Mode, battled through DFU mode, and are still facing update loops or Error 14 failures, standard operating procedures have failed you. At this stage, professional system repair software is a viable fallback.
Tools like AnyFix are designed to repair underlying iOS system anomalies that iTunes and Finder struggle to bypass. Instead of relying on a clean wipe, AnyFix offers a “Standard Repair” mode. This method attempts to fix deep system errors—such as corrupted boot files causing an update loop—without erasing your personal photos, contacts, or app data.
While Finder and iTunes are free, tools like AnyFix operate on a premium subscription model. It is not necessary for standard updates, but for users facing a totally bricked device, failing hardware ports, or those who desperately need to salvage data from a boot-looping phone without resorting to a data-wiping DFU restore, it is a highly effective, time-saving alternative.
AnyFix – Your iOS System Repair Expert
With AnyFix, you can enjoy a one-stop solution to fix various iOS, iPadOS, tvOS, and iTunes issues within minutes, restoring your Apple device to normal without any data loss.
Follow the below step-by-step guidance on how to upgrade iOS via AnyFix.
Step 1: Download and launch AnyFix on your PC > choose the Upgrade/Downgrade iOS option at the bottom of the software’s interface.
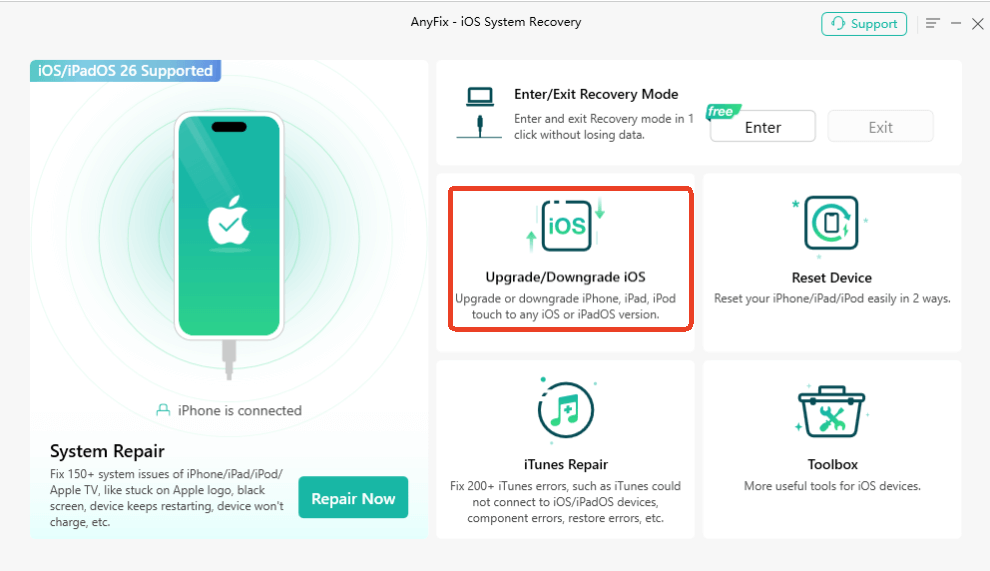
Step 2: Connect your iOS device to AnyFix > select 1 click to upgrade iOS/iPadOS option on the right side of the interface > click the Start Now button at the bottom of the interface.
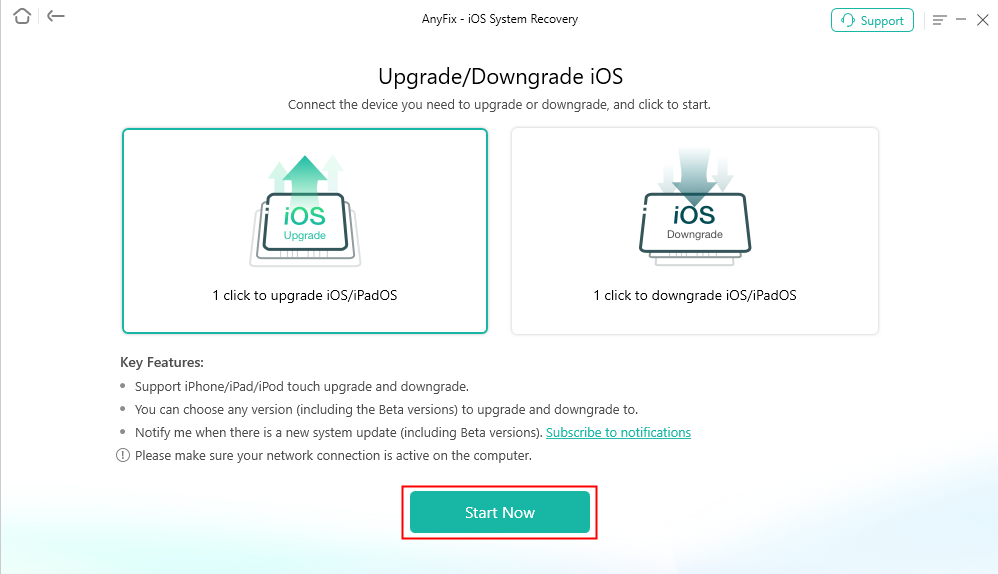
Step 3: Select the firmware version you want to install, then click the upgrade button to proceed.
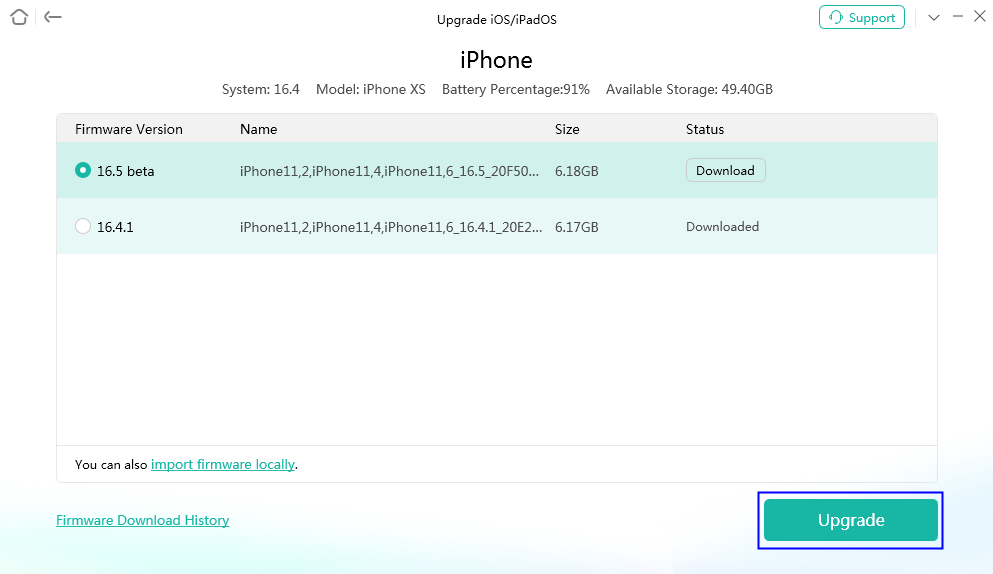
Step 4: Keep your iPhone connected while AnyFix installs the selected iOS version, and do not disconnect it until the process is complete.
Frequently Asked Questions
Why does my phone get stuck on “Update Requested”?
This typically happens when Apple’s servers are severely overloaded (usually on launch day), or your Wi-Fi network drops connection while negotiating the security handshake with Apple. Restarting your device and trying again via a wired computer connection usually bypasses this.
Can I skip versions and upgrade directly to the latest iOS?
Yes, but jumping across multiple major versions (e.g., iOS 16 directly to iOS 27) via an Over-the-Air update is risky. The safest way to handle massive file architecture changes is by plugging the device into a Mac or PC to handle the heavy lifting.
What happens if my phone dies during an update?
If the battery dies while the progress bar is on the screen, the operating system can become corrupted, resulting in a boot loop. Always update with your phone plugged into power, or ideally, plugged into a computer.
Conclusion
When a software installation freezes or throws cryptic errors, the resulting frustration is entirely valid. But you don’t have to accept a bricked phone or a laggy interface. By moving away from fragile OTA updates, understanding the reality of Apple’s error codes, and utilizing Recovery or DFU modes with a computer, you can overcome almost any software block. If all native methods fail, specialized repair tools remain a secure fallback. Don’t let a stalled installation keep your device offline—use these targeted troubleshooting steps to confidently regain control of your iPhone.
AnyFix – Your iOS System Repair Expert
With AnyFix, you can enjoy a one-stop solution to fix various iOS, iPadOS, tvOS, and iTunes issues within minutes, restoring your Apple device to normal without any data loss.
Free Download
for all windows & 100% safe
Free Download
for all mac & 100% safe
Free Download 100% Clean & Safe



Wanda Norris is a junior author in iMobie specializing in iOS tips and solutions. She keeps a close eye on every iOS update to provide practical, easy-to-understand guides that help users solve problems and master their Apple devices.
Product-related questions? Contact Our Support Team to Get Quick Solution >
