Differences between DFU Mode and Recovery Mode
With iPhones, there are two different modes that can allow the user to override any software obstacle and restore the phone to a fully functional state. To learn the differences between DFU mode vs. recovery mode, pay attention to the explanation of each feature provided below.
The iPhone is a powerful machine capable of performing many tasks with precision and intelligence, but it’s not resistant to hardware and software issues. Because there is a possibility that the phone might become unresponsive, then Apple provides built-in mechanisms like DFU mode and Recovery mode that can promptly restore its functionality. However, what is DFU recovery mode? Does DFU mode update iOS? What are the differences between DFU mode and recovery mode?
Drawing a clear distinction between those features is important so that users can choose the most optimal one for the task at hand. That’s why we tried to outline their unique characteristics and the most typical situations where they can be useful.
DFU Mode vs. Recovery Mode – Direct Comparison
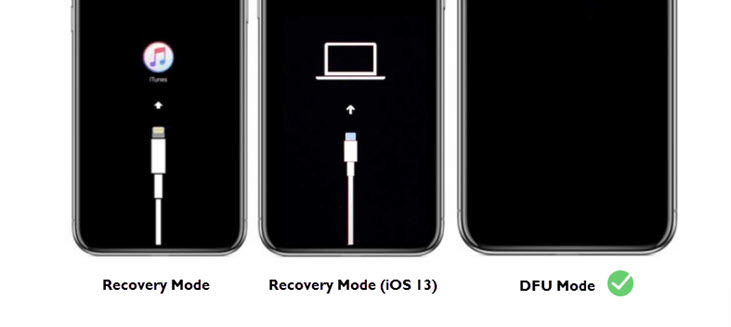
DFU is short for Device Firmware Update, and this mode is intended for completing system tasks that require access to the hardware configuration of the phone. As such, it is an important tool that advanced users can utilize to have almost complete control over the device. When the device is in DFU mode the screen will be completely black but the device will still be powered.
DFU Mode v.s. Recovery Mode
On the other hand, the recovery mode represents a way to revive an iPhone that has stopped working due to a system issue. It represents an option of last resort, and a computer is required to reactivate the device that’s been placed in recovery mode. When this mode is active, the iBoot procedure will start and you will see the icon indicating the device is trying to connect to iTunes.
What Can Recovery Mode and DFU Mode do for You?
The primary purpose of the recovery mode is to let you use iTunes on your Mac computer to reboot the phone immediately. This can be effective for overcoming a range of problems, for example having your phone stuck on the welcome screen.
- Running recovery mode will also result in the installation of the latest iOS version. In other words, this feature serves to make sure the phone is always updated and that no software issue is standing in the way.
On the other hand, the range of tasks that DFU mode can help you complete is a bit wider, including iOS updates as well as downgrades, rebooting a jailbroken iPhone, making changes to default software apps on the phone, etc.
- With DFU mode, iBoot procedure can be completely bypassed, which is necessary for some of the uses listed above. This is why DFU mode is not a replacement for Recovery mode, but rather a different tool that makes unique contributions to iPhone’s security and operability.
How to Enter Recovery Mode?
Activating the Recovery Mode manually is very easy and can be completed within seconds. You don’t need to access any iOS functions for it, and the phone can be turned off when you are performing the procedure. If you want to put your phone into Recovery mode so you can restore it with iTunes, just follow these simple steps:
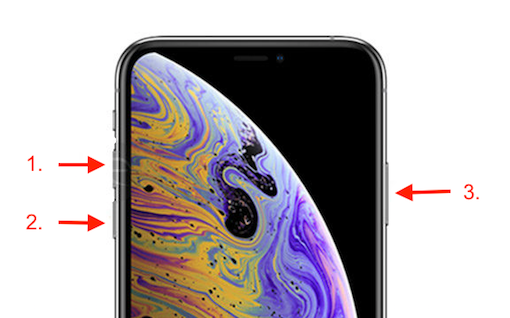
Step 1. Press the Volume Up button shortly and release it after a moment.
Step 2. Follow up this action by immediately pressing the Volume down button and quickly releasing it in a similar manner.
Step 3. Now press the Side button and hold it down for several seconds.
Put iPhone 8 and Newer into Recovery Mode
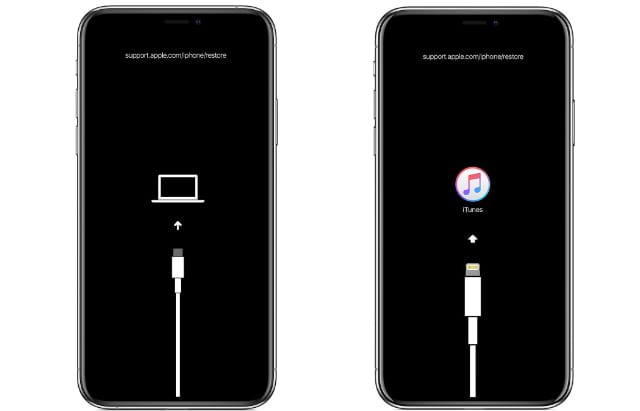
Step 4. The Recovery mode screen with the icon indicating data transfer to a computer will appear.
Enter Recovery Mode
You May Need: How to Fix iTunes Not Recognizing iPhone in Recovery Mode?
How to Put iPhone in DFU Mode?
DFU mode is designed to be accessible without the operating system and can be activated whenever it’s needed. It’s pretty easy to place your iPhone into DFU mode on your own without a technician. Here is the list of actions you need to take do in order to activate this iPhone feature and enable access to the firmware layer:
Step 1. Simultaneously press the Home and Power buttons and hold them for several seconds.
Step 2. Wait until the screen of your iPhone turns completely black.
Step 3. Release the Home button but keep pressing the Power button for another 10 seconds.
When you finish everything you wanted to do, you can leave the DFU mode in a similar manner. Press the same two buttons for approximately 10 seconds, then release the Home button while still holding the Power button. After a while your iPhone will start rebooting, indicating that you have successfully exited from DFU mode.
Further Reading: How to Fix iPhone is Stuck in DFU Mode >
Does DFU Mode Delete Everything from iPhone?
There is a significant downside to activating the DFU mode. While it can allow you to complete tasks you wouldn’t be able otherwise, this comes at a steep price. All personal content unfortunately be deleted in the process of running the DFU mode. You should be aware of this fact and avoid activating this feature unless you have already backed up all iPhone data to another device or simply have no other possibility left than to reset the device to factory settings by using DFU mode.
The Bottom Line
It’s possible to use an iPhone for years without ever having to activate either of the two features covered in this article. However, it certainly doesn’t hurt to be aware of their existence and the differences between DFU mode and Recovery mode. That will equip you to restore your phone or manage the firmware without external assistance, potentially allowing you to get around software bugs and expand the functionality of your smartphone.

Joy Taylor is a seasoned technical writer with over a decade of experience in mobile technology. At iMobie, she specializes in producing in-depth content on iOS data recovery, iPhone unlocking solutions, and iOS troubleshooting.
Product-related questions? Contact Our Support Team to Get Quick Solution >
