Where Does iPhoto Store Photos? Here’s How to Find Photos on Mac
Wondering, “Where does iPhoto store photos?” Well, in this post, you will get to know about the location where it stores your photos, and how find photos on Mac.
Without any doubt, iPhoto is a useful picture management application by Apple. The app was present on a Mac computer, but it was replaced with a Photos application in 2015. However, whenever users import photos into iPhoto, the app makes copies of their photos and leaves original files somewhere else where users can’t access them easily.
No matter for what reasons you want to know the location where iPhoto stores original pictures whether for backup purposes or to transfer them into another application, you can refer to this guide. Here, we are going to show you where iPhoto stores photos in detail. Also, you will get to learn how to find photos on a Mac computer.
Part 1: Where Does iPhoto Store Photos
So, let’s begin: iPhoto stores your picture copies in a special folder known as “iPhoto Library”. You can locate in your Mac Home folder and then, Pictures folder. Here are the detailed steps to find the location where iPhoto stores photos:
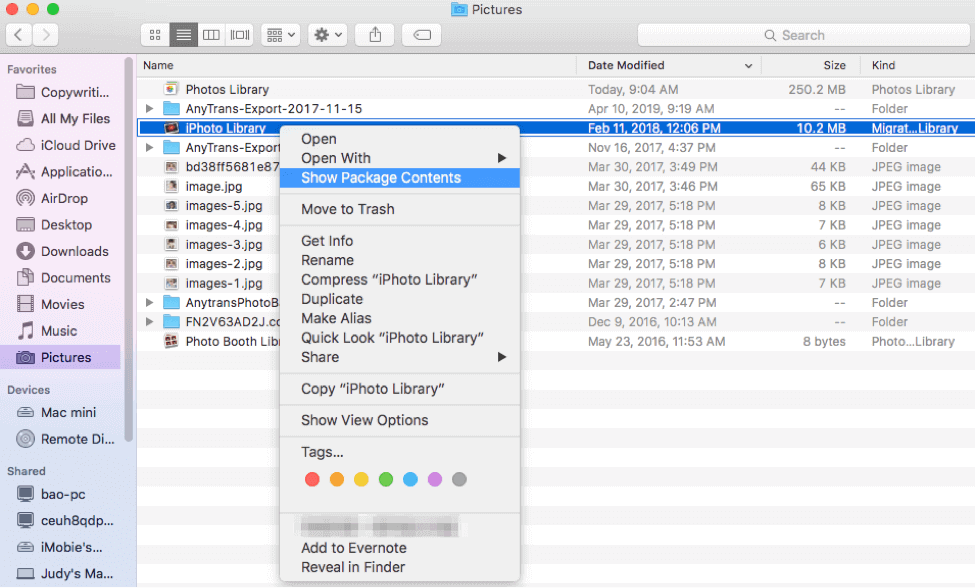
Step 1. To begin the process, go to the “Finder” in your Mac computer and after that, navigate to your Home directory.
Step 2. Thereafter, if you log in to your Mac computer with the name “Alex”, the full path to the folder “iPhoto Library” would be Mac HD > Users > Alex > Pictures > iPhoto Library. And right-click on the folder, and then, choose the “Show Package Contents” option.
Where Does iPhoto Store Photos
Step 3. When you reach your iPhoto Library folder, you will see a set of files and folders organized with numbers. All these numbers you see are the originals files creation dates. Look at the below figure to understand.

How to Find Photo Files on Mac
However, if you are now using an iPhoto newer version known as Photos, then you can locate the photos in a similar way as described above. But, you have to locate the “Photo Library” folder instead of the “iPhoto Library” folder. And then, tap on “Masters” to view your pictures set in folders by date.
Part 2: How to Find Photos on Mac and Transfer Photos to Mac
No doubt, the iPhoto or Photo application allows you to view pictures on Mac. But, what if you want to transfer photos from iPhone to Mac? Don’t worry as AnyTrans is here for you. It is mainly designed for iOS data management and transfer. With the help of it, you can manage your iPhone files including photos on Mac easily. Here are its main features and advantages on photos management:
- Transfer any type of photos: With the help of it, you can move photos in Photo Stream, Camera Roll, Photo Library, Photo Share, and Albums from your iPhone to Mac.
- Support selective transfer: It allows you to move all photos in one go or only selected photos to your Mac.
- Multi-directional transfer: It allows you to migrate files from computer to iPhone also, and there will be no data and quality loss during transfer.
- Supports all data types: No matter whether you want to move photos, audio, videos, apps, contacts, or any other data type from your iPhone to Mac, it can do it with ease.
Now, Free Download AnyTrans on your computer, and then follow the step-by-step guide to view and transfer photos from iPhone to Mac effortlessly.
Free Download * 100% Clean & Safe
Step 1: Connect your iPhone and Mac.
To begin the process, launch the software on your Mac. Then, run it and connect your iPhone to a computer with the help of a digital cable. Next, click Photos category as shown in the figure.
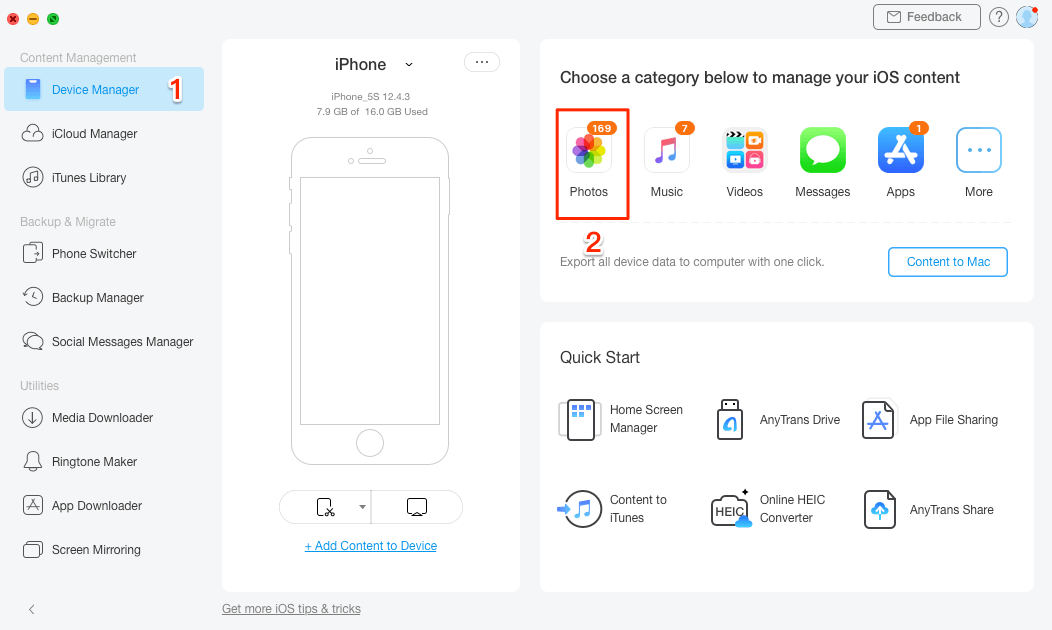
Open AnyTrans and Choose Photos
Step 2: Transfer photos from iPhone to Mac.
After that, select “Photos” and then, choose a photo type you want to move to your Mac computer from iPhone. Let’s take an example of My Photos. Here, choose the desired pictures you want to move and finally, click on the “to Mac” button as shown in the figure.

Choose Photos and Click Send to Mac
Step 3: View photos on Mac.
After the process completes, you can view the transferred photos on your Mac.

How to View Photos on Mac
The Bottom Line
That’s all on how to find photo files on Mac and how to transfer them to Mac. Hopefully, this guide helps you to find the location of your iPhoto/Photo original files. However, give a try to AnyTrans software by downloading and installing it on your PC, and manage your iPhone data in a better and efficient way.

Member of iMobie team as well as an Apple fan, love to help more users solve various types of iOS & Android related issues.
Product-related questions? Contact Our Support Team to Get Quick Solution >
