Want to add a location to a Facebook post, but the place does not appear or the Check in button is missing? This guide shows how to add a location on Facebook from iPhone, Android, and desktop, and how to create a new location when Facebook allows it.
We also cover the most common reasons Facebook cannot find nearby places, including disabled Location Services, missing app permissions, outdated app cache, and business locations that have not been added or indexed yet.
How to Add a Location to a Facebook Post: Step-by-Step
Adding a location to a Facebook post is usually done through the Check in option. This adds a place name to your post, such as a restaurant, café, park, hotel, city, or business page. The steps are slightly different on iPhone, Android, and desktop, but the basic process is the same.
On the Facebook App for iOS (iPhone/iPad)
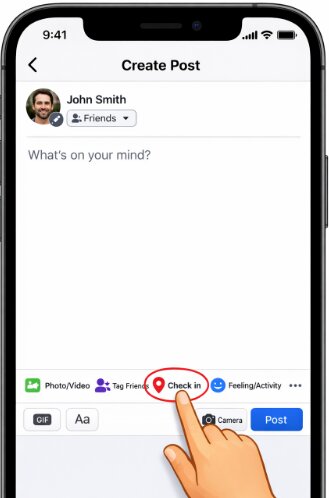
- Open the Facebook app and tap “What’s on your mind?” at the top of your feed to begin a new post.
- Add your text, photo, or video.
- Tap the Check in option. It usually appears with a red map pin icon.
- Facebook will suggest nearby places based on your device location. Choose a place from the list or search for a specific location.
- After selecting the location, it will appear in your post as — at [Location Name].
- Finish editing your post and tap Post.
On the Facebook App for Android
1. Launch the Facebook app and tap “What’s on your mind?” to open the post composer.
2. Write your update or add your photos and videos.
3. Tap the Check in button with the red map pin icon.
4. Choose one of the suggested nearby places or use the search bar to find the correct place.
5. Once the location is attached to your post, tap Post to publish it.
On a Desktop Browser (PC or Mac)
1. Go to Facebook.com in your browser.
2. Click the “What’s on your mind, [Your Name]?” box to open the Create Post window.

3. In the Add to your post section, click the three-dots icon (…) to reveal more options.
4. Select Check in from the menu.
5. Type the place name in the search box and select the correct result.
6. Click Post after the location is added.
How to Add a New Location to Facebook When It Does Not Appear
Many users search for how to create a location on Facebook because the place they want to tag does not appear in search results. This may happen with a new café, local shop, pop-up event, small business, private venue, or recently opened location.
Facebook used to allow users to create custom places more freely, but the feature is now more restricted. In many cases, Facebook only shows locations connected to existing Places, business pages, map data, or verified address information.
If the option is available for your account, here is how to add a new location in a Facebook check-in:
1. Start a new post and tap Check in.
2. In the search bar, type the exact name of the place you want to add.
3. If no result appears, scroll to the bottom of the search results.
4. Look for an option like Add [Place Name] or Add a new place.
5. If the option appears, tap it and choose the correct category, such as Restaurant, Park, Home, Event, or Business.
6. Confirm the location on the map, fill in any required details, and tap Save or Create.
Important: If you do not see the Add a new place option, the feature may not be available for your account, region, app version, or selected location type. Facebook may also limit new place creation to reduce duplicate or inaccurate map locations.
What If You Want to Add a Business Location?
If the place is a business, the more reliable method is to create or update a Facebook Business Page with a valid physical address. Once the page is complete and indexed, it has a better chance of appearing in Facebook location search and check-in results.
For business owners, make sure the Page includes:
- Business name
- Correct category
- Physical address
- Map pin placement
- Opening hours, if relevant
- Contact information
New or recently edited business locations may take time to appear in Facebook search, so the result may not be immediate.
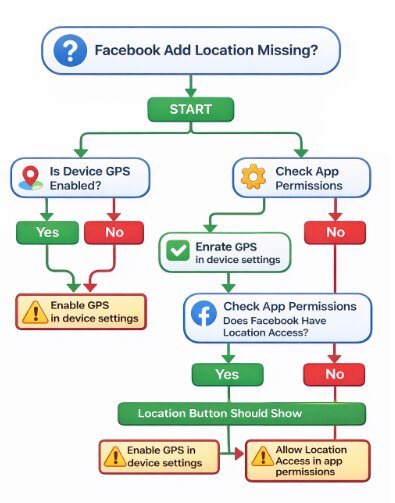
Facebook ‘Add Location’ Button Missing? Here’s the Fix
If the Facebook add location or Check in button is missing, the problem is usually related to device settings, app permissions, app cache, or a temporary Facebook app issue. The feature relies on both your phone’s location services and Facebook’s permission to access them.
1. Enable Device Location Services
First, make sure your phone’s main location service is turned on.
- On iOS: Go to Settings > Privacy & Security > Location Services. Make sure Location Services is switched on.
- On Android: Open Quick Settings and make sure Location is enabled. You can also go to Settings > Location and turn it on from there.
2. Grant Facebook App Permissions
This is the most common reason the Check in button does not show nearby places correctly. Facebook needs permission to access your location while you are using the app.
- On iOS: Go to Settings > Facebook > Location. Select While Using the App. For better nearby place suggestions, also enable Precise Location.
Real-World Experience: If Precise Location is turned off, Facebook may know your general area but fail to suggest the exact café, store, or venue nearby. Turning it on often fixes inaccurate or missing place suggestions.
- On Android: Go to Settings > Apps > Facebook > Permissions > Location. Choose Allow only while using the app.
3. Clear the App Cache or Update Facebook
If your location settings are correct but Facebook still cannot show the Check in option or nearby places, the app may have a cache or version issue.
- Clear Cache on Android: Go to Settings > Apps > Facebook > Storage & cache, then tap Clear cache.
- Update Facebook: Open the App Store or Google Play Store, search for Facebook, and install any available update.
- Restart the App: Fully close Facebook and reopen it after changing permissions or updating the app.
After changing location permissions, completely close and reopen Facebook. This forces the app to re-check its permissions and often makes the Check in option work again.
4. Reinstall Facebook or Check for an Outage
If nothing works, delete and reinstall the Facebook app. This resets local app data and asks for permissions again during setup.
If the problem still happens after reinstalling, check whether Facebook is experiencing a wider issue. Sometimes location features or check-in search can temporarily fail because of a server-side problem.
5. When GPS Accuracy Is the Problem
Sometimes Facebook can open the Check in feature, but it still shows the wrong nearby places. This may happen if your device GPS is unstable, your map position is inaccurate, or your phone cannot detect nearby places correctly.
For normal Facebook use, first try enabling precise location, restarting the app, and checking your map position. If you repeatedly need to test or manage device location for social media, maps, or other location-based apps, a desktop GPS tool such as Fonelora Location Changer can help adjust device location on iPhone and Android without jailbreak or root.
Fonelora Location Changer
Realistic GPS movement simulation, flexible route control, easy no-modification setup, and support for gaming, social, privacy, and location-based testing in one platform.
This is optional and should be used only on your own device or a device you have permission to manage. For most Facebook check-in issues, app permissions and device location settings are enough.
Facebook Check-In vs. Location Tag: What’s the Difference?
The terms used for Facebook location tagging can be confusing. In everyday use, checking in and tagging a place often look similar, but they are slightly different actions.
| Feature Type | What It Does | Best For |
| Facebook Check-in | Creates a post showing that you are at a specific venue or place. It may link to that location’s official Page. | Sharing your current activity, promoting a local business, or letting friends know where you are. |
| Tagging a Place | Adds an — at [Place Name] line to a photo, video, or text post. | Adding context to a post, memory, or photo after the fact. |
| City-Level Tag | Adds a broad location such as San Francisco, California instead of a specific business or venue. | Giving general travel or location context without tagging a specific place. |
| New Place Creation | Lets you add a new place when Facebook allows it after a location search returns no result. | Adding a new venue, small business, local place, or event location when the option is available. |
If your goal is to show where a photo or post was taken, a location tag is usually enough. If your goal is to add a missing venue to Facebook, use the new location steps above or create a business page with a valid address.
Frequently Asked Questions
Here are quick answers to common questions about adding or creating locations on Facebook.
Q1. How do I add a location on Facebook?
Open the post composer, tap Check in, search for the place, and select it. The location will be attached to your post before publishing.
Q2. How do I create a location on Facebook?
Start a post, tap Check in, search for the exact place name, and scroll to the bottom of the results. If Facebook allows it, you may see an Add a new place option. If not, the feature is unavailable for that account or place type.
Q3. How do I add a new location in Facebook check-in?
Use the Check in search box and type the new location name. If no matching result appears, look for the option to add a new place. You may need to choose a category and confirm the place on a map.
Q4. Why can’t I add a location on Facebook?
This is usually because Location Services are off, Facebook does not have location permission, the app cache is outdated, or the place does not exist in Facebook’s location database.
Q5. Why is my business location not showing up?
Your business may not appear if it does not have a complete Facebook Business Page with a valid physical address. New or recently updated pages may also take time to appear in location search.
Q6. Do I need to turn on GPS to add a location?
Yes. To see nearby place suggestions and use Facebook check-in, your device Location Services and Facebook app location permissions should both be enabled.
Q7. Is adding a location different on desktop vs. mobile?
Yes. On mobile, the Check in option usually appears directly in the post composer. On desktop, you may need to click the three-dot menu in the Create Post window to find the Check in option.
Q8. Why is the “Add a new place” option missing?
Facebook does not make this option available to every user or every location search. If the option is missing, try searching for a more exact place name, updating the app, or creating a Facebook Business Page if the location is a business.
Conclusion
Adding a location on Facebook is usually simple: open the post composer, tap Check in, search for the place, and select it. If the place does not exist, Facebook may let you add a new location, but that option is now limited and not always available.
If the Check in button is missing or Facebook cannot find nearby places, start with the basics: enable device location services, grant Facebook location permission, update the app, and clear the cache on Android. These steps fix most Facebook add location problems.
For business owners, the most reliable way to make a place appear is to create or update a Facebook Business Page with a complete physical address. For users with repeated GPS accuracy issues, a location management tool like Fonelora Location Changer can be used as an optional device-location solution, but it should not replace Facebook’s normal check-in and location permission settings.
Fonelora Location Changer
- Bluetooth Hardware Simulation for Safer GPS Spoofing
- Realistic Movement & Route Simulation
- No Root or Jailbreak Required
- All-in-One Solution for Games, Social Apps & Privacy
More Related Articles


