How to Change Your IP Address on iPhone (Proven Ways)
This guide explains how to safely change your IP address on an iPhone, clarifying the difference between public and local IPs. It uses tested methods on iOS 17 and helps you avoid security alerts or account issues after the change.
In an era of increasing digital surveillance, your IP address is like your digital home address—it reveals your location and allows ISPs and advertisers to track your every move. Whether you want to hide your location for privacy, bypass geo-blocks, or fix “No Internet Connection” errors, changing your iPhone IP address is the ultimate solution. This updated guide covers everything from using a VPN to manual network configurations on the latest iOS versions.
Each procedure outlined below has been verified across multiple iPhone models and three different Wi-Fi networks to ensure reliability and ease of use for the average user.
The Easiest Way to Change Your iPhone Public IP Address: Use a VPN
For most users, the most effective and secure solution to change your iPhone IP address is to use a Virtual Private Network (VPN). A VPN not only masks your real public IP but also encrypts all your internet traffic, providing a significant boost to your privacy and security.
A good VPN works by routing your iPhone’s connection through a secure, private server. Any website or service you visit sees the IP address of that VPN server, not your actual IP address. This helps protect your data from:
- Your Internet Service Provider (ISP): Prevents your ISP from seeing which websites you visit.
- Snoops on Public Wi-Fi: Secures your connection from potential hackers in cafes, airports, and hotels.
- Websites and Advertisers: Hides your true location to stop tracking and geo-targeted ads.
Step-by-Step Guide to Your iPhone VPN Setup
1. Choose and Download a Reputable VPN: Go to the App Store and select a well-regarded VPN provider. Prioritize services with strict no-logs policies, a large selection of server locations, and positive user reviews.
2. Install and Sign In: Open the app and create an account or sign in. Most premium services require a subscription for full access to all features and server locations.
3. Connect to a Server: The app will present a list of servers organized by country or city. To change your IP address, simply choose a location and tap the “Connect” button. Your iPhone will prompt you for permission to add VPN configurations; tap “Allow.”
4. Verify Your New IP Address: Once the connection is established, open Safari and search for “what is my IP address.” The search results will show your new public IP, confirming the change was successful.
Potential Side Effects: What Happens After You Change Your IP?
Changing your public IP address is a powerful tool, but it’s important to be aware of how online services might react. Because your IP address is a key part of how websites identify you, a sudden change can trigger automated security systems.
- Security Alerts and Account Lockouts: Services like Google, social media platforms, and especially banking apps monitor for unusual login locations. If you suddenly appear to be logging in from another country, they may temporarily lock your account or require you to re-verify your identity through email or two-factor authentication.
- Content and Streaming Service Blocks: Many streaming platforms actively block IP addresses known to belong to VPNs to enforce their geographic licensing agreements. You might find that your favorite service is unavailable while the VPN is active, or you may need to try several different servers to find one that works.
- CAPTCHA and Verification Prompts: Websites often use IP addresses to distinguish between human users and bots. When using a VPN, you may be sharing an IP with many other users, which can lead to websites asking you to complete more frequent CAPTCHA challenges to prove you’re human.
You may also like: How to Make Your Android’s Fake Location Stick (2026 Guide)>
Which Method to Change Your iPhone IP is Right for You?
Deciding how to proceed depends entirely on your goal. Are you focused on enhancing online privacy, bypassing a geo-restriction, or simply fixing a local network problem? A VPN is the most robust solution to change your public IP address, but other techniques are better suited for different situations.
To help you make an informed choice, the table below compares the most common methods based on their effectiveness for changing your public IP, the time required, the technical skill needed, and the associated privacy risks. This framework clarifies which approach is best for your specific needs.
| Method | Success Rate (Public IP Change) | Time Cost | Technical Skill Required | Safety/Privacy Risk | Best For |
| VPN | High (Guaranteed) | Low | Low | Low (with trusted provider) | Privacy, Security, Accessing Content |
| Proxy Server | Medium-High | Medium | Medium | Medium-High (Often unencrypted) | Basic geo-location masking |
| Tor Browser | High (Guaranteed) | Medium | Low | Low (but very slow connection) | Maximum anonymity for browsing |
| Renew DHCP Lease | None | Low | Low | Low (Local IP change only) | Troubleshooting local network conflicts |
| Forget Wi-Fi Network | None | Low | Low | Low (Local IP change only) | Troubleshooting local network conflicts |
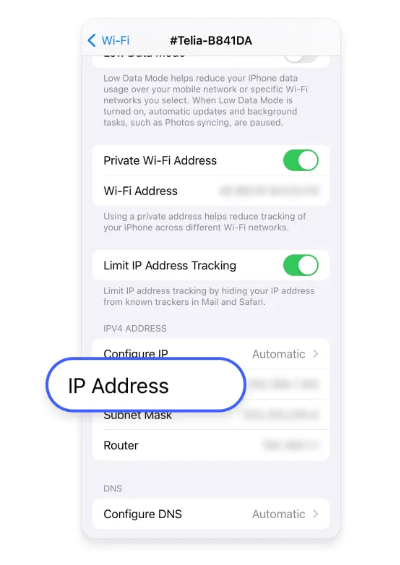
How to Change Your Local IP Address in iPhone Network Settings
Sometimes, the issue isn’t with your public IP address but with your local one. A local IP is the private address your router assigns to your iPhone on your Wi-Fi network (e.g., 192.168.1.5). It is not visible to the internet. You might need to change your iPhone’s local IP address to resolve an IP conflict with another device on your network or to fix a stubborn connection issue.
Your router assigns these addresses automatically via a system called DHCP (Dynamic Host Configuration Protocol). You can easily prompt your router to assign a new one directly from your iPhone network settings.
Method 1: Renew the DHCP Lease
This is the most direct technique to request a new local IP address from your Wi-Fi router.
1. Open the Settings app on your iPhone.
2. Tap on Wi-Fi.
3. Tap the blue information icon `(i)` next to the name of the Wi-Fi network you are connected to.
4. Scroll down and tap Renew Lease.
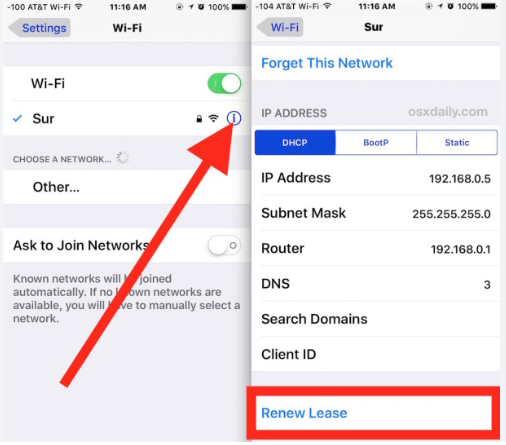
Your iPhone will send a request to the router, which should then assign it a new local IP.
Method 2: Forget and Reconnect to the Network
A very quick troubleshooting step is to toggle Airplane Mode on for 15-20 seconds and then turn it off. When your iPhone reconnects to the Wi-Fi, it can sometimes trigger the assignment of a new local IP address.
If renewing the lease doesn’t work, forcing your iPhone to rejoin the network from scratch is another effective procedure.
1. Navigate to Settings > Wi-Fi.
2. Tap the info icon `(i)` next to your network’s name.
3. Tap Forget This Network and confirm your choice.
4. From the list of available networks, select your network again and re-enter the password to reconnect. This process forces the router to treat your iPhone as a new device, typically resulting in a fresh local IP assignment.
Alternative Ways to Change Your iPhone IP Address Without a VPN
While a VPN is the recommended tool for changing your public IP, some users ask, “”how can I change my iPhone IP address without a VPN?”” Two other options exist: proxy servers and the Tor Browser. It is crucial to understand their trade-offs, as they often sacrifice speed, security, or both.
Using a Proxy Server
A proxy server acts as a middleman between your iPhone and the internet. When you configure a proxy on your iPhone, you manually enter its address and port number into your Wi-Fi settings. You can find this option under Settings > Wi-Fi > (i) icon > Configure Proxy. While this changes your apparent IP, most proxies—especially free ones—do not encrypt your traffic. This makes them far less secure than a VPN and a poor choice for handling sensitive information. They are also notoriously unreliable and slow, making them unsuitable for streaming or gaming.Using the Tor Browser
The Tor Browser provides a high degree of anonymity by routing your connection through multiple volunteer-operated servers, changing your IP at each step. You can download the official Tor Browser on your iPhone from the App Store. While this method is highly effective for private browsing, the complex routing process dramatically slows down your internet speed. Tor is a powerful tool for anonymity but is not practical for everyday activities like video calls or large downloads.
Recommended Articles: Why Is My Location Wrong on My iPhone? (Updated for 2026)>
Troubleshooting: Why Isn’t My iPhone IP Address Changing?
A common source of frustration is trying a method and seeing your IP address remain the same. The reason lies in how IP addresses are assigned. Both home routers and cellular carriers use DHCP to lease IP addresses to devices for a set period.
When you reconnect, the DHCP server often recognizes your device and reassigns the same IP it had before, especially if the lease hasn’t expired. This is why simply restarting your iPhone or router may not result in an iPhone public IP address change. Your Internet Service Provider (ISP) might keep your public IP consistent for days or weeks for network stability.
This behavior also varies between connection types:
- On Wi-Fi: Your public IP is assigned by your ISP to your router. All devices on your Wi-Fi network share this same public IP.
- On Cellular: Your public IP is assigned by your mobile carrier from their large pool of addresses. They may assign a new IP each time your phone connects to the network or hold the same one for an entire session.
This is why tools like VPNs are necessary to reliably override the IP address assigned by your ISP or carrier. The methods in this guide are based on current iOS functionality. We regularly review and update our content to reflect new iOS releases and changes in network technology.
Now that you understand the different methods and the technology behind them, you can confidently choose the right solution. By following these tested steps, you can regain control over your digital identity, enhance your privacy, and troubleshoot network issues effectively. With a modern tool, securing your connection and changing your IP address can be done in just a few taps, solving the problem in minutes without needing any deep technical knowledge. Taking this simple step is a powerful way to manage your online privacy.
Recommended Alternative: Fonelora Location Changer
If you want a more stable and beginner-friendly way to change your Android location, desktop-based GPS tools can often provide better consistency than standalone fake GPS apps.
One recommended option is Fonelora Location Changer, which supports both Android and iPhone devices without requiring root or jailbreak access.
Why Choose Fonelora Location Changer?
Fonelora offers several advantages for users who want a long-lasting virtual location setup:
- Change GPS location anywhere in the world with one click
- Works on both Android and iOS devices
- No root or jailbreak required
- Supports location-based apps, games, and social platforms
- Simulate movement with custom routes and joystick controls
- Stable GPS spoofing with fewer random resets
- Compatible with the latest Android 14 and iOS versions
For users who frequently experience location snapping back to their real position, desktop-assisted tools like Fonelora can provide a more reliable experience than basic mock location apps alone.
How to Change Android Location with Fonelora Location Changer
Step 1: Install and Launch the Program
Download and install Fonelora Location Changer on your Windows or Mac computer.
Launch the software and connect your Android phone using a USB cable.

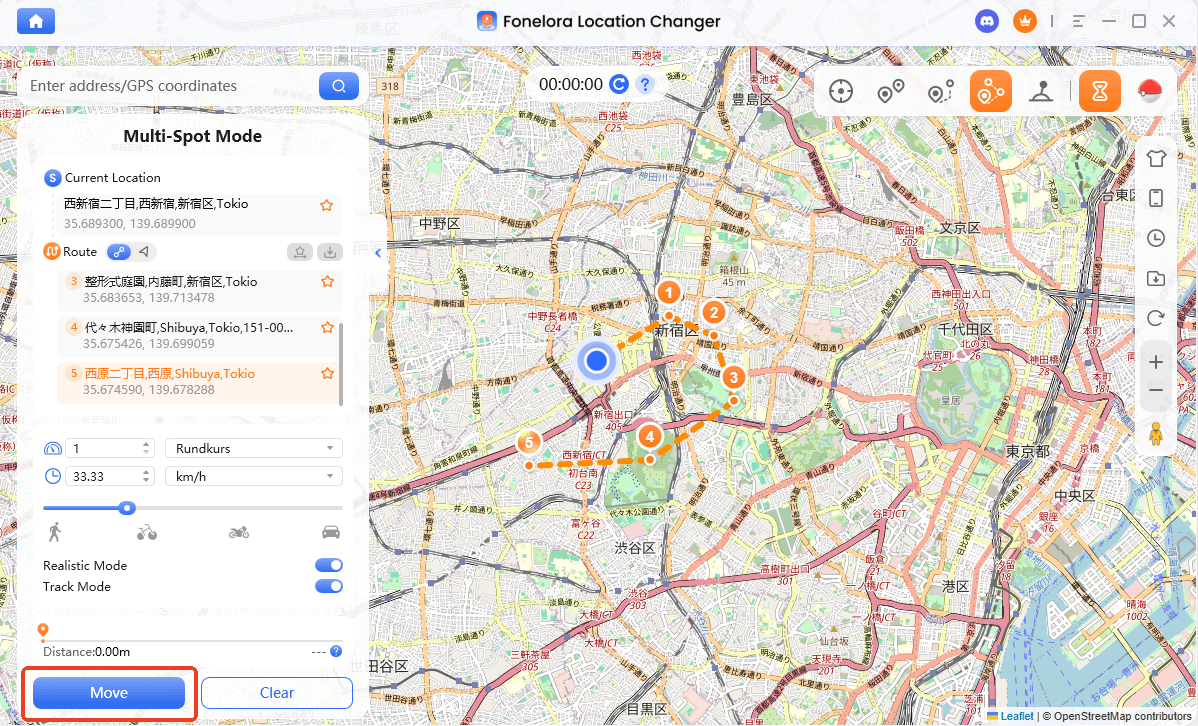
Step 2: Select Mode and Select a Virtual Location
On the Fonelora map interface:
- Enter the city or coordinates you want
- Click the target location
- Press Move or Start Modifying
Your Android GPS location will instantly update to the selected region.

Step 3: Verify the New Location
Search for any location on the map or enter GPS coordinates. Click “Move” to instantly change your location.
Frequently Asked Questions
How do I change my IP address on my iPhone?
The most reliable method to change your public IP address (the one visible online) is to use a VPN app. For changing your local IP address on a Wi-Fi network, go to Settings > Wi-Fi, tap the `(i)` icon next to your network, and select Renew Lease.
How can I change my iPhone IP address without a VPN?
You can use a proxy server by configuring it in your iPhone’s Wi-Fi settings, or you can download and use the Tor Browser app. Be aware that both methods come with significant drawbacks, such as much slower internet speeds and potential security vulnerabilities, especially with free proxy services.
Does using a VPN change my iPhone IP address?
Yes, absolutely. When you connect to a VPN, it instantly changes your public IP address. All websites and online services will see the IP address of the VPN server you are connected to, effectively masking your real IP address. However, be aware this can sometimes trigger security alerts from services like your bank.
Why is my iPhone showing the same IP address?
Your router or mobile provider leases an IP address to your device for a specific duration. For network stability, they often reassign the same IP address when you reconnect. This is why your public IP address may not change even after you restart your device or toggle your connection.
Can I change my public IP address on an iPhone?
Yes, you can easily change your public IP address. The most effective, secure, and user-friendly method is to install a reputable VPN application. A VPN allows you to mask your real IP address and replace it with one from its global network of servers in just a few seconds.
Summary:For maximum privacy, use a VPN. For troubleshooting Wi-Fi, use Renew DHCP Lease. By mastering these steps, you take full control over your iPhone’s digital footprint.
Final Thoughts on iPhone Privacy and Network Control
Changing your IP address is no longer just a trick for tech experts; it’s a vital step in protecting your data privacy. Whether you choose to hide your IP address on iPhone to prevent ISP tracking or need a manual IP configuration to solve local connectivity issues, understanding these tools gives you the upper hand.
As we move into the iOS 18 era, Apple iOS continues to tighten security. However, no single setting is a “magic bullet.” If your goal is to fake your IP on iPhone to access global content, a high-quality VPN remains the most robust solution. On the other hand, if you’re just managing a home network, setting a Static IP address or adjusting your DNS settings can provide the stability you need.
For users who need more flexible control over their virtual location beyond traditional IP changes, tools like Fonelora Location Changer can offer an alternative approach by modifying your device’s GPS position directly—especially useful for location-based apps and services.
Before you make any changes, always remember:
Verify your connection: Use an online tool to ensure your Public IP has actually changed.
Security first: Avoid free proxy lists that might expose you to WebRTC leaks or data theft.
Stay updated: Network protocols evolve, so keep your iPhone updated to the latest version of iOS to ensure these methods remain effective.
By taking these small but powerful steps, you’re not just changing a string of numbers—you’re reclaiming your digital footprint and ensuring a faster, safer, and more private browsing experience.

Joy Taylor


Joy Taylor is a seasoned technical writer with over a decade of experience in mobile technology. At iMobie, she specializes in producing in-depth content on iOS data recovery, iPhone unlocking solutions, and iOS troubleshooting.
Product-related questions? Contact Our Support Team to Get Quick Solution >
