How to Enable Developer Mode on iOS 16
iPhone Developer Mode is hidden by default; enabling it requires connecting to a computer with development tools, and this guide explains the exact steps for Mac and Windows users to access it.
If you are an iPhone user trying to install and test apps outside the App Store, discovering that the developer mode option is not visible in settings can cause immediate confusion. Many tutorials fail to mention that Apple deliberately hides this menu, meaning you must connect your device to a computer running specific development tools to trigger the setting. This guide details the exact procedures for both Mac and Windows users, helping you uncover these hidden menus so you can successfully access advanced features and gain more control over your app testing.
Step 1: Reveal Developer Mode Settings via Mac (Xcode Method)
The primary reason you cannot find the developer toggle on your iPhone is that Apple requires proof you are in a legitimate development environment before revealing it. The official way to trigger this on a Mac is by using Xcode, Apple’s native software development suite.
The Step-by-Step Xcode Connection Procedure
- Prepare Your Mac: Open the Mac App Store and download Xcode. You will need to sign in with your Apple ID to download the application.
Warning: Massive File Size. Xcode is an enormous application (often exceeding 10GB) and requires a significant amount of free hard drive space and a recent macOS version to install. Please allocate sufficient time and check your storage before beginning. - Connect the Device: Plug your iPhone into the Mac using a certified USB-C to Lightning cable. A secure data connection is absolutely required.
- Trust the Computer: Unlock your iPhone. If a “Trust This Computer” prompt appears on your screen, tap Trust and enter your device passcode. This authorizes the Mac to read your iPhone’s system permissions.
- Launch Xcode: Open Xcode on your Mac. In the top menu bar, click on Window and select Devices and Simulators.
- Wait for the Sync: Ensure your connected iPhone appears in the left-hand device list. At the top of this window, you will likely see a loading bar indicating that Xcode is preparing your device. You do not need to click anything else inside Xcode. Simply establishing this connection and letting the loading bar finish is enough to communicate with your phone.
- Check iPhone Settings: Leave the iPhone connected to the computer. Open the Settings app on your iPhone, navigate to Privacy & Security, and scroll to the absolute bottom of the page. The Developer Mode option should now be visible.
- Activate and Reboot: Tap the option and switch it on. Your iOS device will prompt you to restart.
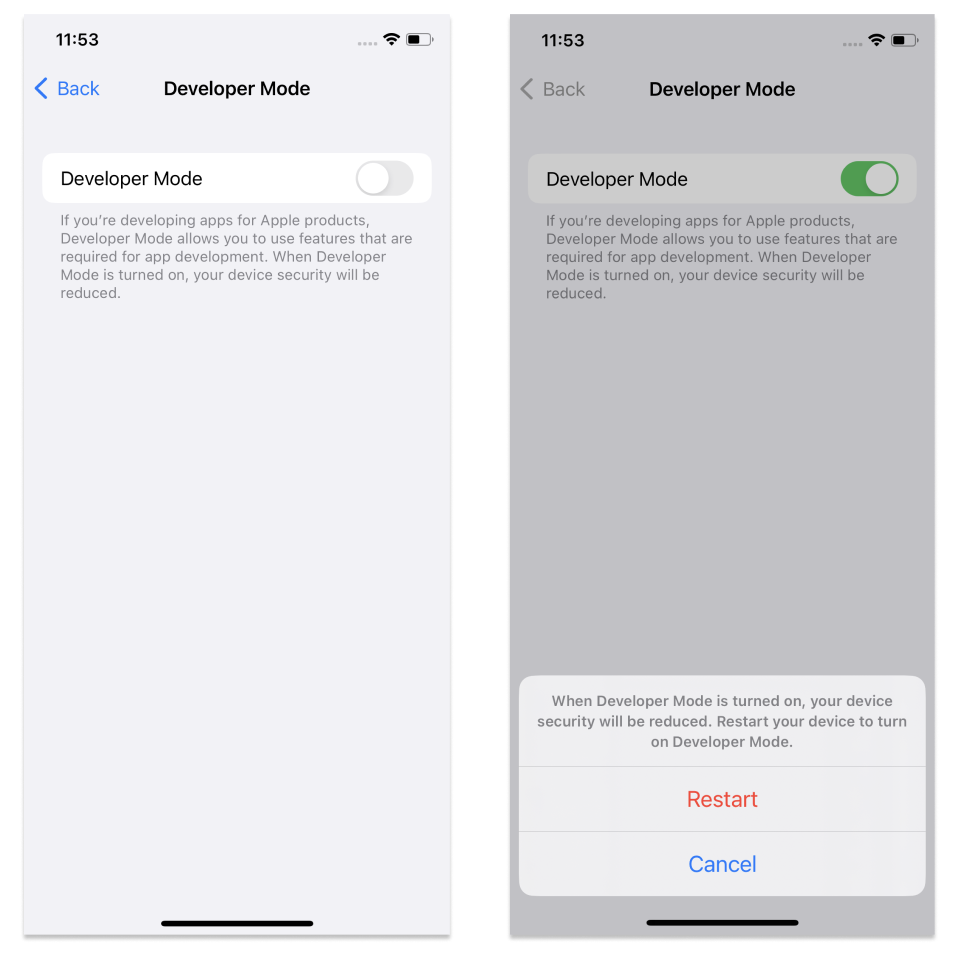
The 60-Second Window. Do not walk away from your phone while it restarts. Once the phone boots back up and you unlock the screen, a secondary pop-up prompt will appear asking you to confirm that you want to turn on Developer Mode. You have approximately 60 seconds to hit “Turn On” and enter your passcode. If you miss this window, the process fails, and you will need to toggle the setting and restart your phone all over again.
Step 2: Reveal Developer Mode via Windows PC
If you have a Windows PC, downloading Xcode is impossible, as the software is strictly Mac-only. However, you can still trigger the hidden developer menu by using third-party sideloading tools that simulate a developer environment. Tools like Sideloadly or AltStore are widely used by the community for this exact purpose.
The Windows Connection Procedure
- Install Apple Drivers: First, you must install the official, non-Microsoft Store versions of iTunes and iCloud for Windows directly from Apple’s website. This ensures your Windows PC has the correct USB drivers to communicate with your iPhone.
- Download a Sideloading Tool: Download a reputable third-party app loader like Sideloadly.
- Connect Your iPhone: Plug your device into your Windows PC. Unlock your phone and accept the “Trust This Computer” prompt.
- Load a Developer Profile: Open Sideloadly. Enter your Apple ID (this is required to sign the app). You will need to find any basic
.ipafile (an iOS app file) online to sideload. Drag the.ipafile into Sideloadly and click Start. - Enable the Setting: Once the software pushes the app to your phone, your iPhone will recognize that a developer action has occurred. Open Settings > Privacy & Security, scroll to the bottom, and you will find the developer menu waiting for you. Turn it on, restart your device, and watch for the 60-second confirmation prompt upon reboot.
Troubleshooting: Fix Developer Mode Not Showing
Even after following the primary procedures, some users still connect their device only to find the menu remains stubbornly hidden. This indicates a communication failure between your hardware and the software.
If the system fails to trigger the menus, follow these systematic troubleshooting steps to restore the connection.
Systematic Fixes
- Verify the Physical Data Connection: Inspect your USB cable. Many third-party cords only provide charging power but cannot transmit data. Swap to an official Apple cable. If you are on a Mac, check your System Information under the USB tree to confirm the device is recognized. If you are on Windows, ensure your phone appears in iTunes.
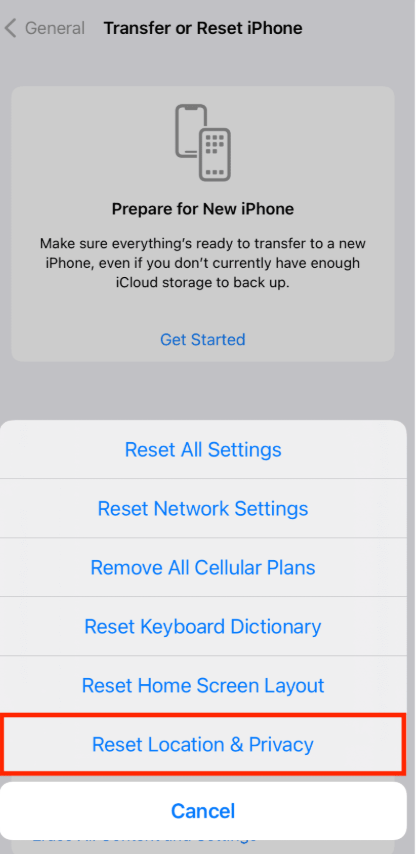
- Reset Trusted Computers: If the trust prompt fails to appear when you plug your phone in, your iPhone might have saved a corrupted connection state. On your iPhone, navigate to Settings > General > Transfer or Reset iPhone > Reset > Reset Location & Privacy. Reconnect the device to your computer to force a fresh “Trust This Computer” prompt. This step solves the majority of missing menu issues.
- Restart the Connection: The debugging features will not activate if your software is dormant or frozen. Close Xcode (or Sideloadly) completely, disconnect your iPhone, and restart your computer. Launch your development software first, and then reconnect the device.
Understanding Apple Developer Settings and Device Security
Once enabled, developer mode allows testing and debugging of apps directly on the device, bypassing standard App Store security checks. But why is this process so cumbersome?
Apple restricts access to developer mode to protect users from unauthorized app installations. The average consumer never needs to access these menus. By keeping the system configuration hidden behind computer connections and secondary reboots, Apple actively prevents malicious software from silently installing onto a device without your explicit, physical consent.
The most important best practice regarding this system configuration is to actively manage it. Users should only enable developer mode when necessary and disable it afterward if not needed. By turning the feature off when your testing is complete, you restore the iPhone’s default security architecture and protect your personal data from unauthorized background access.
Bonus: Simplifying GPS Testing with Fonelora Location Changer
Often, users try to enable developer settings because they want to fake their GPS location for a specific mobile game or location-based app. If your only goal is spoofing your location, going through the massive hassle of downloading Xcode or Sideloadly is entirely unnecessary.
For users who specifically need to test location data—and are not actually compiling their own apps—Fonelora Location Changer offers a premium, consumer-friendly solution that operates without needing advanced system toggles.
Fonelora bypasses the need to hunt for hidden menus. It operates safely without requiring a jailbreak or altering core system files. It includes a built-in Safe Game Mode that simulates realistic movement patterns to help reduce location-based errors or account flags in mobile games.
How to Use Fonelora for Location Spoofing
Step 1: Download and Install
Download Fonelora Location Changer from the official website and install it on your computer.

Step 2: Connect Your Device
Connect your iPhone or Android device using a USB cable.
- On iOS: Tap “Trust This Computer” when prompted
- On Android: Enable USB Debugging

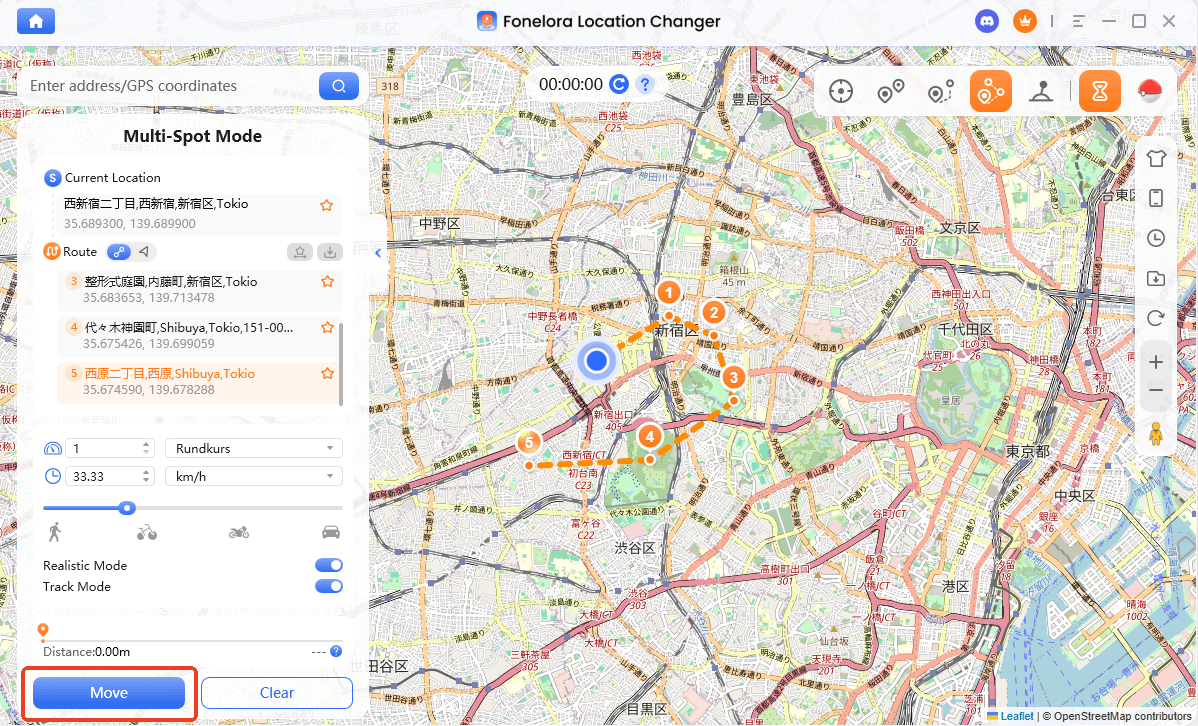
Step 3: Choose a Location
Open the map interface in the software:
- Enter a specific location (such as an airport or busy area)
- Or select a point directly on the map
FAQ
What exactly is developer mode on iOS?
It is an advanced device state introduced in iOS 16 that allows software creators to install, run, and test locally compiled apps on their physical devices.
Why can’t I see the option on my iPhone?
The menu is hidden by default to protect standard users. Apple requires a specific trigger—usually a direct data connection to a computer running development software—to reveal the toggles in your Privacy & Security settings.
Do I absolutely need a computer?
Yes. Triggering the menu requires connecting the device to a computer with development tools installed. This proves to the device that it is in a legitimate development environment.
Is it safe to use?
It is safe as long as you are exclusively installing and testing trusted software. However, because it lowers system security by allowing sideloading, you should disable it in your settings when your app testing is complete.
Conclusion
Overcoming a device where the developer option is hidden does not have to end in frustration. By understanding that Apple requires a direct connection to development software, you can easily trigger the necessary menus. Whether you are using the official Xcode method on a Mac or a third-party sideloading tool on a Windows PC, following these steps will safely unlock your device’s advanced capabilities. Remember to monitor your phone closely during the reboot phase to catch the 60-second confirmation prompt, and always disable the feature once your testing is complete to maintain your device’s strict security standards.

Joy Taylor is a seasoned technical writer with over a decade of experience in mobile technology. At iMobie, she specializes in producing in-depth content on iOS data recovery, iPhone unlocking solutions, and iOS troubleshooting.
Product-related questions? Contact Our Support Team to Get Quick Solution >
