Unable to Share Location on iPhone: Tested Solutions
iPhone location sharing issues cause anxiety but are usually due to settings, connectivity, or battery problems; this guide shows simple, proven steps to restore accurate, reliable family location visibility quickly.
When you are trying to keep your family safe, the last thing you want is a technology failure. If you are an iPhone user trying to share your location with a family member, only to find the map is blank or refusing to update, the anxiety is immediate and real. You rely on these features for peace of mind, not abstract troubleshooting.

Most of the time, this problem stems from a few specific culprits: a buried privacy setting, a time-sync error, a drained battery, or simply a bad cellular connection on the receiver’s end. Fortunately, restoring your device’s visibility is a straightforward process once you know exactly where to look. This detailed guide covers the tested, real-world methods to fix your iPhone location sharing so your family stays connected securely and accurately.
How to Fix iPhone Location Sharing
When your location fails to update, your first instinct might be to restart your phone. While that is a helpful step, a permanent fix requires verifying your actual broadcast permissions. After dealing with this glitch personally, I found that the fastest resolution comes from checking your exact Find My configurations, verifying your system clock, and confirming your family member’s connection.
Here is the exact procedure to inspect your Apple ID configuration and correct your privacy settings:
- Check the “Me” Tab in Find My: Open the Find My app and tap the “Me” tab located at the bottom right of your screen. Look for the “Share My Location” toggle. It is incredibly common for users to accidentally bump this switch and turn off their sharing. Ensure this is toggled to the green “on” position.
- Verify Your Apple ID Profile: Open the main Settings app and tap your Apple ID profile name located at the top of the screen. Tap “Find My” and verify that sharing is enabled at the account level.
- Inspect Privacy & Location Services: Return to the main Settings menu, scroll down, and select “Privacy & Security,” then tap “Location Services.” Confirm the global master switch at the top is activated.
- Fix App-Specific Permissions (The “Gotcha” Step): Still in the Location Services menu, scroll down to the Find My app. Set the permission to “While Using the App” or “Always.” Crucially, ensure the “Precise Location” toggle is enabled. iOS updates frequently reset this specific switch, which immediately degrades your broadcast accuracy.
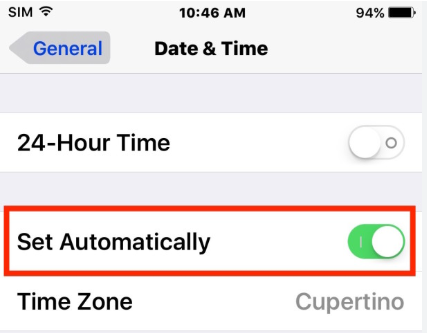
- Sync Your Date & Time: Go to Settings > General > Date & Time. Ensure the “Set Automatically” toggle is switched on. Apple’s iCloud servers rely on exact cryptographic timestamps. If your iPhone’s clock is out of sync by even sixty seconds, iCloud will reject your location data to prevent security conflicts.
- Check the Receiver’s Device: Do not assume the problem is entirely on your end. The person trying to see your location needs a functioning device, too. If your wife, husband, or child is sitting in a building with thick concrete walls or has an outdated version of the Find My app, they will not be able to receive the data your phone is successfully sending.
If your battery is running low, your iPhone will automatically activate Low Power Mode (indicated by a yellow battery icon). This mode severely limits background app refresh rates, effectively pausing your live GPS broadcast. Charging your phone or manually disabling Low Power Mode in your battery settings is often an instant fix.
Built-In Adjustments vs. iOS System Repair Tools
Sometimes, despite verifying every permission, the system simply refuses to broadcast. When you are stuck trying to troubleshoot stubborn location errors, you generally have two main approaches: continuing to adjust built-in iOS menus or using a dedicated iOS system repair tool.
If your goal is keeping your family safe, you want a solution that ensures your real, highly accurate location is broadcasted. (Be wary of any software that offers to “spoof” or “teleport” your GPS coordinates. Faking your location is the exact opposite of what you need during an emergency). Understanding the differences between standard settings and system repair tools will help you choose the correct method to revive your actual GPS hardware.
| Evaluation Criteria | Built-In iOS Settings Method | iOS System Repair Software |
|---|---|---|
| Primary Use Case | Fixing accidentally toggles or time-sync errors. | Repairing deeply corrupted iOS system files blocking the GPS. |
| Success Rate | High for standard user errors. | High for underlying software glitches. |
| Time Cost | Fast. Takes just a few minutes of menu navigation. | Moderate. Requires downloading firmware via a computer. |
| Technical Skill | Low. Standard menu navigation. | Moderate. Requires connecting to a PC/Mac. |
| Safety Risk | None. Standard system adjustments. | Low. Most offer standard repair modes with no data loss. |
If your location sharing remains frozen after adjusting manual settings, comparing these criteria reveals that your operating system itself might have suffered a glitch during a recent update, requiring a deeper system refresh.
Resolving Stubborn Glitches with an iOS System Repair Tool
If you continue to experience a frozen map despite configuring your menus correctly, it is highly likely that a software bug is blocking your iPhone’s internal GPS module from communicating with iCloud. In these scenarios, a dedicated iOS system recovery tool (such as Tenorshare ReiBoot, iMyFone Fixppo, or similar trusted software) provides a safe way to repair the operating system.
These tools are designed to rewrite corrupted core iOS files that standard restarts cannot fix. Most importantly, they accomplish this safely without erasing your personal data or requiring you to jailbreak your phone.
Here is the general procedure to resolve persistent software bugs using a standard repair tool:
- Connect Your Device: Download and install a trusted iOS system recovery tool on your Mac or Windows computer. Connect your iPhone using a secure USB cable.
- Select Standard Repair Mode: Launch the software and choose the “Standard Repair” or “Standard Mode” option. This specific mode is critical because it repairs the operating system while preserving your photos, messages, and app data.
- Download Firmware and Repair: The software will prompt you to download the latest clean version of your iOS firmware. Once downloaded, click the repair button. The tool will safely reinstall the core system files, clearing out any bugs that were freezing your Find My app.
By fixing the underlying software corruption, your iPhone’s GPS module will finally be able to communicate properly with your apps again.
Fixing iCloud Sync Errors and Network Connectivity
Secondary causes for location errors often stem from unseen data transfer blockages. An essential requirement for proper broadcasting is a strong, continuous internet link. Your iPhone could be calculating perfect GPS coordinates, but a stable internet connection is required for real-time location updates. If your smartphone cannot communicate with Apple’s servers, the broadcast will freeze instantly, resulting in an outdated status on the receiving end.
Furthermore, ensuring Apple ID and iCloud are properly synced is essential. Network connectivity issues directly interrupt the transmission of your real-time data. To resolve these underlying obstacles, apply this specific network procedure:
- Verify Your Connection Strength: Open your Control Center and confirm you are connected to a robust Wi-Fi network or possess active, strong cellular data. A weak signal is a leading cause of tracking delays.
- Inspect iCloud Sync Status: Navigate to Settings, tap your name at the top of the menu, and select “iCloud.” Verify that “Find My” is actively permitted to sync data to your cloud account.
- Execute a Network Reset: If your phone refuses to hold onto a cellular or Wi-Fi connection, you may need to clear out corrupted network settings. Go to Settings > General > Transfer or Reset iPhone > Reset > Reset Network Settings.
Resetting your network settings will permanently delete all your saved Wi-Fi passwords, VPN configurations, and Bluetooth device pairings. You will need to manually re-enter your home and work Wi-Fi passwords once the device reboots. Have your passwords written down and ready before performing this step.
By verifying your account configuration and aggressively addressing network connectivity issues, you implement a proven method to keep your device communicating without interruption.
Why Your iPhone Won’t Share Its Location Explained
Understanding the mechanics behind these location errors helps you prevent future occurrences. In most instances, this problem stems from a combination of outdated operating systems, strict privacy configurations, and battery management features.
When Apple releases a new iOS update, it frequently upgrades its background security protocols. This is generally great for your security, but if an update is installed improperly, it can automatically revert your location permissions to their most restrictive defaults. This intentional design inadvertently causes tracking failures, as the system suddenly refuses to let the Find My app run in the background.
Additionally, background app refresh is heavily throttled when your device attempts to save battery life. If you rely on location sharing for daily family check-ins, regularly updating device settings helps prevent recurring issues. By keeping your software current, staying aware of your battery level, and systematically checking your connectivity and iCloud configuration, you effectively eliminate many background incompatibilities. The outcome is highly positive: the user successfully restores location sharing and maintains connection with family without future disruption.
Alternative Solutions: Fonelora Location Changer
As mentioned earlier, desktop-based tools are generally the most dependable option for modifying GPS location. Compared to mobile apps that rely on easily detectable “Mock Location” settings, desktop solutions tend to deliver a more stable and consistent signal.
If you’re looking for a simpler and more reliable alternative, Fonelora Location Changer is a solid option to consider.
Instead of relying on basic spoofing techniques, Fonelora changes your device’s GPS location through a computer connection. This approach helps minimize common problems like location jumping (rubber-banding) and reduces the likelihood of immediate detection.
Why Choose Fonelora Location Changer?
Fonelora focuses on stability and realistic movement—two key factors when modifying location-based apps like Uber:
- Change GPS location instantly with one click
- Compatible with both iOS and Android devices
- No need to root or jailbreak your phone
- Built-in movement simulation for more natural behavior
- Adjustable speed and customizable routes
- Helps reduce sudden location resets or “snapping”
It’s especially useful for:
- Drivers aiming to position themselves in high-demand areas
- Users testing location-based features or scenarios
- Anyone seeking a smoother alternative to mobile spoofing apps
How to Use Fonelora to Change GPS Location
Follow these simple steps to get started:
Step 1: Download and Install
Download Fonelora Location Changer from the official website and install it on your computer.

Step 2: Connect Your Device
Connect your iPhone or Android device using a USB cable.
- On iOS: Tap “Trust This Computer” when prompted
- On Android: Enable USB Debugging

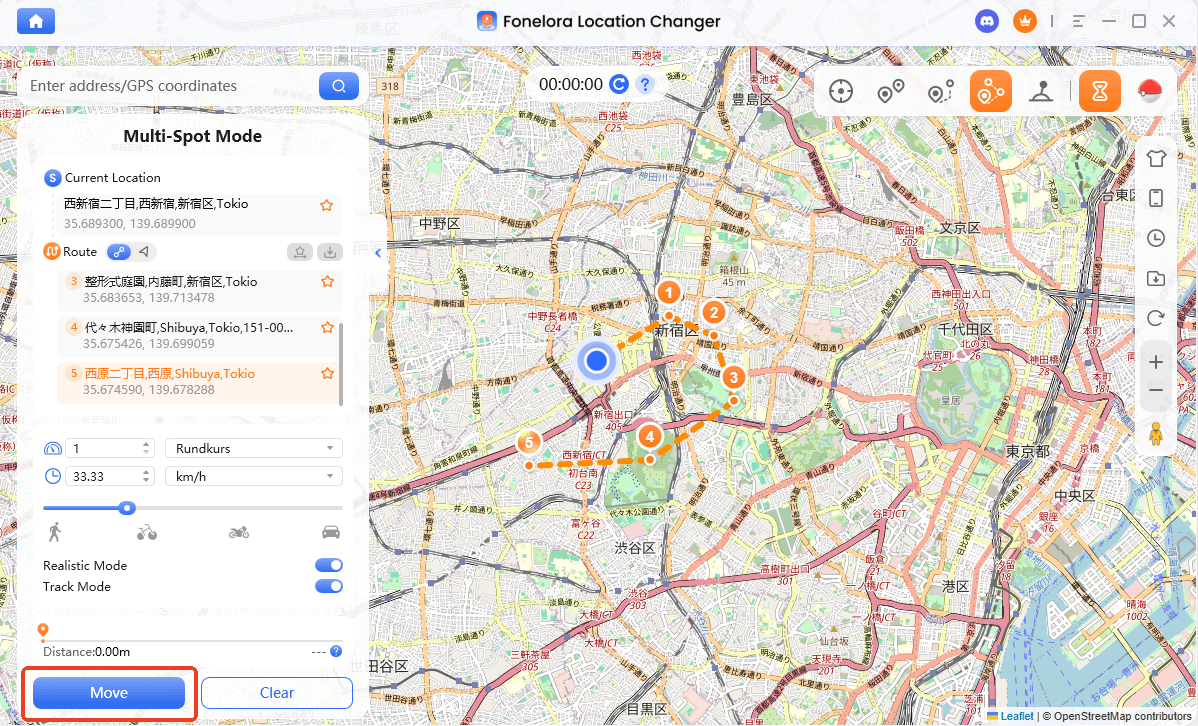
Step 3: Choose a Location
Open the map interface in the software:
- Enter a specific location (such as an airport or busy area)
- Or select a point directly on the map
Frequently Asked Questions About iPhone Location Sharing
Why is my iPhone showing “Location Not Available”?
This issue is typically caused by location services, an inaccurate date and time setting, or poor cellular reception. It can also occur if you have accidentally toggled off the “Share My Location” switch inside the Find My app’s “Me” tab, or if your phone is in Low Power Mode.
How do I quickly fix location sharing on my iPhone?
The most effective method is to verify your specific app permissions. Navigate to Settings > Privacy & Security > Location Services, and ensure the master switch is on. Then, scroll down to the Find My app and ensure the permission is set to “While Using the App” or “Always,” and that “Precise Location” is turned on.
Does my Apple ID affect how I share my location?
Absolutely. The entire family location system relies heavily on your Apple ID and iCloud infrastructure. Your iCloud account authenticates your identity and distributes your real-time data to authorized contacts securely. If your Apple ID requires you to accept new terms of service or re-enter a password, location sharing may pause until you log back in.
Conclusion
Dealing with a frozen map or a “Location Not Available” error causes immediate stress, especially when you are simply trying to keep your loved ones informed and safe. Whether the root cause lies in accidentally privacy settings, frustrating network and iCloud sync errors, or a simple time-zone mismatch, you now possess the exact procedures to fix the problem.
By systematically checking the “Me” tab in your Find My app, ensuring your system clock is set automatically, and verifying that both you and your receiving family members have stable connections, you can resolve the majority of standard errors in minutes. For persistent bugs that standard menus cannot solve, utilizing a trusted iOS system repair tool offers a secure method to refresh your operating system without compromising your data. Apply these tested methods today, update your settings, and ensure your iPhone securely and accurately broadcasts your true location whenever your family needs it most.

Joy Taylor is a seasoned technical writer with over a decade of experience in mobile technology. At iMobie, she specializes in producing in-depth content on iOS data recovery, iPhone unlocking solutions, and iOS troubleshooting.
Product-related questions? Contact Our Support Team to Get Quick Solution >
