How Do I Recover Previous Versions of Word Documents? (2026 Expert Guide)
Wondering how to recover previous versions of a Word document after overwriting or accidental edits? This 2026 expert guide explains how Word’s version history works across OneDrive, SharePoint, and local files. You’ll learn when older versions are still available, how to restore them safely, and what to do if version history isn’t enabled.
Accidentally saving over a critical file is a workflow disruption that demands immediate action rather than panic. One moment, you have a finalized report; the next, a mistaken “Save” command has overwritten hours of effort. If you are searching “how do I recover previous versions of Word documents,” here is the reality: The solution is rarely permanent, but the method you use depends entirely on one variable.
Recovery depends entirely on whether your file was saved to OneDrive or your local hard drive.
This guide removes the guesswork. We have tested these methods across Microsoft 365, Office 2021, and Office 2019 to ensure accuracy. Whether you utilize cloud syncing or strictly offline storage, the following sections provide the exact technical steps to retrieve your data.
You may also like: How to Recover Deleted Word Document on Mac >
Quick Decision Guide: Local vs. Cloud Recovery Options
Before attempting any recovery steps, you must identify exactly where your file relies for storage. The procedure to restore a previous version of a Word file differs entirely based on this factor. Your success rate is dictated by this distinction.
Cloud Recovery (OneDrive / SharePoint)
If your document is saved to OneDrive or SharePoint with AutoSave enabled, recovery is highly likely. Microsoft 365 creates continuous version snapshots in the cloud. You can view precise timestamps and restore any edit from the past 30 days without data loss. If this applies to you, proceed directly to Method 1.
Local Recovery (Hard Drive / USB)
If your file resides on your computer’s desktop or Documents folder without cloud syncing, Word does not automatically keep a “version history” in the same way. Recovery in this scenario relies on operating system backups like Previous Versions (Windows) or Time Machine (Mac).
If you save locally, successful recovery often depends on whether you had backup utilities configured before the data loss occurred.
Identified your storage type? Except for some PC data recovery tools, you can also use the sections below to apply the correct technique for your situation.
Method 1: How to See Version History in Word (OneDrive & SharePoint)
For users with files stored on OneDrive or SharePoint, recovering an old draft is the intended function of the software. Because the file exists in the cloud, the Version History feature tracks changes silently in the background, creating a timeline you can browse.
This is the industry standard for data integrity. Here is how to restore a previous version of a Word file using the cloud interface:
1. Open the Document: Open the current version of the Word file you accidentally overwrote.
2. Access the Title Bar: Look at the very top center of the Word window where the filename is displayed. Click the filename.
3. Browse Version History: In the dropdown menu that appears, select Browse Version History. A sidebar will open on the right side of your screen.
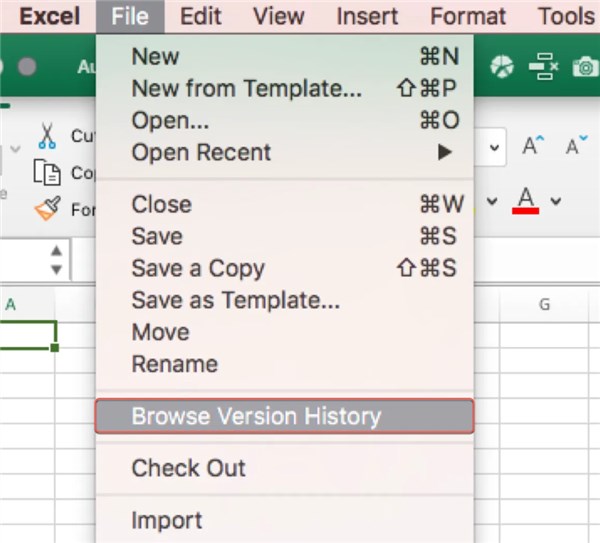
4. Review Timestamps: You will see a list of dates and times, accompanied by the name of the author who made the edits. Click the timestamps to view a read-only snapshot of the document at that moment.
5. Restore or Copy: Once you identify the correct version, you have two choices:
- Restore: This replaces your current file with the old version immediately.
- Save a Copy: This creates a separate file, allowing you to compare the old and new versions side-by-side to merge specific paragraphs.
Troubleshooting: Why is Version History Grayed Out?
If you see the “Version History” option but cannot click it (it appears gray), do not panic. This usually indicates a synchronization pause.
- Check Your Sign-In: Ensure you are signed into your Microsoft account within Word (look for your name in the top right).
- Check Connectivity: Word needs to communicate with the OneDrive server to retrieve the list.
Method 2: Recover Overwritten Word Documents Saved Locally (Windows)
If you work offline, the “Version History” feature inside Word will likely not work, and the same limitation often applies when trying to recover unsaved Notepad files. Instead, you must rely on Windows system backups. We have broken this down into the Standard Method (for users with backups) and the Last Resort Method (for users without backups).
Method 2A: Using Windows Previous Versions (Best Case Scenario)
1. Honest Reality Check: This tab will likely be empty if you did not have Windows File History or System Restore points configured before the data loss. However, it is the first place you should check.
2. Open File Explorer and navigate to the folder containing your Word document.
3. Right-click the file and select Properties.
4. Click the Previous Versions tab located at the top of the Properties window.
5. Wait for Search: Windows will briefly search for shadow copies. If Windows took a snapshot via File History, you will see a list of file versions organized by date.
6. Select the version you need and click Restore.
Method 2B: The “Last Resort” – Searching for Temporary Files
If the “Previous Versions” list is empty, you are not entirely out of options yet. Word creates temporary files while you work. Even if you saved over the main file, a fragment of the previous version might still exist in the hidden AppData folder. This is a technical workaround, but it is worth attempting.
1. Open the Run Command: Press the Windows Key + R on your keyboard.
2. Enter the Path: Type %appdata%\Microsoft\Word and press Enter.
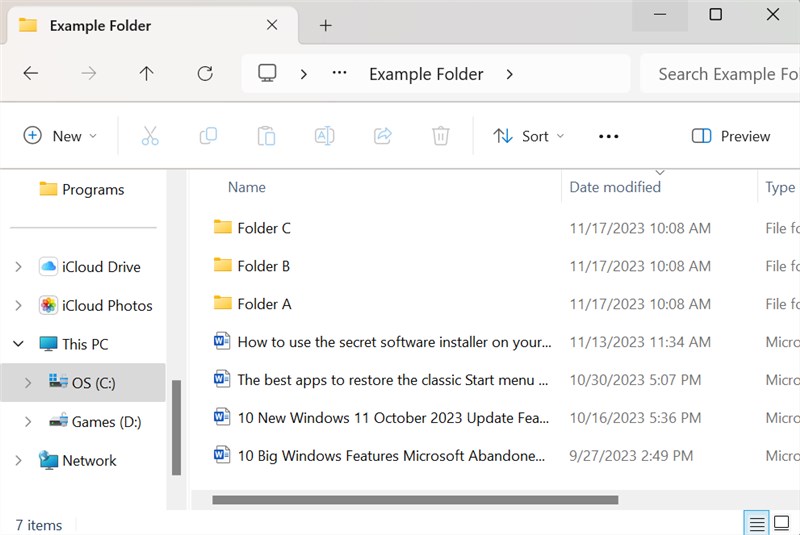
3. Search for Artifacts: Look for files that end in .asd or .tmp. They may have names starting with a tilde (~) or look like gibberish.
4. Filter by Date: Sort the folder by “Date Modified” to find files created around the time you were working on the document before the overwrite.
5. Attempt Recovery:
- Copy the file to your desktop.
- Rename the file extension from .tmp or .asd to .docx. (Windows may ask you to confirm—click Yes).
- Try opening the file in Word.
Warning: This method is not guaranteed. The formatting may be broken, but it often recovers the raw text, which is better than losing everything.
Method 3: Restore Old Version of Word Document on Mac (Time Machine)
Mac users often struggle to find accurate advice because Windows-centric guides dominate the results. If you need to restore an old version of a Word document on macOS (Catalina through Sonoma), your primary solution is Time Machine. Unlike simple auto-saves, Time Machine keeps hourly backups of your entire drive.
How to Use Time Machine Restore for a Single File
This allows you to roll back a specific .docx file without reverting your entire system.
1. Connect Backup Drive: Ensure your external Time Machine backup drive is connected. (Note: If you don’t have the drive, Time Machine sometimes keeps “Local Snapshots” on your internal drive, so try these steps anyway).
2. Locate the Folder: Open Finder and navigate to the folder where your Word document is currently located.
3. Enter Time Machine: Click the Time Machine icon in the menu bar (top right) and select Browse Time Machine Backups.

4. Navigate the Timeline: Use the timeline on the right edge of the screen to scroll back to a time before the overwrite occurred.
5. Preview First: This is the most critical step. Select the Word file in the historical window and press the Spacebar. This loads a Quick Look preview, allowing you to verify it is actually the version you want before you restore it.
6. Click Restore: This brings that specific file back to the present.
Further Reading: How to Recover Word Document That Was Not Saved on Mac >
Why Can’t I Find Previous Versions? (Understanding AutoSave)
A common point of confusion is why Word doesn’t simply “remember” the file on your hard drive. Here is the expert insight that clarifies this mechanics: True versioning relies on cloud snapshots.
Most users conflate AutoRecover with Version History, leading to frustration when they try to recover an overwritten Word document.
- AutoRecover: This feature is designed purely for crash protection. It saves a temporary file every 10 minutes to help you if Word closes unexpectedly (e.g., a power outage). It generally does not protect you against manual overwrites (hitting “Save” yourself).
- AutoSave (Version History): This is connected to OneDrive/SharePoint. It continuously saves distinct snapshots to the cloud database, creating a retrievable timeline of every change.
If you cannot find previous versions, it is because the file was saved locally without Windows File History or Time Machine active. To prevent this obstacle in the future, follow this checklist:
- Enable AutoSave: Toggle the switch in the top-left corner of Word (requires OneDrive).
- Configure Local Backups: Set up File History (Windows) or Time Machine (Mac) immediately.
- Use Track Changes: If you must work locally, manually enable Track Changes via the Review tab. This keeps a record of your edits within the document itself, allowing you to reject changes even after saving.
Frequently Asked Questions About Word File Recovery
Q1. How do I recover an overwritten Word document?
If the file is on OneDrive, use the Version History feature by clicking the document title. If the file is local, check the Previous Versions tab in Windows Properties or use Time Machine on Mac. If those fail, check the %appdata% folder for temporary files.
Q2.Where is Version History in Microsoft Word?
In modern versions of Word (Microsoft 365, Word 2019/2021), Version History is located by clicking the filename in the top title bar. You can also find it by navigating to File > Info > Version History.
Q3.Does Word version history work without OneDrive?
No. The native “Version History” feature inside the Word application requires the file to be synced to OneDrive or SharePoint. Local files require operating system backups (File History or Time Machine) to retrieve older versions.
Q4.How far back does Word version history go?
For OneDrive and SharePoint files, Microsoft typically retains version history for the last 30 days for personal accounts. Business accounts may retain versions for longer, depending on the administrator’s retention policies.
Q5.Can I restore an older Word version if the file is saved locally?
Yes, but strictly via system-level backups. You must have configured Windows File History or Mac Time Machine before the data loss occurred. Without these pre-configured backups, Word does not keep permanent historical copies of local files.
Conclusion: Regain Control of Your Documents
Losing work to an accidental overwrite is stressful, but understanding the difference between Cloud and Local storage allows you to navigate the solution efficiently—and the same principle helps you recover deleted photos or other important files. If you use OneDrive and AutoSave, your data is resilient and easily retrievable via Version History. If you rely on local storage, your safety net depends entirely on Windows File History or Mac Time Machine.
Do not wait for the next data mishap. Take a moment right now to check your settings—enable AutoSave or configure your local backup drive. By verifying these safeguards today, you ensure that your future work is protected against accidental overwrites.

Joy Taylor is a seasoned technical writer with over a decade of experience in mobile technology. At iMobie, she specializes in producing in-depth content on iOS data recovery, iPhone unlocking solutions, and iOS troubleshooting.
Product-related questions? Contact Our Support Team to Get Quick Solution >
