How to Recover Deleted Photos on PC: Verified Solutions for Windows 10 & 11
Accidentally deleted photos on a Windows PC? In many cases, they can still be recovered—even after emptying the Recycle Bin—depending on how the data was lost. This guide shares verified solutions for Windows 10 and 11, covering built-in recovery options, backup restores, and trusted photo recovery software to help you get your pictures back safely.
There is a specific kind of panic that sets in when you hit “Delete” and realize a fraction of a second later that you selected the wrong folder. You are searching for how to recover deleted photos on PC because those digital memories feel irreplaceable, and the Recycle Bin is empty. You are not alone in this—data loss impacts everyone, from professional photographers to parents organizing family albums.
When a file disappears, your first instinct is likely to download every tool you can find. Pause. Taking the wrong action now can permanently destroy data that is currently recoverable. Files are rarely gone forever the moment you delete them. Whether you are dealing with a simple accidental deletion or a more complex permanent loss involving “Shift+Delete,” the data often remains on the drive, waiting to be rescued.
This guide outlines specific, verified steps to recover your images. We will move from the simplest built-in fixes to a detailed walkthrough using specific deep-scan software used by professionals.
CRITICAL WARNING: Stop Using Your Computer
The Golden Rule of Data Recovery: Do Not Write New Data.
This is the single most critical factor in successful data recovery. When a photo is deleted, Windows does not immediately erase the binary data (the ones and zeros that make up your image). Instead, it simply marks that space on your hard drive as “available” for new files.
If you continue to browse the web, install programs, or save new Word documents to that drive, you are handing Windows permission to overwrite those “available” blocks. Once the old data is overwritten, recovery becomes impossible.
Check Your Drive Type (HDD vs. SSD)
Your chances of recovery depend heavily on whether your computer uses a traditional Hard Disk Drive (HDD) or a modern Solid State Drive (SSD).
How to check:
1. Press Ctrl + Shift + Esc to open Task Manager.
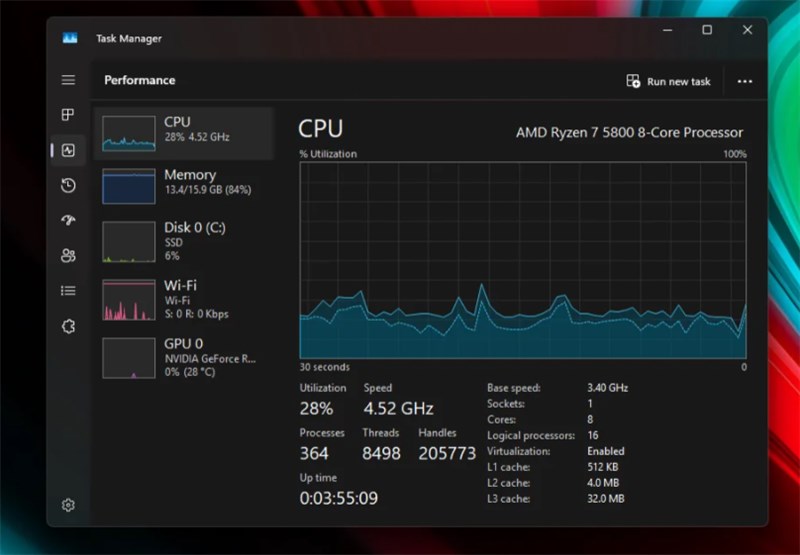
2. Click the Performance tab (the icon looks like a heartbeat monitor).
3. Look at the “Disk” section on the left. It will label your drive as HDD or SSD.
Why this matters:
- HDD: You have a generous window of time. Deleted data sits physically on the magnetic platter until overwritten.
- SSD: You must act immediately. SSDs use a command called TRIM, which proactively wipes deleted data cells to maintain speed. If you have an SSD, skip the manual checks and proceed to Method 2 immediately to recover data from an SSD, or shut down the PC and perform the recovery from an external boot drive if possible.
Your Recovery Decision Tree
- Did you just press Delete? Check the Recycle Bin immediately (Method 1).
- Is your Recycle Bin empty or did you Shift+Delete? Check Cloud Backups (Method 1).
- Are the files still missing? Stop writing to the drive and proceed to Deep Scan (Method 2).
Recovery Options Compared: Free Tools vs. Professional Suites
Many users waste hours looking for a hidden “undo” button when they actually need a data reconstruction tool. Understanding the difference between what Windows offers and what third-party PC data recovery tools do will save you time.
Manual Methods (Native Windows Tools)
Tools like the Recycle Bin and File History are your first line of defense. They are free, safe, and require no installation. However, they rely on the file system’s index remaining intact.
Professional Recovery Software (Deep Scan)
When native tools fail, you need software that performs “file carving.” These tools ignore the Windows file system and scan the raw storage sectors to reconstruct files based on their digital headers (e.g., identifying a JPEG by its specific hexadecimal start code).
The Reality of “Free” Recovery:
- Recuva (Free): Excellent for simple undeletion on HDDs. It is completely free but struggles with complex “Shift+Delete” scenarios on modern drives.
- Disk Drill / Stellar / EaseUS (Freemium): These are “heavy duty” tools. They offer superior deep scanning algorithms.
Important: Most offer a “Free Preview” which allows you to see if the files are there, but they will charge you to actually save the files (or cap you at 500MB free). We recommend using the free preview to verify recoverability before paying.
Method 1: Restore Deleted Photos from Recycle Bin & Cloud Backups
Before assuming the worst, we must exhaust the standard recovery options. These are non-destructive and take only moments.
Check the Windows Recycle Bin
Unless you held down the Shift key while deleting, or the files were too large for the bin, your photos sit here.
1. Double-click the Recycle Bin icon on your desktop.
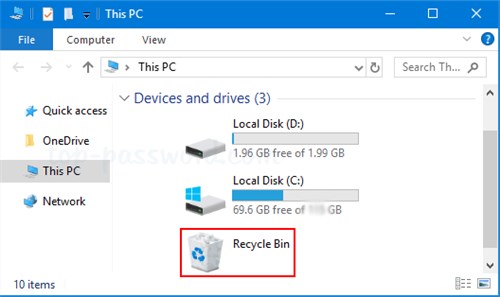
2. Click the “View” tab and select “Details” to sort by Date Deleted.
3. Right-click your photo files and select Restore. This sends them back to their original folder.
The Double-Check: OneDrive and Local Sync
Windows 10 and 11 act aggressively to sync your “Pictures” folder to OneDrive. Even if you deleted the file from your desktop, a copy might exist in the cloud or a synced folder.
The Local Check (Fastest):
Open File Explorer and look for the generic OneDrive folder in the left sidebar. Browse the “Pictures” subfolder there. Often, the deleted file is simply sitting in the cloud version of the folder, untouched.
The Cloud Recycle Bin:
If the local folder is empty, check the server:
1. Log in to the OneDrive website.
2. Navigate to the Recycle Bin in the left-hand menu.
3. Check if your deleted JPG files are listed there. OneDrive keeps deleted files for 30 days.
Method 2: How to Recover Permanently Deleted Photos (Deep Scan Walkthrough)
If the manual methods failed, your file system has “forgotten” where the photos are. We must now use software to find them.
For this guide, we will use Disk Drill as our primary example because its visual interface makes it easy to preview files, which is critical for verifying that a photo isn’t corrupted before you try to recover it. However, the steps are conceptually similar for other reputable tools like Stellar Data Recovery or the free tool Recuva.
Phase 1: Installation (The Safety Check)
Do not download the software to the same drive you lost files on.
If you lost photos on your C: drive, download and install the software onto a USB stick or an external hard drive (D: or E:). Installing it on C: could overwrite the very photos you are trying to save.
Phase 2: The Scan
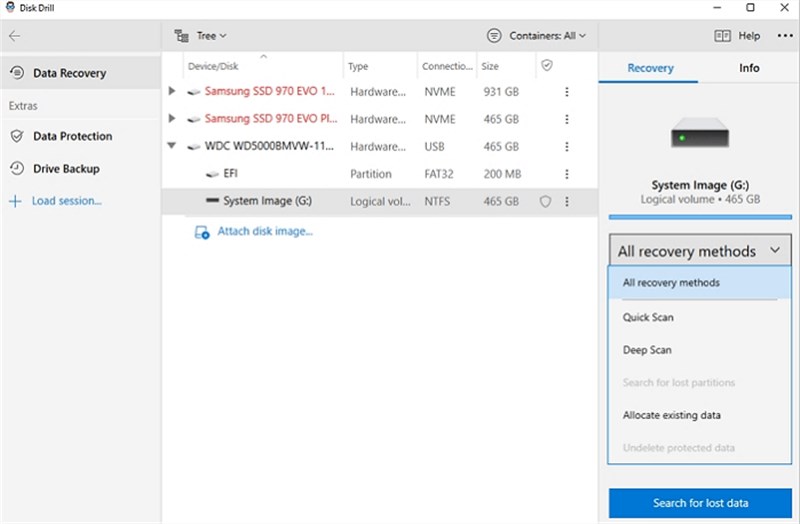
1. Launch Disk Drill.
2. Select the Drive: You will see a list of drives. Select the drive where the photos were located (usually Local Disk (C:)).
3. Choose Scan Method: Click Search for lost data. The software will run a “Quick Scan” (finding recently deleted files) followed automatically by a “Deep Scan” (scouring for raw data).
A deep scan on a large drive can take several hours. Be patient.
Phase 3: Preview and Recover
1. Filter Results: Once the scan finishes, you will see thousands of files. Click the Pictures filter in the sidebar.
2. Use the Preview Eye: This is the most important step. Click the “eye” icon next to a file name.
- If you see the full photo: The file is recoverable.
- If the preview is grey or jagged: The file header is intact, but the data is overwritten. It is likely corrupt and unrecoverable.
3. Select and Recover: Check the boxes next to the healthy photos. Click Recover.
4. Choose a Safe Destination: The software will ask where to save the files. You must save them to a different drive (e.g., your external USB drive). Saving them back to the source drive is dangerous and can corrupt the data during the process.
Method 3: Recover Deleted Photos from SD Cards & External Drives
Photographers and creators often face a different challenge: files deleted from removable media. The process for SD card photo recovery is similar to internal drives, but you have a significant advantage.
The SD Card Advantage
Unlike internal SSDs, SD cards and USB flash drives rarely use the TRIM command. This means that when you delete a photo from an SD card, the data remains physically intact on the flash memory chips for much longer.
The “filename” Gotcha
When recovering from an SD card using Deep Scan, you will often find that your original filenames (e.g., DSC_1234.jpg) are gone. This happens because the file system table that held the names was destroyed.
What to look for: Look for files named FILE001.jpg, FILE002.jpg, etc. You will need to rely on the Preview function to identify your images visually.
Steps for External Recovery
1. Connect the Device: Insert your SD card into a card reader. Ensure Windows assigns it a drive letter (e.g., E:).
2. Select External Source: Open your recovery software (like Disk Drill or Recuva) and select the SD card.
3. Scan for Specific File Types: In the software settings, you can often narrow the scan to specific camera formats like .CR2 (Canon), .NEF (Nikon), or .ARW (Sony) to speed up the process.
Troubleshooting: Why Are Recovered Photos Corrupted?
A common heartbreak in data recovery is seeing your file reappear in the list, only to find it won’t open or looks like a jumbled mess of colors (half-grey, half-image).
The Hard Truth About Corruption
Large photos are stored in fragments scattered across your drive. If you continued using the computer after deletion, new data might have overwritten just one fragment of the image.
- Can I fix it? If the “header” (the beginning of the file) is overwritten, the file is usually gone forever.
- Partial Corruption: If the header is fine but the middle is missing, you might see half a photo. There are “JPEG Repair” tools available, but they cannot magically recreate pixel data that has been overwritten by a Word document.
This highlights why the “Golden Rule” from the beginning was so vital. By saving recovered files to an external drive rather than the original source, you prevent your recovery tool from accidentally overwriting the end of File A while trying to save File B.
Frequently Asked Questions About PC Photo Recovery
Q1. How do I recover deleted photos on my PC for free?
For a completely free solution, start with Recuva. It is effective for standard hard drives and accidental deletions. If Recuva fails, or if you are on an SSD, you can use the free trial of Disk Drill to scan and preview files to see if they are even recoverable before deciding to purchase.
Q2.Can I recover permanently deleted photos on Windows 11?
Yes, in many cases. “Permanently deleted” usually means the file has been removed from the file system index (Shift+Delete), but the data remains on the disk. Using deep scan software can locate these raw files. However, if your PC uses an SSD with TRIM enabled, you must act quickly (often within hours) before the drive cleans up the deleted data cells.
Q3.Why are my recovered photos named “File001”?
This occurs during a “Deep Scan” or “Raw Recovery.” The software found the image data by scanning the drive’s physical sectors, but the file system map that linked that data to the name “Summer_Vacation.jpg” was destroyed. You will need to rename them manually after recovery.
Q4.Is it safe to use data recovery software?
Yes, provided you download it from the official developer’s website. The biggest risk is not the software itself, but where you install it. Always install the software on a different drive (like a USB stick) than the one you are trying to recover data from to avoid overwriting your lost files.
Conclusion: Securing Your Digital Memories
Losing photos is a stressful experience, but deletion is rarely the end of the road. By acting immediately to stop new data from being written to your drive and utilizing the correct software for your specific hardware (HDD vs. SSD), you have a strong chance of reclaiming your images.
Don’t let the panic dictate your actions. If you have verified your drive type and checked your backups, download a verified tool like Disk Drill or Recuva to a USB drive and run that scan today to recover lost audio files along with photos and videos. Once your files are safe, consider setting up a robust backup routine—like Windows File History or an automated Cloud sync—so that next time, a simple “Restore” click is all you need.

Joy Taylor is a seasoned technical writer with over a decade of experience in mobile technology. At iMobie, she specializes in producing in-depth content on iOS data recovery, iPhone unlocking solutions, and iOS troubleshooting.
Product-related questions? Contact Our Support Team to Get Quick Solution >
