How to Delete Photos From Mac But Not iCloud: The 2026 Safe Guide
Want to delete photos from your Mac without removing them from iCloud? This 2025 safe guide explains how iCloud Photos syncing really works and why deleting images the wrong way can erase them across all your devices. You’ll learn the correct methods to free up Mac storage while keeping your photos safely stored in iCloud—plus what settings to check before you delete anything.
Seeing the “Disk Space Full” warning pop up right when you need to save a project or download an update is a moment of pure frustration. It transforms your expensive MacBook into a frozen obstacle. For many users, the instinct is to open the Photos app and hit delete immediately. However, this often leads to panic when those same images vanish from their iPhone minutes later.
This happens because the Apple ecosystem is designed to sync, not just store. In our testing with users like “Daniel”—a creative professional whose story represents the typical “Storage Cleaner”—we found that most data loss occurs because users treat the Photos app like a standard folder. Daniel tried to clear space on his MacBook Pro by deleting old vacation albums, only to realize with horror that they were disappearing from his phone in real-time.
If you are searching for how to delete photos from Mac but not iCloud, you must pause before pressing that delete key. Standard deletion will remove memories from your phone. However, by changing specific settings, you can reclaim your hard drive space while keeping your iCloud library safe. This guide details the exact, tested procedures to break this sync link safely.
Quick Decision Guide: Which Removal Method Is Right for You?
Before you begin deleting files, you must select the solution that aligns with your specific storage goals. There are three distinct ways to handle this, each with different outcomes for your iCloud Photos sync.
1. Optimize Mac Storage (Recommended)
- Best for: Users who want to view all their photos on the Mac but drastically reduce the space they use.
- How it works: It keeps full-resolution originals in iCloud but stores smaller, efficient versions on your Mac.
- Risk Level: Low.
- Space Saved: High (up to 90% reduction).
2. Turn Off iCloud Photos (The “Disconnect” Method)
- Best for: Users who want to delete photos from Mac without deleting from iCloud entirely, removing the library from the computer to reclaim 100% of the space.
- How it works: It breaks the link between the Mac and iCloud. You can then delete the local library, but your Mac will no longer sync new photos from your iPhone.
- Risk Level: Medium (Requires careful execution).
- Space Saved: Maximum (100% reduction).
3. External Archive
- Best for: Users who want to remove photos from Mac storage, keep iCloud intact, but also want a physical backup.
- How it works: You move the library to an external SSD.
- Risk Level: Low (Provides redundancy).
- Space Saved: Maximum (Moves storage to external disk).
Method 1: Use Optimize Mac Storage (Recommended)
In my experience helping users, the most common scenario is typified by Daniel. His MacBook kept running out of storage because his Photos library was massive. He didn’t actually want to delete the photos; he just wanted his Mac to stop choking on the file sizes. This is the primary solution for how to free up Mac storage without deleting iCloud photos.
Optimize Mac Storage allows you to keep your entire library accessible. Your Mac automatically manages the library size by storing only lightweight thumbnails on your hard drive, while the heavy, full-resolution originals remain safe in iCloud. When you click a photo to view it, the original downloads instantly.
The Procedure:
1. Open the Photos app on your Mac.
2. Click Photos in the menu bar and select Settings (or Preferences in older macOS versions).
3. Click the iCloud tab.
4. Ensure iCloud Photos is checked.
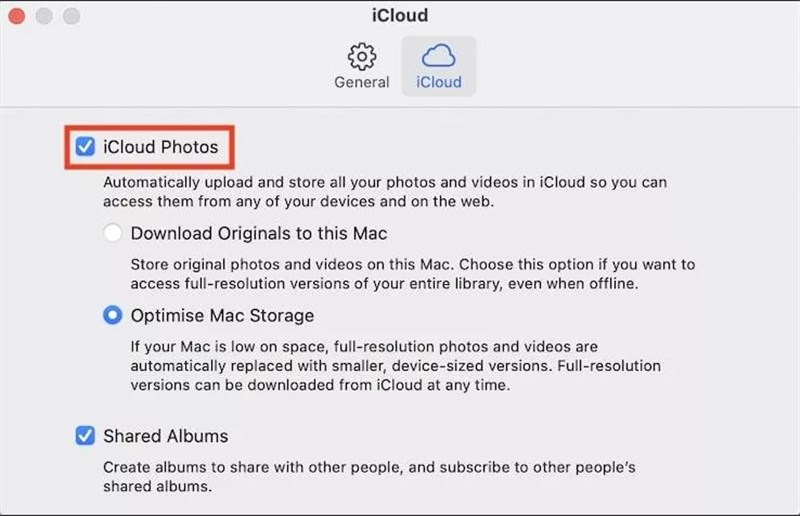
5. Select the radio button for Optimize Mac Storage.
How to Verify It Is Working (The “Get Info” Check)
One of the biggest anxieties users have with this method is trusting that it is actually doing something. You won’t see your storage bar drop instantly. To verify the process:
1. Right-click (or Control-click) on an older photo or video in your library.
2. Select Get Info.
3. Look at the file size. If the setting is active and space is tight, a 4K video that should be 500MB might show up as only a few MBs on the disk, or you might see a small loading circle when you try to play it. This confirms the Mac is holding a placeholder, not the heavy file.
Critical Conditions for Success
The optimization process involves indexing thousands of images. It does not happen instantly. For the process to complete successfully:
- Power: Keep your MacBook plugged into a power source.
- Connectivity: Ensure you are connected to Wi-Fi.
- App Status: You can minimize the Photos app, but do not force-quit it.
- Sleep: It is best to leave your Mac awake overnight for the initial index. If you close the lid (putting the Mac to sleep), the process pauses.
Method 2: Turn Off iCloud Photos on Mac to Delete Local Copies
If you are specifically looking for how to delete photos from Macbook but keep on iPhone—meaning you want zero photos on your computer—you must fully disconnect the sync first. This is a “nuclear” option for the iCloud Power User.
Warning: This method breaks the sync. Once you do this, your Mac will no longer receive new photos from your phone automatically. The Photos app on your Mac will become a blank slate.
Important Note on “Mixed States”: If you previously used “Optimize Mac Storage” (Method 1) and now want to use this method, be aware that your Mac might currently hold only low-resolution thumbnails. Turning off iCloud now might leave you with blurry, unusable images on the Mac. This is why the verification step below is non-negotiable.
Step-by-Step Procedure
Step 1: Access Settings
Go to Photos > Settings > iCloud.
Step 2: The Mandatory Safety Check (Do Not Skip)
Before you touch any settings, you must confirm your photos are safe on the server.
- Open your web browser (Safari or Chrome) and go to iCloud website.
- Log in with your Apple ID.

- Click on the Photos icon.
- Verify that your most recent photos (taken today or yesterday) are visible here.
- If they are not on iCloud website, stop immediately. Your Mac has not finished syncing. If you proceed, you will lose data. Wait for the sync to finish.
Step 3: Break the Connection
Once you have verified your photos are safe in the browser, in the Mac Photos app, uncheck the box for iCloud Photos.
The Critical Decision: A pop-up will appear. It usually says: “If you turn off iCloud Photos, photos that have not been fully downloaded to this Mac will be removed.”
- Since you verified your photos are on iCloud in Step 2, you can safely proceed.
- If asked to Download Originals, you can likely ignore this if your goal is to clear space and you trust your iCloud/iPhone backup. Downloading originals defeats the purpose of clearing space.
Step 4: Delete the Local Library
DANGER ZONE: The following step effectively wipes the library from your Mac. Ensure you completed Step 2.
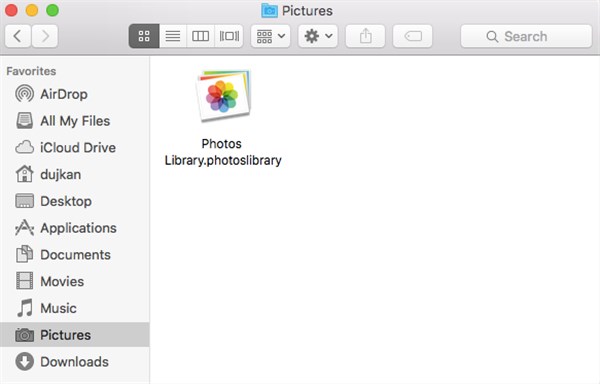
- Close the Photos app.
- Open Finder and go to your Pictures folder.
- Locate the file named Photos Library.photoslibrary.
- Drag this file to the Trash.
- Empty the Trash.

By choosing to disable iCloud Photos on Mac and verify via the web first, you ensure that the delete command never reaches the iCloud server, keeping your memories safe on your other devices.
You may also like: How to Recover Deleted Photos on PC >
Method 3: Move Originals to an External Drive (The Archive Approach)
For users who want to remove photos from Mac storage keep iCloud, but are uncomfortable with deleting the local copies entirely, the external archive is the ideal solution—especially if you ever need to recover data from an SSD later. This method allows you to offload the heavy Photos library storage to an external SSD (Solid State Drive) rather than your Mac’s internal drive.
This offers the best of both worlds: you free up internal space, but you retain a physical backup of your high-resolution images that you can access anytime.
How to Move Your Library:
1. Connect a fast external drive to your Mac (USB-C or Thunderbolt drives are best for speed).
2. Quit the Photos app.
3. Open a Finder window and navigate to your Pictures folder.
4. Drag the Photos Library.photoslibrary file onto your external drive.
5. Wait for the copy to finish. Do not unplug the drive.
6. Once copied, double-click the library on the external drive to open it. Photos will ask for permission to switch libraries. Click “Open Other” if prompted and select the one on the external drive.
7. Verify your photos appear correctly.
8. You can now delete the library file from your Mac’s internal Pictures folder.
This technique serves as a robust external photo backup. Whenever you want to view your photos on the Mac, simply plug in the drive.
The Technical Why: Understanding iCloud Sync Behavior
To prevent future data mishaps, it is helpful to understand the architecture behind these buttons. Here is a critical expert insight that many users overlook: iCloud is a syncing service, not a static backup bucket.
When iCloud Photos sync is active, your devices do not hold independent copies of your photos; they all look at the same master list. Think of your devices as different windows looking into the same room.
- The Sync Logic: If you delete a photo on your Mac, you are not just clearing a file from that specific hard drive; you are sending a command to the iCloud server to remove that image from the room. The server then pushes that command to your iPhone and iPad.
This is why Optimize Mac Storage is often the superior choice over manual deletion. It respects the sync logic—keeping the image in the database—but intelligently discards the heavy data (the high-resolution file) from your local machine. Disabling iCloud Photos on the Mac (Method 2) works because it removes the Mac from this communication loop entirely.
Troubleshooting & FAQ: Common Storage Snags
A common obstacle users face after following these steps is that their available disk space does not increase immediately. If you are wondering why your Photos storage does not shrink after changes, check these factors.
1. Check the “Recently Deleted” Album
When you delete photos (especially if you used Method 2 to delete the library contents), macOS often moves them to a Recently Deleted album within the app rather than erasing them instantly. They sit there for 30 days as a safety measure. To reclaim space now:
- Click Recently Deleted in the Photos sidebar.
- Click Delete All in the top right corner.
2. Allow Time for Optimization
If you chose Optimize Mac Storage, the process is not instant. Your Mac must upload originals to iCloud and download thumbnails. For large libraries (50GB+), this indexing process can take 24 to 48 hours.
If the process seems stuck, ensure your Mac is not going to sleep (check Energy Saver settings) and that the Photos app is open in the background.
3. Frequently Asked Questions
Q1. Can I delete photos from my Mac without deleting them from iCloud?
Yes, but only if you first disable “iCloud Photos” in your Mac’s settings (Method 2). If the setting is on, deleting a photo on the Mac deletes it from iCloud.
Q2. How do I check if my photos are actually safe before deleting the Mac library?
Log into iCloud via a web browser. If your photos are visible there, they are safe on Apple’s servers, regardless of what you do to your Mac’s hard drive.
Q3. Can I turn off iCloud Photos on Mac and keep photos in iCloud?
Yes. When you uncheck “iCloud Photos” on your Mac, the connection breaks. Your iCloud photos remain safe in the cloud and on your other devices, but they will no longer sync to the Mac.
Q4. How do I free up Mac storage without losing iCloud Photos?
The safest method is to use the “Optimize Mac Storage” feature found in Photos > Settings > iCloud. This reduces the file size of photos on your Mac while keeping the originals in the cloud.
Conclusion
Managing digital storage shouldn’t feel like a gamble with your memories. Whether you choose to Optimize Mac Storage to keep your library visible but lightweight, or disconnect your Mac entirely to reclaim maximum space, you now have the tools to handle the problem without fear, with free recovery software for Mac as a safety net if something goes wrong.
By understanding how iCloud Photos sync works—and more importantly, knowing how to verify your data is safe via iCloud before you act—you can avoid the accidental data loss that plagues so many users. Take a moment today to check your settings or set up that external archive. Regaining control over your storage takes only a few minutes, but it provides peace of mind that your photos—and your hard drive space—are exactly where you want them to be.

Joy Taylor is a seasoned technical writer with over a decade of experience in mobile technology. At iMobie, she specializes in producing in-depth content on iOS data recovery, iPhone unlocking solutions, and iOS troubleshooting.
Product-related questions? Contact Our Support Team to Get Quick Solution >
