How to Recover Audio Files on Windows (2026): A Verified Guide to Restore Recordings & Music
Audio files can disappear after accidental deletion, formatting, or a system crash. This 2025 Windows guide explains verified ways to recover recordings and music using built-in tools like Previous Versions and File History, plus proven recovery software options when needed.
Losing a critical recording is a stomach-churning experience. Whether you are a podcaster like “Amanda”—who felt the blood drain from her face after accidentally deleting a vital interview—or a music collector watching a library vanish, the panic is real. You might be staring at an empty folder, wondering if that specific “Shift + Delete” command was the final nail in the coffin. Perhaps you have already checked the Recycle Bin and found it empty, or you are holding an SD card that your computer refuses to read—at that point, your next focus should be how to recover data from micro sd card safely before any further damage or overwriting occurs.
If you need to recover audio files that seem to have disappeared, take a breath. In most cases, the data still exists on your drive; it is simply hidden from view. This guide provides a verified, systematic approach to recover deleted audio files on PC and external media. We move beyond basic advice to tackle complex scenarios, from formatted drive recovery to validating recovered files using hex editors.
Recovery Options: Manual Fixes vs. Professional Software
Before you attempt a fix, it is vital to understand which method aligns with your specific data loss scenario. You generally have two categories of solutions: manual Windows features and professional data recovery software.
Manual fixes, such as the Recycle Bin or Windows File History, are excellent first steps because they are free and built into your operating system. If you simply pressed “Delete” on a file, these tools usually work instantly. However, they have significant limitations. If you used the “Shift + Delete” command, formatted the drive, or if the file was on an external device not covered by backup settings, these native tools will likely fail to locate your data.
Professional PC recovery software fills this gap. These tools scan the drive’s sectors to find data that the file system has marked as “deleted” but has not yet overwritten. While this option often involves a cost (or specific tool selection), it provides a much higher success rate for complex scenarios like formatted drive recovery or corrupted file systems.
Choosing the Right Method
To help you decide quickly, refer to this comparison of recovery methods:
| Metric | Recycle Bin / File History | Data Recovery Software |
| Best For | Recent, accidental deletions | Permanently deleted files, formatted drives |
| Cost | Free (Native to Windows) | Freemium / Paid (e.g., Disk Drill, Recuva) |
| Technical Skill | Low | Moderate |
| Data Integrity | High (Restores original file) | Variable (Depends on overwriting) |
| Shift+Delete Success | None | High |
Method 1: Recover Permanently Deleted Audio Files (High Success Rate)
When manual backups fail, professional software is the industry-standard solution to recover permanently deleted audio files. This method works by bypassing the operating system’s file table and scanning the raw data on the disk.
Expert Insight: The safest recovery approach is to stop using the drive immediately. Audio files can become unplayable even after successful recovery if the storage system overwrites small fragments of the file with new data. This is particularly true for large WAV files.
We recommend using tools known for handling media fragmentation. Recuva is a solid free option for simple deletions. For more complex header reconstruction (vital for audio), Disk Drill or PhotoRec (free, open-source, but text-based) are industry staples.
Step-by-Step Recovery Procedure
Follow this workflow to maximize your chances of success, especially for MP3 recovery or retrieving high-fidelity recordings.
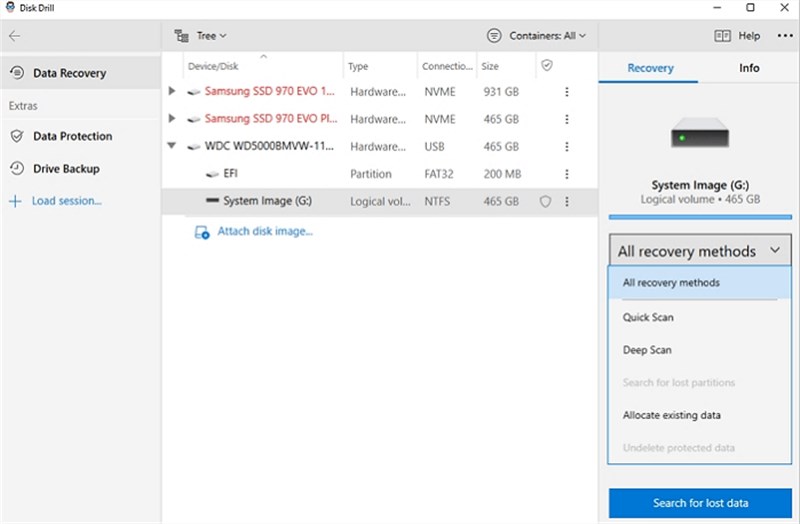
1. Smart Installation: Download the installer for your chosen software (e.g., Disk Drill or Recuva). Crucial: Download the installer to a USB drive and run the installation from there. If you install the software directly onto the drive where you lost your audio (e.g., Drive C:), the installation files themselves might overwrite the very audio data you are trying to save.
2. Select the Source: Launch the software and choose the specific drive or partition where your audio files are stored.
3. Filter for Audio: To speed up the process, navigate to the file type filters. Select “Audio” or specific formats like WAV or M4A. This prevents the software from wasting time sorting through thousands of system files.
4. Run a Deep Scan: Initiate the scan. Do not stop at the “Quick Scan.” A “Deep Scan” (or “Full Scan”) looks for file signatures (headers) deep in the drive sectors, which is necessary for files lost via “Shift + Delete.”
5. Preview and Recover: Verify the file size. Select the files you need and save them to a secure external location (like the USB drive you installed the software on). Never save them back to the original folder immediately.
For Messy Filenames: If your files come back named File0054.mp3 instead of the original song title, do not panic. The audio data is likely intact, but the metadata filename was lost. You can use tools like MusicBrainz Picard after recovery to “listen” to the file’s acoustic fingerprint and automatically fix the tags and filenames.
Method 2: Restore Deleted Music Files from Windows Backups
If you are a music collector missing an album or a specific track, you may not need complex software. For simple deletion scenarios, you can often restore deleted music files using native Windows tools. These should be your first check before attempting a deep scan.
Check the Recycle Bin
Unless you used the “Shift + Delete” command, your files likely sit in the Recycle Bin.
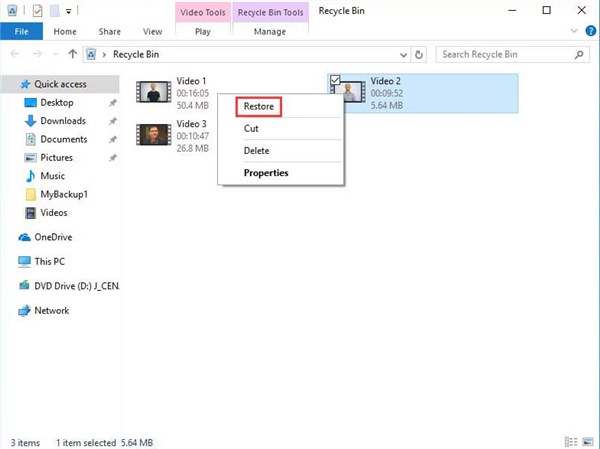
1. Open the Recycle Bin from your desktop.
2. Sort by “Date Deleted” to find recent files.
3. Right-click the audio file and select “Restore.” The file will return to its original folder.
You may also like: How to Recover Files Deleted from Recycle Bin >
Use Windows File History
If the bin is empty, Windows File History is the next tier of defense. This automated backup feature saves snapshots of your files over time.
1. Type “Restore your files with File History” in the Windows search bar.
2. Navigate to the folder where your music was stored.
3. Use the arrow buttons to scroll back in time until you see the missing files.
4. Click the green “Restore” button to recover them.
This method requires that File History was enabled before the data loss occurred. It is also less effective for external drives unless you specifically configured Windows to back them up.
Method 3: Recover Voice Recordings from SD Cards and External Drives
Creators who use Zoom H6 recorders, Tascam devices, or smartphones often face a unique challenge: the need to recover audio files from SD card media. Portable storage is prone to corruption due to improper ejection or battery failure during recording. If you need voice memo recovery or have lost field recordings, the workflow differs slightly from internal drive recovery.
Connect and Verify
First, connect your SD card or external drive to your PC. If Windows prompts you with a message saying, “The disk you inserted was not readable by this computer” or asks you to Format the drive, choose Cancel.
Warning: Formatting creates a new file system. While it fixes the drive for future use, it wipes the table of contents for your old data, making it significantly harder to recover voice recordings.
Scanning External Media
1. Check Physical Locks: Ensure the physical lock switch on the side of the SD card is in the “Unlock” (up) position. This is a common, simple oversight that prevents Windows from reading the card.
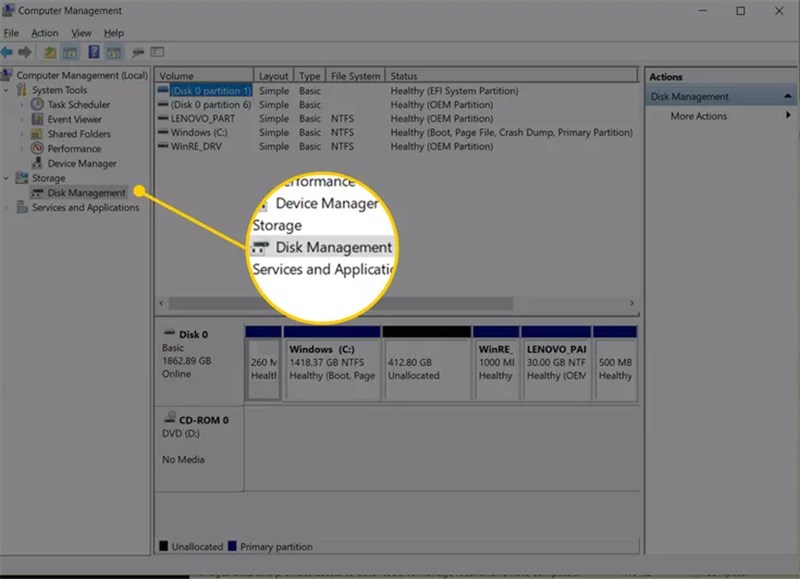
2. Assign a Drive Letter: If the card does not appear in File Explorer, open “Disk Management” (Right-click Start > Disk Management). If the disk appears there but lacks a letter, right-click and select “Change Drive Letter and Paths” to make it visible to the system.
3. Run Recovery Software: Launch your recovery tool (Disk Drill or PhotoRec) and point it specifically to the external drive letter. Since these cards often use FAT32 or exFAT file systems, professional software is usually required to reconstruct the directory structure.
Troubleshooting: Why Recovered Audio Files Won’t Play
A common frustration after recovery is seeing the file reappear with the correct name and size, only to find it silent or glitchy when played. This is often due to corrupted audio repair issues linked to file fragmentation.
When a large file (like a high-fidelity WAV) is saved, it isn’t always written in one continuous block. It is often split into fragments across the drive platter. If the file allocation table (the map) is damaged, recovery software might find the “Header” (the start of the file) but miss the subsequent fragments.
How to Verify Your Recovered Audio
Before you celebrate a recovery, you must verify the data integrity. Here is how to check if your file is actually audio or just an empty shell:
The Bitrate Check:
Right-click the recovered file and go to Properties > Details. Look for the Bitrate field.
- Good Sign: You see a standard number (e.g., 128kbps, 320kbps, 1411kbps).
- Bad Sign: The Bitrate is 0kbps or blank. This usually indicates the file header is missing or corrupted, even if the file size looks correct.
The Hex Editor Test (Advanced):
If the bitrate is zero, you need to see what is inside the file. Download a free tool called HxD (Hex Editor).
1. Open your audio file in HxD.
2. Look at the data representation on the right side.
3. The Diagnosis: If the file is filled with 00 00 00 (zeros) throughout, the file contains no data—it is “ghost data.” If you see random alphanumeric characters, the audio data exists, but the header is broken. In this case, you may need a specialized repair tool like MP3 Diags or a raw recovery service.
Frequently Asked Questions About Audio Recovery
Q1. Can I recover deleted audio files from an SSD?
Yes, but it is extremely time-sensitive. Modern SSDs use a command called TRIM, which actively wipes data blocks soon after deletion to maintain performance. To stand a chance, you must disable TRIM immediately.
How to disable TRIM temporarily:
- Open the Start menu, type CMD, and run as Administrator.
- Type this command and hit Enter: fsutil behavior set DisableDeleteNotify 1
- Run your recovery software.
- Once finished, turn TRIM back on by typing: fsutil behavior set DisableDeleteNotify 0
Q2. How do I restore deleted MP3 files on my PC specifically?
MP3 recovery is generally highly successful because MP3 headers are standard. Even if the file name is lost, tools like Recuva or Disk Drill can identify an MP3 by its internal signature (ID3 tags). If the filename is lost, use MusicBrainz Picard post-recovery to auto-tag the files based on the audio content.
Q3. Is there free software that works?
Yes, but know the limits.
- Recuva: Completely free and good for simple, recent deletions. It struggles with complex fragmentation.
- Disk Drill: Offers a free trial that lets you scan and preview files, typically allowing recovery of up to 500MB for free. This is often enough for dozens of songs or voice memos but may not cover a full library.
- PhotoRec: Completely free and powerful, but uses a command-line interface (no mouse) which can be intimidating for beginners.
Q4. Can I recover audio files deleted from the Recycle Bin?
Yes. Once emptied from the Recycle Bin, the file is not gone; the space it occupied is just marked as “available.” You must use data recovery software to retrieve these files before they are overwritten by new data.
Conclusion
Losing hours of recordings or a curated music library can feel paralyzing, but as we have seen, it is rarely the end of the line. Whether you need to recover deleted audio files on PC after a simple mistake or perform a complex voice memo recovery from crashed Hard Drive or SD card, the data is usually recoverable if you act fast.
The key is to minimize disk usage immediately to prevent overwriting those vital file fragments. By following the verified methods outlined above—starting with native Windows tools and graduating to professional scanning software like Disk Drill or Recuva—you can regain control of your digital library. Do not let a formatted drive or a panicked click destroy your work. Start your recovery scan now and restore your audio before the data is lost forever.

Joy Taylor is a seasoned technical writer with over a decade of experience in mobile technology. At iMobie, she specializes in producing in-depth content on iOS data recovery, iPhone unlocking solutions, and iOS troubleshooting.
Product-related questions? Contact Our Support Team to Get Quick Solution >
