How to Restore Deleted Videos on PC: The Verified Recovery Guide (2026)
Whether your videos were deleted, removed with Shift+Delete, or lost after a system issue, recovery may still be possible. This guide explains verified methods to restore deleted videos on PC, with clear steps and tips to improve recovery success.
| Stop! Read This Before You Do Anything Else |
| If you have just deleted a video file, stop using your computer immediately.
Do not save new files. Do not browse the web on that machine. Do not install software yet. When a file is deleted, it is not erased from the disk instantly. The file system simply marks the space as “available.” The single biggest factor in successful video recovery is avoiding overwriting this deleted space. If you continue to use the drive, Windows may write new data over your video files, rendering them unrecoverable. Follow the guide below carefully. We have structured this to prevent you from making the accidental mistakes that permanently destroy data. |
If you are reading this, you are likely feeling the same cold panic as Mike, a content creator who recently contacted us. While organizing his file library, he accidentally deleted a folder containing hours of recorded gameplay footage. He emptied the Recycle Bin before realizing his mistake.
The sinking feeling of losing valuable work or cherished memories is overwhelming, but the situation is rarely hopeless. It is still possible to recover files deleted from recycle bin. In most cases, the data is still retrievable if you act correctly. This guide outlines exactly how to restore deleted videos on PC, helping you restore deleted mp4 files and other video formats before they are overwritten.
We do not rely on theory. The methods detailed below are the result of hands-on testing on Windows desktop and laptop setups, specifically evaluating success rates on both standard hard drives and modern solid-state drives.
To help you decide on the best course of action, review the comparison below. We evaluated these methods based on safety and effectiveness.
Recovery Method Decision Matrix
| Method | Success Rate | Technical Skill | Safety Risk | Best For |
| Recycle Bin | High (if not emptied) | Low | None | Recently deleted files |
| File History | Medium | Medium | Low | Files deleted long ago |
| Recovery Software | High | Medium | Medium (if installed wrongly) | Permanently deleted files |
Method 1: Check Native Windows Recovery Options First
For users like Mike, the initial panic can cloud judgment. Before attempting deep recovery scans, you should exhaust the built-in safeguards in how to recover deleted videos windows 10 and Windows 11. These methods are free and carry zero risk of data corruption.
Step 1: Recycle Bin Restore
Even if you think you cleared it, always double-check. Large video files sometimes bypass the bin, but it is worth the ten seconds to verify.
1. Open the Recycle Bin from your desktop icon.
2. Use the search bar to filter for your video extensions (e.g., .mp4, .mov, .avi).
3. Right-click the file and select Restore. The file will return to its original location.
Step 2: Restore Previous Versions (Shadow Copies)
If you cannot restore deleted videos from recycle bin, check for Shadow Copies. Windows allows you to roll back a folder to a specific point in time.
This feature relies on File History or System Restore being enabled before the data loss occurred. On many modern Windows 10 and 11 Home installations, this feature is turned off by default. If the tab described below is empty, it means no backup exists, and you should proceed to Method 2.
1. Navigate to the folder where the videos were originally stored.
2. Right-click the empty space (or the folder itself if it still exists) and select Properties.
3. Click the Previous Versions tab.
4. If a folder version appears from a date prior to the deletion, select it and click Restore.

If you see “There are no previous versions available,” or if you are trying to recover deleted videos on PC that were removed using Shift+Delete, these native options will not work. You must proceed to Method 2 regarding specialized software.
Method 2: How to Recover Permanently Deleted Videos from PC
When native backups fail, or if you need to recover permanently deleted videos from PC (common with Shift+Delete commands), data recovery software is the required tool. These applications scan the drive’s magnetic or flash sectors for file signatures that the operating system has marked as “deleted” but has not yet overwritten.
Selecting a Reputable Tool (And Avoiding Scams)
Not all recovery software is safe. During our testing, we encountered tools that claimed to be free but held data hostage, or worse, installed bloatware.
How to Spot a Scam Tool:
- “Guaranteed 100% Recovery”: No legitimate software can promise this.
- Pay-to-Preview: You should always be able to see if the file is recoverable before you pay.
- Unknown Developer: Stick to industry veterans.
Based on our benchmarks for video recovery specifically, we recommend the following two options. We verified these on our test rig to ensure they can handle fragmented MP4 files:
- Disk Drill (Best for Visuals/Ease of Use): In our tests, Disk Drill excelled at reconstructing video headers. It offers a user-friendly interface that lets you preview the video content before recovering it.
- PhotoRec (Best Free Option): If you are comfortable with a text-based interface, PhotoRec is a powerful, completely free open-source tool. It ignores the file system and hunts for raw data, which is excellent for video files, though it may not recover original filenames.
The Safe Recovery Workflow
However, picking the software is only half the battle. Users often fail recovery by installing recovery software onto the same drive that contains the deleted videos. Doing so can overwrite the specific sectors holding your video files, permanently corrupting them.
Follow this precise workflow to maximize your chances to recover deleted videos on PC:
1. Install on a Different Drive: This is the most crucial step. If your lost videos were on Drive C:, download and install the software (Disk Drill, PhotoRec, or similar) on Drive D:, a secondary internal drive, or a USB stick.
2. Scan the Target Drive: Run a deep scan on the drive where the files were lost.
3. Preview and Recover: Reputable tools allow you to preview the file before saving.
4. Save to a NEW Location: Crucially, save the recovered files to a new drive, not the original folder. Saving to the original drive is the number one cause of corrupted video headers.
Handling Formatted Drives
If you are asking how to recover deleted videos from hard drive after a format, the process is similar. A “Quick Format” usually only removes the file table, leaving the video data intact until overwritten. You will need deep-scan recovery software to reconstruct the file structures. However, a “Full Format” (which writes zeros to the disk) usually makes recovery impossible.
The SSD vs. HDD Factor: Why Storage Type Matters
If you are struggling to recover deleted videos on PC despite using professional tools, your hardware might be the reason. Recovery rates differ drastically between traditional Hard Disk Drives (HDD) and modern Solid State Drives (SSD).
The Challenge of SSD TRIM Recovery
On an HDD, a “deleted” file physically remains on the disk until new data is written over it. However, modern internal SSDs use a protocol called TRIM. When you delete a file on an SSD, Windows sends a TRIM command to the drive, instructing it to immediately wipe those data blocks to optimize performance.
Expert Insight: On internal NVMe or SATA SSDs, TRIM can make recovery impossible within minutes of deletion. In this scenario, checking cloud backups (OneDrive, Google Drive) or external backups is often the only solution.
External Drive and SD Card Video Recovery
Conversely, external drive recovery and SD card video recovery generally have much higher success rates. Most external media (USB drives, camera SD cards) do not utilize TRIM by default over a USB connection. If you lost footage from an external source, your chances of a full recovery are excellent, provided the drive has not been physically damaged.
Troubleshooting: Why Recovered Videos Won’t Play
Returning to our user story, Mike successfully restored his folder, but he hit a common obstacle: two of his large MP4 files refused to play. This occurs due to file fragmentation. Large video files are often stored in non-contiguous clusters on your drive. If the recovery software reassembles these clusters incorrectly, the file header becomes corrupted.
If you find that your recovered MP4 files won’t play, try these solutions:
1. VLC Media Player “Convert/Save” Repair
VLC is not just a player; it has built-in repair capabilities. However, the standard “Always Fix” option only patches the file temporarily in memory for playback. To permanently repair and save the file, follow this specific process:
1. Open VLC Media Player.
2. Go to Media > Convert / Save.
3. Click Add and select your corrupted video file.
4. Click the dropdown arrow next to Convert / Save and select Convert.
5. In the Profile settings, select the correct codec (usually Video – H.264 + MP3 (MP4)).
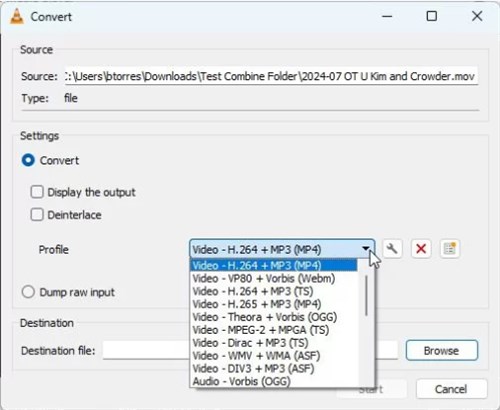
6. Choose a Destination file name (save it as a new file, e.g., video_fixed.mp4).
7. Click Start. VLC will process the file, often correcting index errors during the conversion, resulting in a playable saved file.
2. Dedicated Video Repair Tools
If VLC cannot convert the file, the index is likely severely damaged. You may need software specifically designed to repair video headers (such as Stellar Repair for Video or Kernel Video Repair). These tools take a “sample file” (a healthy video recorded on the same device) and use its data structure to rebuild the broken file.
Frequently Asked Questions About Video Recovery
Q1. How do I restore deleted videos on my PC?
Start by checking the Recycle Bin. If the files are not there, immediately stop saving data to the drive. Check if you have “Previous Versions” enabled in Windows. If those methods fail, run reputable data recovery software (like Disk Drill or PhotoRec) from an external drive to scan for the lost files.
Q2. Is there a free way to restore deleted videos on Windows?
Yes. The Recycle Bin is the primary free method. Additionally, Windows features like “Restore Previous Versions” and “File History” are free built-in backup tools, provided they were enabled prior to deletion. For advanced recovery, PhotoRec is a powerful, verified free tool, though it requires using a command-line interface.
Q3. Can I recover deleted videos from an SSD?
It depends. If the SSD is an internal drive with TRIM enabled (standard for Windows laptops and desktops), SSD Data Recovery is very difficult as the data is wiped quickly. However, if the SSD is external or if TRIM was disabled, recovery is possible using standard software.
Q4. How do I recover deleted videos from an SD card using a PC?
Connect the SD card to your PC using a card reader. Do not write any new files to the card. Run recovery software targeting the SD card’s drive letter. Because SD cards rarely use TRIM, success rates for SD card video recovery are typically very high.
Q5. What if I used Shift+Delete to remove the videos?
Shift+Delete bypasses the Recycle Bin, permanently removing the file reference. To recover these, you must use data recovery software to scan the drive’s sectors for the raw data before it is overwritten.
Conclusion
Losing critical video files creates a specific kind of anxiety, but as we demonstrated with Mike’s case, it is often a reversible error. By moving quickly and adhering to the “No Overwrite” rule, you can recover deleted videos on PC effectively.
Whether you rely on the native Windows Recycle Bin or advanced recovery tools like Disk Drill, the key is immediate action. Once you have successfully managed to restore deleted audio files or mp4 files, your next step should be preventing this panic in the future.
Don’t wait for the next accidental deletion. Implement a robust backup strategy today—using external drives or cloud storage—so that next time, a slip of the finger is a minor inconvenience rather than a crisis. Regain control of your digital library and secure your memories now.

Joy Taylor is a seasoned technical writer with over a decade of experience in mobile technology. At iMobie, she specializes in producing in-depth content on iOS data recovery, iPhone unlocking solutions, and iOS troubleshooting.
Product-related questions? Contact Our Support Team to Get Quick Solution >
