JetFlash Online Recovery Tool: 2026 Download & Repair Guide
Need to fix a problematic Transcend JetFlash USB flash drive in 2026? The JetFlash Online Recovery Tool is a free official utility designed to diagnose and repair JetFlash USB drives that won’t show up, are unreadable, or behave unpredictably. In this guide you’ll learn where to download it, how it works, and how to use it safely—plus what to do first if you need to recover your data before repair.
Facing a locked device when you need it most is a significant obstacle. We have all been there: you plug in your trusty drive, only to be met with an unreadable disk error or a persistent prompt asking you to format the disk. For many users, this moment is panic-inducing. The drive often holds years of documents, and suddenly, it seems like nothing more than a plastic paperweight.
When standard Windows formatting fails, the JetFlash Online Recovery Tool is often the specific solution required to restore usability. Whether you are dealing with a write-protected USB or a drive that has become inaccessible, this software is designed to repair controller issues that generic operating system tools cannot touch.
However, there is a critical caveat that many users miss: repairing the drive and recovering your data are two different processes.
Repair vs. Data Recovery: Deciding the Right Step for Your USB
Before running any software, it is vital to distinguish between repairing the device hardware and undeleting your files. A common misconception is that the JetFlash Online Recovery Tool will restore your missing documents. In reality, its primary function is USB flash drive repair at the firmware level. This process often involves wiping the memory chips to fix corruption, meaning your data could be lost forever if you proceed incorrectly.
To make the best decision for your situation, compare these two approaches:
1. Data Recovery Software:
- Goal: Extract files (photos, docs, videos) from a corrupted drive.
- Data Safety: Safe. It reads the drive without modifying it.
- When to use: If your priority is saving your files, use this first.
2. JetFlash Online Recovery Tool:
- Goal: Fix the hardware so the USB drive works again.
- Data Safety: Destructive. It often performs a factory reset (Format).
- When to use: If your priority is a working USB drive, or after you have already secured your files.
Windows offers a native repair option (CHKDSK), but it typically fails when facing severe firmware errors or RAW USB drive states because there is no readable file system for Windows to mount. The JetFlash tool goes deeper, resetting the controller to factory settings. However, you must accept that this process is often destructive. If you need your files, do not proceed to the repair tool immediately. Make your choice based on priority: save the data first, or fix the hardware now.
Critical First Step: Recover Files Before Using the JetFlash Recovery Tool
If your drive appears as a RAW USB drive or prompts you to format, the data often still exists on the memory chips, even if Windows cannot read the file system. Proceeding directly to the repair tool without caution would be a mistake if you do not have a backup.
Expert Insight: Many users assume the JetFlash Online Recovery Tool restores deleted files. In most cases, it focuses on repairing or reinitializing the USB drive firmware. Running it too early can wipe out recoverable data. A safer approach is attempting file-level recovery first, then using JetFlash repair only after important data has been copied off or is confirmed unrecoverable.
The Safe Workflow
1. Stop using the drive: Continued attempts to write to the drive may overwrite the very data you are trying to save.
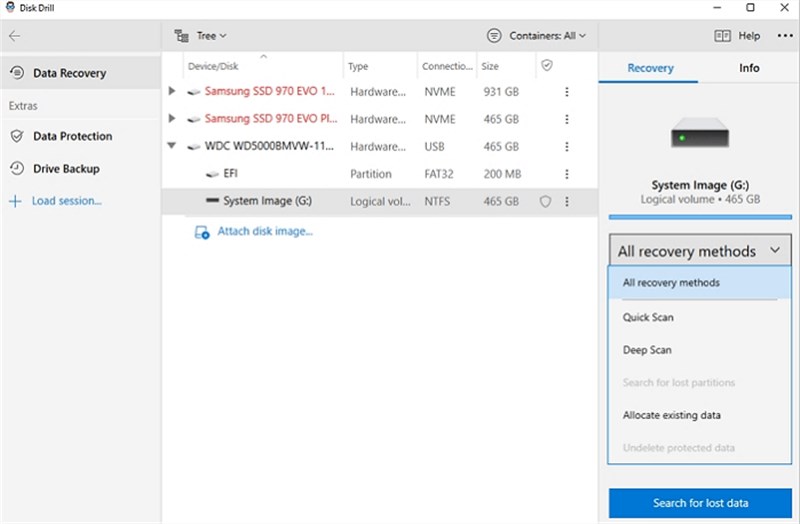
2. Scan with Data Recovery Software: Download reliable USB flash drive data recovery software. Tools like Disk Drill, Recuva, or PhotoRec are excellent starting points. They function by scanning the raw sectors of the memory for file headers (like JPEG or DOCX signatures) rather than relying on the corrupted file system.
3. Extract your documents: Run a deep scan and save your recovered files to a safe location on your computer’s hard drive, not the USB stick you are trying to fix.
Only once you have secured your files—or if the data is not important—should you proceed to the download steps below. This order of operations is the only way to ensure you don’t trade your data for a working (but empty) flash drive.
Download JetFlash Online Recovery Tool: The Official Workflow
Once you have secured your data, you can proceed with the repair. It is crucial to use the official source. Avoid third-party hosting sites, as they often bundle malware with legitimate utilities or host outdated versions that may not support newer Windows 11 updates.
Direct Download Link:
You can download the software directly from Transcend’s Service & Support center:
Download JetFlash Online Recovery via Transcend Support
Follow this procedure to repair your Transcend JetFlash drive on Windows 10 or Windows 11:
Step 1: Preparation
Ensure your internet connection is stable. The tool is lightweight, but it acts as a client that must connect to Transcend’s servers to download the specific firmware files required for your device during the repair process.
Step 2: Connection
Plug your specific Transcend drive into a stable USB port on your computer.
Use a rear USB port directly on the motherboard if you are using a desktop tower. Front panel ports connect via internal cables that can degrade voltage. If a drive is already failing, that slight voltage drop can cause the firmware update to fail or the drive to disconnect mid-repair.
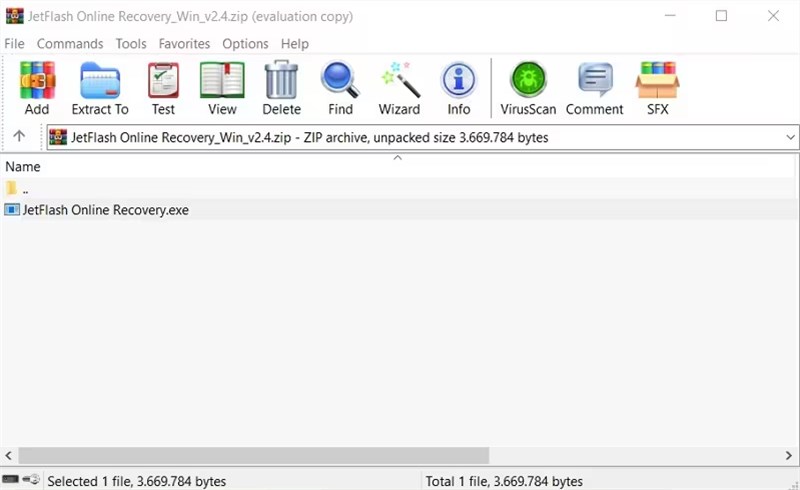
Step 3: Execution
Locate the JetFlashOnlineRecovery.exe file you downloaded. Right-click the file and select “Run as administrator.” This is a mandatory step; the tool requires elevated permissions to communicate with the hardware driver on modern Windows systems.
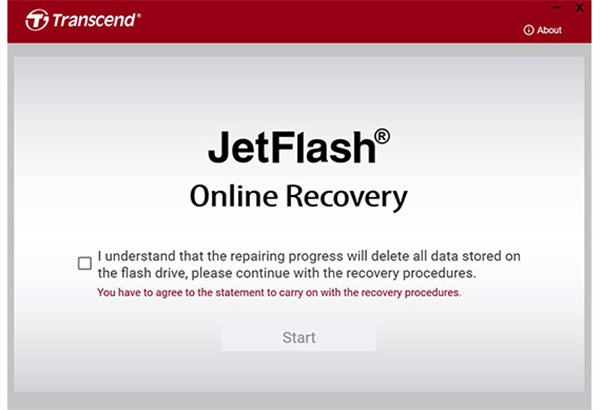
Step 4: Mode Selection
The tool interface will generally present two distinct options. Note that the interface may not label them “A” or “B,” but will describe the action:
- Repair drive & keep existing data
This mode attempts to rebuild the file system table without initializing the storage blocks. It is worth trying first if you skipped data recovery, but be aware it has a lower success rate for write protected USB errors.
- Repair drive & erase all data
This acts as a complete factory reset. It is highly effective for fixing RAW USB drive issues and severe corruption because it wipes the slate clean, but it will delete everything.
Step 5: Finalize
Click “Start.”
Duration Warning: This process typically takes between 2 to 5 minutes, but it can take longer depending on your internet speed and the capacity of the drive. The progress bar may appear to pause or “freeze” while it downloads firmware or formats large blocks of memory. Do not unplug the drive. If you disconnect the drive while the firmware is updating, you risk permanently “bricking” the device.
Once the tool notifies you that the format is complete, unplug the drive and plug it back in. Windows should now recognize it as a fresh, empty drive.
Troubleshooting: Tool Not Working?
It is not uncommon to encounter a situation where the software fails to detect your device. You might see an error message like “Device not found” or “Please plug in the drive.” If this happens, do not panic. It usually points to a compatibility or connection issue rather than a dead drive.
1. Verify Manufacturer Identity (VID/PID)
The JetFlash repair software acts strictly on Transcend controllers. Fake drives or drives from other brands will not be recognized. Even if your drive says Transcend on the outside, it is worth verifying how Windows sees it internally:
1. Open Device Manager (Right-click Start button -> Device Manager).
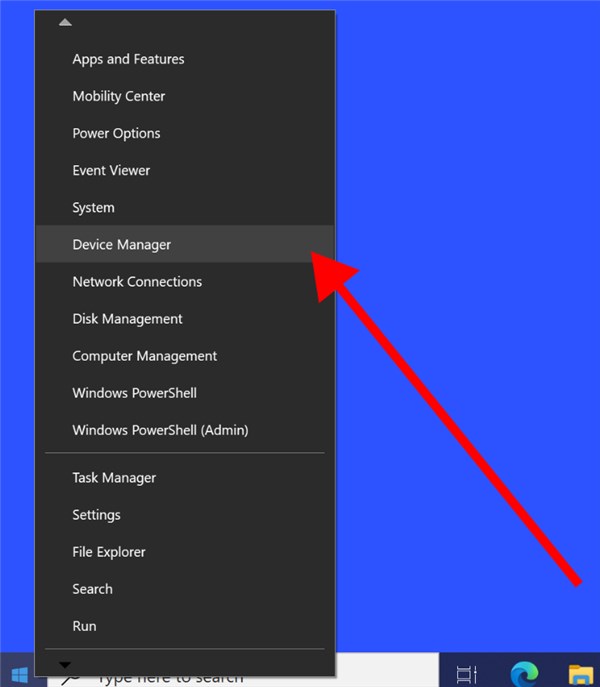
2. Expand Disk drives, right-click your USB drive, and select Properties.
3. Go to the Details tab and select Hardware Ids from the dropdown menu.
4. Look for the VID (Vendor ID) and PID (Product ID).
- Transcend VID: Usually 8564 or similar specific codes.
- If the VID reads 0000, FFFF, or a generic code, the controller is malfunctioning so badly that the software cannot see it, or the drive is counterfeit.
2. Port and System Checks
- Switch Ports: As mentioned earlier, try a USB 2.0 port if USB 3.0 fails. Sometimes legacy controllers respond better to older protocols.
- Permissions: Ensure you are running the tool with Administrator privileges.
- Security Software: Temporarily disable your antivirus or firewall. These programs sometimes flag the low-level write access required for the firmware update as suspicious activity and silently block the tool from working.
3. Compatibility Mode
If you are using the tool on Windows 10 or 11 and having issues, try running the tool in compatibility mode for Windows 7. Right-click the .exe file -> Properties -> Compatibility -> “Run this program in compatibility mode for Windows 7.” This can resolve driver handshake issues on newer operating systems.
Why Your Transcend USB Failed: Understanding RAW and Firmware Errors
Understanding why your drive failed can help manage your expectations regarding repair. Common symptoms like a write-protected USB or a drive turning into a RAW USB drive often point to logical corruption or firmware panic.
- Logical Corruption: This occurs when the file system (NTFS, FAT32) is damaged due to unsafe removal (pulling the drive out while writing) or power surges. The recovery software fixes this by formatting the drive and rebuilding the file system structure.
- Firmware/Controller Errors: The USB controller is the “brain” of the drive. It manages where data is stored and tracks the health of memory blocks. If the firmware becomes corrupted or if the controller detects too many bad blocks, it locks the drive to protect the remaining data. This often results in a “Read Only” state. The recovery tool communicates directly with this controller to reset it to factory defaults, effectively “rebooting” the internal system.
If the failure is due to cracked connectors, water damage, or dead NAND memory chips, no software tool can fix it. If the JetFlash tool cannot communicate with the controller after multiple attempts, physical replacement is likely the only solution. This distinction explains why the tool works perfectly for some users but fails for others with physically compromised hardware.
Transcend USB Repair FAQs
Q1. What is the JetFlash Online Recovery Tool used for?
It is a specialized utility developed by Transcend to repair their specific line of USB flash drives. It is designed to fix connection errors, write protection issues, and corruption that prevents the drive from being formatted by Windows.
Q2. Is the JetFlash Online Recovery Tool an official Transcend tool?
Yes, it is the official proprietary software from Transcend support. It is always recommended to download it directly from the manufacturer to ensure you have the latest version compatible with modern controllers.
Q3. Does the JetFlash tool recover deleted files or just repair the USB?
This is the most critical distinction. The tool is a repair utility, not a data recovery utility. While the “Repair and keep data” mode attempts to preserve files, the “Erase all data” mode—which is more successful at fixing drives—wipes the device clean.
Q4. Why is my JetFlash USB not detected by the recovery tool?
This usually happens if the drive is not a genuine Transcend product, or if the controller is physically damaged. It can also occur if you do not run the tool as an Administrator or if the firmware on the drive is too corrupted to handshake with the software.
Q5. Will the tool erase my data?
It depends on the mode. Always assume data loss is possible. The tool prioritizes saving the hardware over saving the data. If your files are critical, use flash drive data recovery software before opening the repair tool.
Q6. Can I use this tool on non-Transcend USB drives?
No. The software is programmed to recognize specific vendor commands for Transcend controllers. It will likely display a “Device not detected” error if used on generic drives or brands like SanDisk or Kingston.
Q7. What should I do if my JetFlash drive shows RAW or needs formatting?
First, attempt to recover your data using third-party recovery software. Once your files are safe, download the JetFlash tool and select “Repair drive & erase all data” to reset the file system and make the drive usable again.
Conclusion
When your storage media fails, the anxiety of data loss is real. However, by distinguishing between the need to save your files and the need to fix the hardware, you can solve the problem without making it worse—especially if you need to recover data from damaged Hard Drive storage. The JetFlash Online Recovery Tool is a powerful solution for reviving unresponsive drives, but it must be used with an understanding of its destructive nature.
By following the workflow outlined above—securing your data first, then applying the official repair—you can regain control of your hardware. Whether you are seeing a RAW USB drive error or a simple format prompt, this method offers the highest chance of restoring your Transcend drive to working condition. Visit the support link, follow the steps carefully, and get your digital life back on track today.

Joy Taylor is a seasoned technical writer with over a decade of experience in mobile technology. At iMobie, she specializes in producing in-depth content on iOS data recovery, iPhone unlocking solutions, and iOS troubleshooting.
Product-related questions? Contact Our Support Team to Get Quick Solution >
