The Disk You Attached Was Not Readable by This Computer: 2026 Fix Guide
Seeing “The disk you attached was not readable by this computer” on Mac or Windows can be alarming, but it often has fixable causes like an unsupported file system, bad cables, partition issues, or drive corruption. This 2026 fix guide walks you through safe troubleshooting steps to make the disk readable again without risking data loss. You’ll also learn when to use repair tools, recover files first, or reformat as a last resort.
You just plugged your external hard drive into your Mac, expecting the familiar icon to appear on your desktop. Instead, a stark, grey dialogue box has blocked your view: “The disk you attached was not readable by this computer.”
If you are reading this, you are likely experiencing a moment of genuine panic. That drive holds your backups, your photos, or your current project. The error message makes it sound like the hardware is dead.
Here is the reassurance you need right now: This is usually a software glitch, not a hardware failure.
This error typically indicates a communication breakdown between the drive’s file system and macOS, and free recovery software for Mac can help if you need to access files before attempting fixes. The physical disk is likely spinning and healthy; the Mac simply doesn’t know how to read the “table of contents” (the directory). This guide will help you navigate the situation, prioritizing the safety of your data above all else.
Critical Warning: Do Not Click “Initialize”
When the Mac says disk not readable, the operating system presents three buttons in the error dialogue box: Initialize, Ignore, and Eject.
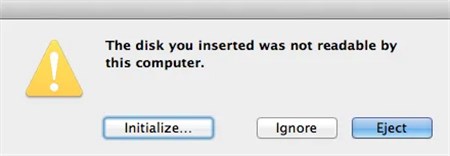
🛑 STOP: The “Initialize” button is not a fix.
In the heat of the moment, it is natural to click “Initialize,” assuming it means “start” or “reset connection.” This is the most dangerous action you can take.
The “Initialize” Trap
In Apple’s technical terminology, Initialize is synonymous with Erase and Format. If you click this button, macOS will wipe the drive’s directory structure to prepare it for a new file system. The reality is that your drive is not empty; it just has a corrupted file system or a format (like NTFS) that macOS is struggling to mount. If you proceed with initialization, you destroy the very data you are trying to save.
The Correct Action: Click Ignore. This dismisses the dialogue box but keeps the drive connected and receiving power. This state allows the system to see the physical device, which is required for diagnostics and data recovery.
Strategic Decision: Repair the Drive or Rescue the Data?
Before opening any tools, you must make a strategic choice. Are you trying to fix the hardware so you can use it again, or are you trying to extract critical files immediately? Attempting a native repair involves writing data to the disk to fix directory structures. If the drive is physically failing (making clicking noises or running slow), these repair attempts can push the hardware over the edge, causing total failure.
Use the table below to determine your workflow:
| Feature | Option A: Native Repair (Disk Utility) | Option B: Recovery-First (Data Rescue) |
| Primary Goal | Fix the file system to mount the drive normally. | Extract files to a safe location immediately. |
| Risk of Data Loss | Moderate. Repair operations write changes to the disk. | Low. Recovery software typically uses read-only access. |
| Time Cost | Fast (Minutes). | Slow (Hours, depending on drive size). |
| Best For | Connection issues, minor software errors, users with backups. | Critical data with no backups; drives making strange noises. |
If you have a backup, proceed to Method 1. If this drive holds your only copy of important files, we strongly recommend Method 3 (Recovery-First) before attempting any repairs.
Method 1: Basic Diagnostics & Terminal “Handshake”
For many users, unreadable disk errors stem from simple power fluctuations or minor directory corruption. Before assuming the worst, we need to rule out the hardware chain and verify if the Mac sees the device at a system level.
Step 1: Physical Isolation
In our lab tests with mechanical hard drives (HDDs), we found that swapping a USB cable or bypassing a USB hub resolved the issue in roughly 40% of cases.
1. Bypass Hubs: Connect the drive directly to the Mac. USB hubs often fail to provide sufficient voltage to spin up mechanical hard drives.
2. Swap the Cable: A frayed internal wire in a USB-C cable causes intermittent connection drops that macOS interprets as a readability error.
3. Port Testing: Try a different Thunderbolt/USB port on your Mac.
Step 2: The “Pro Tip” Check (Terminal)
If Disk Utility is freezing or not showing the drive, use the Terminal to see the raw truth. This bypasses the graphical interface.
1. Open Terminal (Cmd + Space, type “Terminal”).
2. Type diskutil list and press Enter.
3. Scan the list for your external drive (look for the size, e.g., 2TB or 500GB).
The Result: If you see your drive listed here (usually as /dev/disk2 or similar), this is good news. The hardware is detected, meaning the issue is almost certainly a file system corruption that can be recovered.
Step 3: Running First Aid
If the connection is solid, use Disk Utility First Aid to attempt a directory repair.
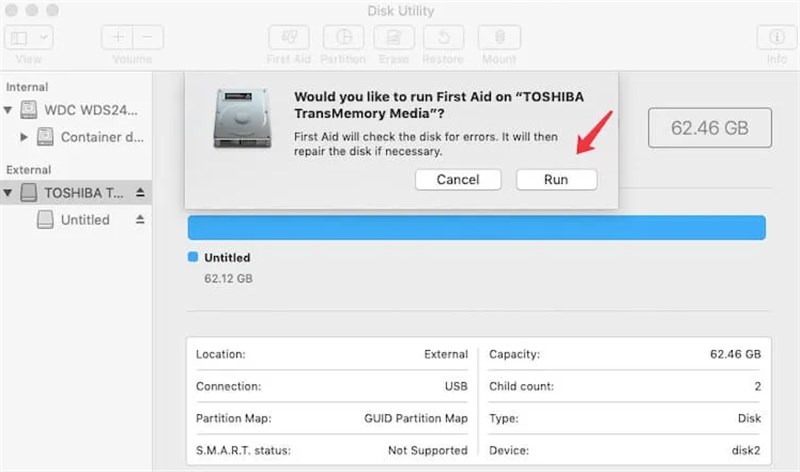
1. Open Disk Utility.
2. Crucial Step: In the menu bar, click View and select Show All Devices. This reveals the physical disk (top level) and the indented volumes below it.
3. Select the volume (indented) that is greyed out.
4. Click First Aid > Run.
The Outcome:
- Success: Disk Utility reports “Operation successful” and the drive mounts.
- Failure: You may see error codes like -69845 or messages stating “File system verify or repair failed” or “Overlapped extent allocation.” This indicates severe corruption that First Aid cannot fix. Stop immediately and move to Method 3.
Method 2: Fixing Cross-Platform Compatibility (NTFS)
A specific variation of this error plagues users who work with both Windows and macOS, especially when they need to recover data from a crashed hard drive. If your external hard drive works on Windows but triggers the “Not Readable” error on Mac, the hardware is fine, but the software language is confused.
Scenario A: You Have Access to a Windows PC
If you use an NTFS-formatted drive on Windows and unplug it without using “Safely Remove Hardware,” Windows flags the drive as “dirty” (in use). When you plug this drive into a Mac, macOS sees this “dirty bit” flag. To protect the data from further corruption, macOS refuses to mount the volume.
The Fix:
1. Reconnect to Windows: Plug the drive back into a PC.
2. Repair via Windows: If prompted to “Scan and Fix,” allow it. This runs chkdsk to repair the flag.
3. Safe Eject: Click the USB icon in the Windows system tray and select Eject. Wait for the “Safe to Remove” notification.
4. Reconnect to Mac: It should now mount correctly.
Scenario B: You Do Not Have a Windows PC
If you are mobile and cannot access a PC, the issue might actually be a third-party driver conflict on your Mac.
macOS can read NTFS drives natively, but it cannot write to them without third-party software (like Paragon NTFS, Tuxera, or iBoysoft).
- Check for Outdated Drivers: If you updated your macOS recently (e.g., to Sonoma), your old NTFS driver might be incompatible, blocking the mount.
- Uninstall/Update: Go to System Settings and check for NTFS for Mac software. Try updating it to the latest version. If that fails, uninstall the driver completely and restart your Mac. macOS should then mount the drive in “Read-Only” mode, allowing you to copy your files off safely.
Method 3: Recovering Data When the Disk Won’t Mount
If Disk Utility failed with an error code, or if the drive is recognized in Terminal but won’t mount, native macOS tools have reached their limit. At this stage, your priority shifts from “repair” to “extraction.”
When a drive is “unreadable,” Finder is blocked by the corruption. However, professional data recovery software can bypass the operating system’s requirement to mount the drive, scanning the physical magnetic platters or memory chips directly.
The Deep Scan Workflow
To get your files back without formatting:
1. Select a Tool:
- User-Friendly (Paid): USB data recovery Tools like Disk Drill, EaseUS, or Stellar Data Recovery offer intuitive interfaces and strong success rates for macOS file systems.
- Advanced (Free/Open Source): For tech-savvy users comfortable with command-line interfaces, TestDisk or PhotoRec are powerful, free alternatives, though they lack the visual ease of use.
2. Target the Physical Device: Even if the volume doesn’t appear in Finder, the recovery software will list the physical USB device. Select this device.
3. Run the Scan: Allow the software to parse the drive. This involves reading every sector and may take several hours for large drives.
4. Preview and Save: Most reputable tools allow you to preview files (ensure the photos open and documents are readable) before you pay for a license.
5. Recover to a Safe Location: Crucial Rule: Never save the recovered files back to the same drive you are recovering from. Save them to your Mac’s internal drive or a secondary external drive to avoid overwriting data.
Method 4: Resolution – Correctly Initializing the Drive
Once your data is secured via Method 3, or if you verified the drive is empty, you can finally resolve the error permanently. You are now ready to click “Initialize” and format the drive.
This process wipes the “disk not initialized” error and creates a fresh file system.
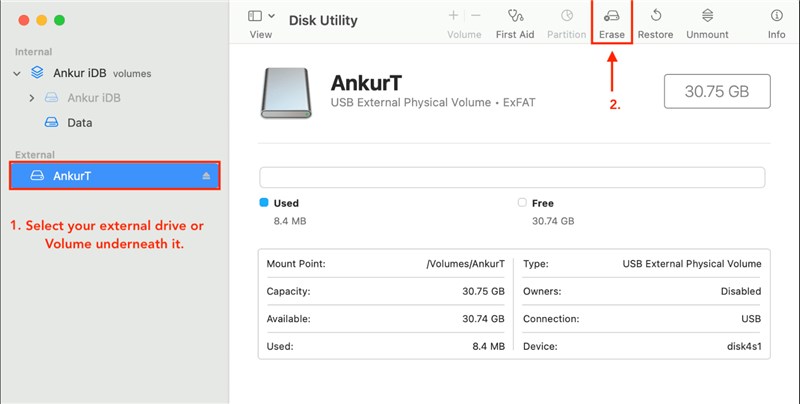
Choosing the Right Scheme and Format
When you click Erase in Disk Utility, you will be asked for a Scheme and a Format. Getting this wrong can lead to future compatibility issues.
The Scheme:
- GUID Partition Map: Choose this for all modern usage. It is required for APFS, necessary for bootable Mac backups, and works with all modern Windows versions (10/11).
- Master Boot Record (MBR): Only choose this if you are using the drive with very old Windows machines (XP/7) or legacy devices like old TVs or car stereos. It is less reliable for modern storage.
The Format:
- APFS (Apple File System): Best for SSDs and Flash Drives used only on macOS (High Sierra and later). It is faster and resistant to corruption.
- Mac OS Extended (Journaled): Best for mechanical hard drives (HDDs) used only on Macs.
- exFAT: The best choice for cross-compatibility. It allows you to transfer large files between Windows and Mac seamlessly.
Steps to Initialize:
1. Open Disk Utility.
2. Select the physical drive (top level).
3. Click Erase.
4. Name the drive, set Scheme to GUID Partition Map, and choose your Format.
5. Click Erase.
FAQ: Understanding Mac Disk Errors
Q1. What does “The disk you attached was not readable by this computer” mean?
This error indicates that macOS detects the hardware connection of your external drive but cannot recognize the file system. It usually signifies file directory corruption, an incompatible format (like a raw NTFS issue), or a faulty cable, rather than a physically broken drive.
Q2. Can I fix this without formatting?
Yes, often. If the issue is a simple cable fault or a “dirty” NTFS flag, you can fix it without data loss. If the directory is corrupted, you can use data recovery software to extract files before formatting. Formatting should always be the last step.
Q3. Why did Disk Utility First Aid fail?
First Aid repairs basic directory structures. It fails if the corruption is too severe (e.g., “invalid node structure”) or if there are physical bad blocks on the disk preventing a write operation.
Q4. How do I check if my drive is physically dead?
Listen to the drive. Rhythmic clicking, grinding, or beeping noises are clear signs of mechanical failure. In these cases, software tools cannot help, and you should contact a professional data recovery lab immediately.
Regaining Control of Your Data
The message “The disk you attached was not readable by this computer” is alarming, but it is rarely a dead end. By resisting the urge to click “Initialize” immediately, you preserve your options to recover videos and photos on a computer.
Start with the basics: swap your cables and use the Terminal command diskutil list to verify the hardware is alive. If those steps don’t resolve the mount issue, prioritize data rescue using recovery software before attempting any repairs. Your files are likely still there, waiting to be read.
More Related Articles

Joy Taylor is a seasoned technical writer with over a decade of experience in mobile technology. At iMobie, she specializes in producing in-depth content on iOS data recovery, iPhone unlocking solutions, and iOS troubleshooting.
Product-related questions? Contact Our Support Team to Get Quick Solution >
