Recover Deleted Snapchat Memories: The Complete Guide (2026)
Whether you’re on iPhone or Android, there are several ways to recover deleted Snapchat Memories and saved snaps. In this guide, you’ll learn what to check first inside Snapchat, how to restore from cloud backups, and what to do if your Memories are missing after reinstalling or switching devices.
You are likely reading this with a knot in your stomach. Whether your finger slipped, an update wiped your gallery, or you simply logged in to find a blank screen, losing your digital history is a significant emotional obstacle. We understand that panic. You are not looking for a story about someone else’s vacation; you are looking for a way to recovery your deleted photos and videos back right now.
The internet is full of conflicting advice, but restoring your data requires a systematic approach. Whether you need to recover deleted Snapchat Memories because of an accidental deletion, or you are facing the “Snapchat Memories not showing” error, this guide separates technical reality from wishful thinking.
We have stripped away the fluff to focus on the three methods that actually work: fixing sync errors (the most common culprit), requesting official archived data, and performing a deep forensic search of your device.
Snapchat Memories Disappeared? Check Sync Status First
Before you start downloading recovery software or panicking about permanent data loss, you must verify that the content is actually deleted. A common oversight occurs when users switch phones, update their OS, or reinstall the app: the Snapchat Memories not showing error is frequently a synchronization delay rather than actual data loss.
If you see gray icons, spinning circles, or blank spaces where your Snaps should be, the app is likely struggling to download your cloud backup. Snapchat Memories rely on a strong data connection to populate the app’s timeline. If your “Smart Backup” setting is interrupted, the app will fail to display older content.
How to Fix Sync Issues
Step 1. Check Connectivity:
Ensure your device is connected to a strong, stable Wi-Fi network. Cellular data often throttles the background sync process.
Step 2. Verify Smart Backup:
- Open Snapchat and tap your Profile icon.
- Tap the Settings (gear icon).
- Scroll to Memories.
- Ensure Smart Backup is checked. If you see a “Backup Progress” bar or a “Syncing…” message here, do not close the app. Leave Snapchat open on your screen and let it finish completely.
If the synchronization completes and the specific Snaps are still missing, you can then confirm that the files were deleted or removed from the Snapchat cloud backup. In that scenario, we move to external recovery methods.
Recovery Options Compared: Manual vs. Software
When deleted Snaps recovery via sync fails, you face two distinct approaches: the official manual method provided by Snapchat, or third-party data recovery tools. Choosing the right method depends on your technical comfort level and the specific device you use.
Below is a comparison to help you decide which method fits your situation:
| Feature | Official Snapchat Data Request (Manual) | Data Recovery Software (DiskDigger/Dr. Fone) |
| Primary Use | Retrieving account history and server-side media. | Scanning physical storage for deleted cache files. |
| Safety | High. You are interacting directly with the platform. | Moderate. Requires reputable software to avoid malware risks. |
| Success Rate | Variable. Retrieves what is legally stored on their servers. | Moderate (Android only). Effective only if data hasn’t been overwritten. |
| Skill Level | Low. Requires only account access. | High. Often requires connecting the device to a PC. |
Recommendation: Always begin with the Official Data Request. It is free, secure, and requires no specialized hardware. If that fails, Android users may consider specific PC data recovery software like DiskDigger to scan for Snapchat cache files.
How to Use ‘My Data’ to Recover Deleted Snaps
The My Data Snapchat tool is the most reliable first step for Snapchat account recovery of media. This method allows you to download a ZIP file containing your account history. While the app interface might show a Memory is gone, the server occasionally retains the raw media file in your archive for a short period before purging it completely.
Step-by-Step Data Request
1. Access Settings: Open Snapchat, tap your Profile, then the Settings gear icon.
2. Navigate to Privacy: Scroll down to the “Account Actions” or “Privacy Controls” section and select My Data.
3. Log In: You may need to log in again via the in-app browser for security verification.
4. Configure the Export: Look for the option to include “Memories and other media.”
Depending on your region (GDPR/CCPA laws), this option might look different. Ensure you are requesting a downloadable copy of your information (HTML and JSON formats).
5. Submit Request: Enter your verified email address and click Submit Request.

Analyzing Your Data (What to Look For)
Snapchat will send an email when your data is ready for download. This usually takes a few hours. This is the step where most users get confused because the file structure can be overwhelming.
1. Download and Unzip: Download the ZIP file to a computer. It is very difficult to navigate these files on a phone.
2. Open the Folder: Once unzipped, you will see several folders and files. You are looking for a folder labeled html or media.
3. Locate the Media: Open the html folder and click on memories_history.html. This will open a webpage in your browser listing your Memories.
- Crucial Step: Look for a folder specifically named memories or story_content within the unzipped structure. If Snapchat successfully exported your deleted content, the raw video files (MP4) or images (JPG) will be sitting loosely in this folder.
- Troubleshooting: Sometimes these files do not have proper names (e.g., 39485739.mp4). You may need to open them one by one to see what they contain.
Even if the video file itself is missing, the memories_history.html file lists the dates and times of your Memories. This confirms the metadata exists. You can use this log to cross-reference with your own cloud backups (like Google Photos) to see if a backup occurred on that specific date.
Deep Dive: Android Cache and Restricted Folders
If the official data request yields no results, the next logical step involves examining your device’s local storage. This is where the operating system matters. Android and iOS handle Snapchat cache and file management differently.
For iPhone Users (iOS)
On iOS, Snapchat is “sandboxed,” meaning direct cache access is extremely difficult without jailbreaking (which we do not recommend). However, many users enable camera roll sync without realizing it.
- Check Recently Deleted: Open the Apple Photos app, tap Albums, and scroll to Recently Deleted. If you ever saved a Snap to your storage and then deleted it, it will remain here for 30 days.
- Check iCloud Photos: Log into iCloud on a desktop browser. Sometimes, a photo exists in the cloud even if it was removed from the local device storage to save iPhone space.
For Android Users (The “Access Denied” Fix)
Android file systems historically allowed users to browse app data, but Android 11, 12, 13, and 14 have introduced strict privacy restrictions. If you try to open the Android/data folder on your phone using a standard file manager, it will likely show as empty or display “Access Denied.”
Do not give up here. You can bypass this restriction by connecting your phone to a computer.
1. Connect to PC: Plug your Android device into a Windows PC or Mac using a USB cable.
2. Enable File Transfer: On your phone, tap the “Charging via USB” notification and switch it to “File Transfer” or “MTP.”
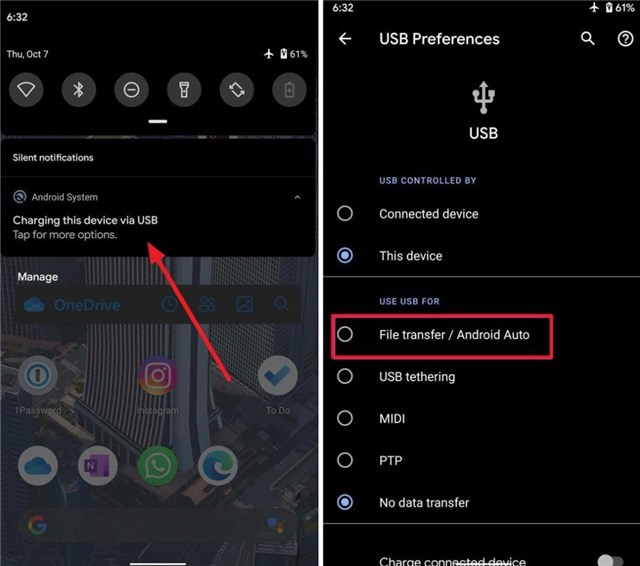
3. Browse via Computer: Open the file explorer on your computer. Navigate to: Internal Storage > Android > data > com.snapchat.android > cache. By accessing this folder from a computer, you bypass the mobile OS restrictions that hide these files from you.
4. Look for .nomedia Files: Once inside the cache folder, look for a subfolder named received_image_snaps or simply cache.
5. Rename and Recover: You may see files with strange extensions or files ending in .nomedia. Copy these files to your computer desktop. Rename them, adding .jpg (for images) or .mp4 (for videos) to the end of the filename. Try opening them to see if your lost memory is hidden there.
Software Recommendations (Proceed with Caution)
If the cache is empty, you may consider data recovery software. Warning: Most “Snapchat Recovery” apps are scams. However, there are two legitimate tools often used by technicians:
- DiskDigger (Android – Play Store): This is a safe app for recovering photos. The free version scans your cache and thumbnails. It does not require a PC. It is excellent for finding low-resolution versions of deleted images.
- Dr. Fone / Tenorshare (PC Required): These are paid desktop suites that scan your phone’s deep memory. They are safer than random APKs but require you to enable “USB Debugging.” Use these only as a last resort.
Checking these local directories provides a technical workaround that standard Snapchat support requests will not cover.
Understanding Storage: Cloud vs. Camera Roll
To prevent future data loss, it is vital to understand where your content actually lives. A major source of confusion is the difference between Snapchat Memories and your phone’s physical storage.
When you capture a Snap and save it to Memories, it uploads to cloud backup Snapchat servers. It is not automatically saved to your device’s Camera Roll or Gallery unless you explicitly change your settings or export the image.
- Memories (Cloud): Tied to your account. If you delete a Snap here, the server instruction is to remove it. Recovery is difficult because the source file is remote.
- Camera Roll (Local): Stored on your phone’s chip. If you delete a Snap here, it follows your phone’s “Recycle Bin” rules, making recovery much easier via standard data recovery tools. Best Android Data Recovery Software
When you search how to get back deleted memories on Snapchat, you are usually trying to retrieve data from the cloud. However, the most successful recoveries occur when the user unknowingly had “Auto-Save to Camera Roll” enabled, meaning a local copy existed all along.
FAQs: Scams, Support, and Safety
When valuable photos are lost, desperation can lead to risky decisions. It is critical to navigate the recovery landscape safely.
Q1. Can I recover deleted Snapchat Memories?
Yes, but with limitations. If they are not in your “My Data” export or local device cache, and were not saved to your Camera Roll, they are likely permanently gone.
Q2. Can Snapchat support restore deleted Memories?
Generally, no. For privacy and storage reasons, once a user deletes a Memory from the cloud, Snapchat’s servers are designed to erase that data. Support agents usually cannot reverse this action.
Q3. Why did my Snapchat Memories disappear?
This is often due to a sync error, an outdated app version, or a poor internet connection. Always check your “Smart Backup” status before assuming the data is lost.
Q4. Are third-party Snapchat recovery tools safe?
Be extremely cautious. Many apps claiming to recover old Snapchat memories are scams designed to steal your login credentials.
Warning: Avoid any website or tool that asks for your Snapchat password, requires “human verification” surveys, or promises to “hack” your account to retrieve lost partitions or data. Legitimate recovery software (like DiskDigger) scans your device, not your online account, and will never ask for social media login details.
Conclusion: Protecting Your Digital Memories
Losing photos is painful, but knowing where to look—and where not to waste your time—is half the battle. If the My Data export and the PC-connected cache search did not retrieve your files, it is likely they are gone from the Snapchat servers.
To ensure you never face this stress again, take a moment to adjust your Snapchat storage settings immediately:
- Enable Auto-Save: Go to Settings > Memories and look for “Save Button.” Set it to Memories & Camera Roll. This ensures every Snap you save creates a physical copy on your phone.
- Backup Your Camera Roll: Ensure your phone is syncing to Google Photos (Android) or iCloud (iOS). This creates a redundant backup independent of Snapchat.
By layering these backups, you protect yourself against accidental deletion, app errors, and lost devices. Your digital history is valuable; take these simple steps today to ensure it remains safe.

Joy Taylor is a seasoned technical writer with over a decade of experience in mobile technology. At iMobie, she specializes in producing in-depth content on iOS data recovery, iPhone unlocking solutions, and iOS troubleshooting.
Product-related questions? Contact Our Support Team to Get Quick Solution >
