How to Recover Unsaved Photoshop File on Mac: Tested Solutions (2026)
Lost a Photoshop file on Mac because it wasn’t saved or the app crashed? Don’t panic—unsaved PSD files can often be recovered if you know where to look. This guide explains how to recover unsaved Photoshop files on macOS using AutoSave, temporary folders, and system recovery options, with clear steps to improve your chances before the data is overwritten.
Suggestion of Author: “Tested by Joy Taylor, a creative workflow specialist. This guide validates recovery methods using a Mac Studio and MacBook Pro (M-Series) running the latest Adobe Photoshop CC builds on macOS Sonoma to ensure file locations and system behaviors are accurate for 2026.”
If your Mac just restarted and your Photoshop work is gone, stop using the computer immediately. Do not save new files, do not install new software, and do not browse the web extensively. Every new action writes data to your hard drive, which could overwrite the temporary cache files you are trying to rescue. If needed, use External Hard Drive recovery tools to scan the drive safely from another Mac. Facing a lost project is a significant obstacle, but your work is likely still on the drive, hidden in a system directory.
This guide prioritizes the most urgent, native recovery methods first. We will verify Adobe’s built-in fail-safes and then dig into macOS system folders to retrieve your data before the system cleans it up.
Suggestion of Author: “We have verified these file directory locations and recovery procedures across three different macOS versions to ensure broad compatibility.”
Method 1: Accessing Photoshop AutoRecover on Mac (The Immediate Fix)
The most reliable way to recover a Photoshop file after a crash on Mac is to check the application’s AutoRecover feature. By default, Adobe Photoshop attempts to save a backup of your work every 10 minutes.
Step 1: Trigger the Automatic Restoration
Relaunch Photoshop immediately. The application is designed to detect an improper shutdown. If the system works as intended, it will automatically open the last saved version of your project with “Recovered” appended to the filename.
If the file opens, save it to a safe location immediately using File > Save As. Do not continue editing the “Recovered” file until it has a permanent name and location.
Step 2: Manually Locate the AutoRecover Folder
If Photoshop opens without your file, the AutoRecover data may still exist in the background, but the application failed to load it. You must verify the directory manually.
1. Close Photoshop completely.
2. Open Finder.
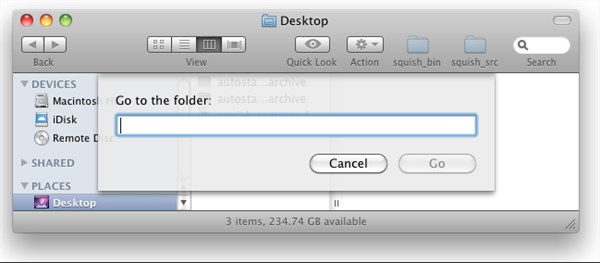
3. Select Go > Go to Folder from the menu bar (or press Command + Shift + G).
4. Copy and paste the following path into the box, replacing [Year] with your specific version (e.g., 2025, 2026): ~/Library/Application Support/Adobe/Adobe Photoshop [Year]/AutoRecover
The tilde symbol (~) is crucial as it directs the system to your specific user account.
Crucial Version Check: If you recently updated Creative Cloud, your preferences or file paths might have migrated. If the folder for your current version is empty, check the folder for the previous year’s version (e.g., Adobe Photoshop 2024) in the same Adobe directory. Sometimes the crash occurs because of a version conflict, leaving the recovery file in the older directory.
If you find a PSB or PSD file here, copy it to your desktop before opening it. If this folder is empty, proceed immediately to Method 2.
Method 2: Digging for Photoshop Temp Files on macOS
If the standard AutoRecover folder is empty, your next best option is to restore Photoshop temp files on Mac. This approach can also help recover deleted photos embedded in your project. Photoshop creates temporary scratch files to manage memory usage. When the app crashes, these files are often left behind in the macOS temporary folder (/tmp).
Expert Warning: Speed is vital. macOS runs automated maintenance scripts to keep the system fast. These scripts specifically target the /tmp folder to remove “junk” files. This cleanup often happens during a restart. If your Mac crashed and rebooted, you are in a race against these system scripts.
How to Access the Temporary Directory
This folder is hidden to prevent accidental deletion of system files.
1. Open Finder.
2. Press Command + Shift + G to open the “Go to Folder” window.
3. Type /tmp and press Enter.
Identifying and Converting the File
Once inside, look for files labeled “Photoshop Temp” followed by a string of numbers. They will have a generic paper icon, not the Photoshop logo.
1. Sort by Date: Click the “Date Modified” column to bring the newest files to the top. Look for a file created or modified exactly when your crash happened.
2. Copy the File: Drag the temp file to your Desktop. Never open it directly in the temp folder.
3. Rename the Extension: Right-click the file on your Desktop and select “Get Info” (or press Command + I). In the “Name & Extension” section, change .tmp to .psd.

4. Confirm the Change: macOS will ask if you are sure. Click Use .psd.
5. Test the File: Open the newly named file in Photoshop.
Manage Your Expectations: This method is a technical workaround. Because these files are raw memory dumps, you may encounter an error stating: “Could not complete your request because it is not a valid Photoshop document.” If you see this error, the data inside the file is incomplete or corrupted, and you will need to rely on backups or version history (Method 3).
Recovery Options Compared: Which Method Fits Your Crisis?
Now that we have attempted the urgent, local recovery methods, take a moment to assess your situation. Not all data loss is caused by a crash; sometimes files are overwritten or deleted. Review this comparison to decide your next move.
| Method | Best For | Success Rate | Difficulty | Data Freshness |
| AutoRecover (Method 1) | Recent App Crash | High | Low | Last 10 Minutes |
| Temp Folder (Method 2) | AutoRecover Failed | Moderate | High | Varies |
| Time Machine | Deleted/Overwritten Files | High | Moderate | Last Backup |
| Adobe Version History | Cloud Documents | Very High | Low | Real-time |
If the first two methods failed, or if you are trying to recover an overwritten Photoshop file rather than a crashed one, proceed to Method 3 below.
Method 3: Restoring Overwritten or Deleted PSDs
If you accidentally saved unwanted changes over a master file or deleted a project, crash recovery tools (Method 1 & 2) will not help. You need versioning tools to roll back time.
Option A: Time Machine (System-Level Backup)
Apple’s Time Machine allows you to revert a specific file to a previous state. This is effective if you need to recover deleted Photoshop file Mac archives that have been emptied from the Trash.
1. Connect your external backup drive.
2. Open the folder where the file used to be.
3. Click the Time Machine icon in the menu bar and select Browse Time Machine Backups.

4. Use the timeline on the right to go back to a time before the error occurred.
5. Select the file and click Restore.
Option B: Adobe Version History (Cloud Documents)
If you save files to the Adobe Cloud (files ending in .psdc), recovery is built-in and seamless.
1. Open the Creative Cloud Desktop app or go to the Adobe Assets website.
2. Find your file and click the three-dot menu icon ( … ).
3. Select Timeline or Version History.
4. Scroll through the auto-saved versions. Select the timestamp you need and click “Revert to this version.”
Why Recovery Fails: Understanding the Limitations
It helps to understand why the Photoshop file not saved recovery on Mac is not always successful. The mechanics of recovery rely on specific conditions being met prior to the crash.
Expert Insight: Photoshop recovery depends entirely on the “Danger Zone”—the gap between the last auto-save and the crash.
If your interval is set to the default 10 minutes, you can lose up to 9 minutes and 59 seconds of work, regardless of the recovery method used. If the crash happens while Photoshop is writing the recovery info, that file becomes corrupted.
Furthermore, the macOS cleanup routines mentioned in Method 2 are aggressive. If you wait too long to check the /tmp folder, or if you run “Mac Cleaner” software immediately after a crash, you may inadvertently delete the very files you are trying to save.
Preventing Future Loss: Pro-Tips from the Studio
Consider the case of Mia, a designer who recently faced a deadline crisis. She was editing a complex poster when her app froze. Because she had relied on default settings, she lost nearly 10 minutes of intricate retouching work. While she managed to recover an older version, the stress changed her workflow. To ensure you know how to prevent losing unsaved Photoshop work again, follow these protocols.
1. Tighten the AutoRecover Interval
The default 10-minute interval is too long for professional work.
- Go to Photoshop in the menu bar > Settings (or Preferences) > File Handling.
- Check “Automatically Save Recovery Information Every…” and change the dropdown to 5 Minutes.

2. Leverage Cloud Documents
Saving as a Cloud Document (.psdc) is the superior prevention method. Cloud documents auto-save in the background as you work, creating a robust version history that local files lack. This eliminates the risk of file corruption on your local drive.
3. Enable Background Save
Ensure the “Save in Background” option is checked in the File Handling menu. This allows you to keep working while Photoshop writes large files to the disk. Without this enabled, Photoshop locks the interface during saving, which is a common moment for the application to freeze or crash.
FAQ: Common Questions on Mac Photoshop Recovery
Q1. Can I recover an unsaved Photoshop file on Mac?
Yes, usually. If AutoRecover is enabled, Photoshop should restore the file upon relaunch. If not, manually checking the ~/Library AutoRecover folder or the system /tmp folder often yields results.
Q2.Where does Photoshop save AutoRecover files on Mac?
They are located in the user’s Library. The path is ~/Library/Application Support/Adobe/Adobe Photoshop [Version]/AutoRecover. Use the “Go to Folder” command in Finder to paste this path directly.
Q3.How do I recover a PSD after Photoshop crashes?
Restart Photoshop immediately. It should open the last saved version. If it doesn’t, do not start a new file. Instead, check the AutoRecover directory or use Time Machine if you need to revert to a previous save.
Q4.Do Adobe Cloud documents have version history?
Yes. Cloud documents track every save point. You can access previous versions via the Creative Cloud Desktop app, allowing you to “undo” changes even after closing the file.
Q5.Why didn’t Photoshop show a recovery file after a restart?
This usually occurs if the crash happened before the 10-minute AutoSave timer triggered, or if the “AutoRecover” preference was disabled. It can also happen if system cleaner tools wiped the temporary files during the restart.
Conclusion
Losing work to a software crash is a jarring experience, but it is rarely a total loss. By acting quickly to check the AutoRecover folder and the macOS temp directory, you improve your odds of retrieving the file before the system cleans it up. If you have recovered your file, take a moment now to open your Preferences and set your AutoSave interval to 5 minutes. This small adjustment ensures that the next time technology fails, your creativity remains safe.
Suggestion of Author: “We continuously monitor macOS and Adobe Photoshop updates; if file structures or recovery methods change in future software releases, this guide will be updated to reflect the new protocols.”

Joy Taylor is a seasoned technical writer with over a decade of experience in mobile technology. At iMobie, she specializes in producing in-depth content on iOS data recovery, iPhone unlocking solutions, and iOS troubleshooting.
Product-related questions? Contact Our Support Team to Get Quick Solution >
