How to Recover Word Files: 4 Verified Methods for Windows (2026 Guide)
Lost a Word document on Windows? This guide walks you through 4 verified recovery methods for unsaved, deleted, or missing files. You’ll learn how to use AutoRecover, Recover Unsaved Documents, Recycle Bin restore, and File History—step by step.
Losing hours of critical work is a crisis that strikes without warning. Whether a sudden power outage shut down your PC or you accidentally clicked “Don’t Save” in a rush, the immediate panic of a missing document is overwhelming. You might be staring at a blank screen or a folder that feels emptier than it should be.
If you are currently scrambling to recover word files because a Word document closed without saving or simply vanished, take a moment. You have not reached a dead end.
This guide is built for the immediate crisis. We have stripped away the fluff to give you a systematic, rapid-response recovery plan. Whether your file was deleted in recycle bin, corrupted, or overwritten, the solutions below are tested and verified to help you locate your missing data and resume your work immediately.
Recovery Decision Guide: Choose the Right Method
Panic often leads to random clicking, which can waste valuable time and potentially overwrite the very data you are trying to save. To recover word files successfully, you must match your specific situation to the correct recovery technique. Stop guessing and use this decision guide to identify the procedure that fits your scenario.
Triage Your Situation:
1. Did Word crash or close unexpectedly?
- Primary Solution: AutoRecover (Method 1)
- Success Rate: High (if the feature was enabled)
- Data Freshness: Recent (usually the last 10 minutes)
- Best for: Word crash recovery and power outages.
2. Did you accidentally delete the file?
- Primary Solution: Recycle Bin Recovery (Method 2)
- Success Rate: Very High (unless the bin was emptied)
- Data Freshness: Exact state at the time of deletion
- Best for: Recover deleted word documents.
3. Did you save over a file and need an older version?
- Primary Solution: OneDrive Version History (Method 2)
- Success Rate: High (requires cloud sync)
- Data Freshness: Multiple previous save points
- Best for: Recover overwritten word document scenarios.
4. Is the file completely missing or hidden?
- Primary Solution: Deep Search for Temporary Files (Method 3)
- Success Rate: Moderate
- Data Freshness: Variable
- Best for: When a Word document disappeared from standard views.
Method 1: Recover Unsaved Word Documents (Crash Recovery)
If Word crashed, your battery died, or you accidentally closed the program without saving, this is your first stop. Microsoft Word has a built-in safety net called AutoRecover Word, which takes snapshots of your work at set intervals (usually every 10 minutes).
Usually, the Document Recovery pane appears automatically on the left side of the screen upon relaunching Word. If it does not, you must manually locate the AutoRecover files.
Steps to Manually Recover Unsaved Documents:
1. Open Microsoft Word and select the File tab in the top left corner.
2. Click on Info.
3. Locate the Manage Document button (sometimes labeled Manage Versions).
4. Click the dropdown and select Recover Unsaved Documents.
5. A dialog box will open displaying the default UnsavedFiles directory. Look for files with the .asd extension.
Important Technical Note (Don’t Skip This):
By default, Windows hides file extensions to make the view “cleaner.” This means you might just see a file name like AutoRecovery save of Report without the .asd at the end.
If you don’t see extensions: In the file dialog window, click View at the top, and check the box for File name extensions. This ensures you are selecting the correct recovery file type.
6. Select the file that matches your missing document and click Open.
Critical Warning: Do Not Double-Click
Do not try to open these .asd files by double-clicking them from a standard File Explorer window. Windows often cannot associate the file type correctly, resulting in an error message that increases panic. You must open them through the Word “Open” dialog as described in the steps above.

If the dialog box is empty, you can verify the storage location manually. Navigate to this directory on your PC:
C:\Users\[YourUsername]\AppData\Local\Microsoft\Office\UnsavedFiles
These steps effectively resolve recover word file not saved errors caused by power loss or application crashes.
You may also like: 7 Ways to Recover Unsaved/Deleted Notepad Files on Windows 11/10 >
Method 2: Restore Deleted or Overwritten Word Documents
For the “Accidental Deleter” who moved a file to the trash or the user who saved unwanted changes, the recovery process differs from a crash scenario. Here is how to recover deleted word documents or reverse accidental edits.
Scenario A: The File Was Deleted (Local Storage)
To restore deleted word file windows usually stores the file in the Recycle Bin initially.
1. Double-click the Recycle Bin icon on your desktop.
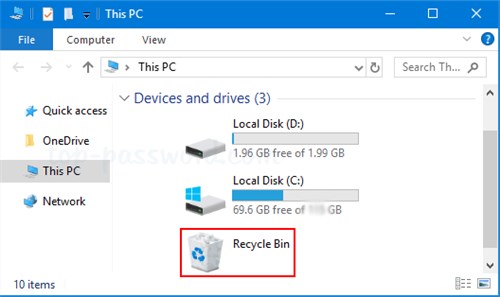
2. Search for your document name in the search bar at the top right of the window.
3. Right-click the file and select Restore.
4. Check your original folder—the file will reappear exactly where it was before deletion.
Scenario B: The File Was Overwritten (OneDrive/SharePoint)
If you saved over a document and need an older draft, Recycle Bin recovery or will not help. This is a common pain point: you have the file, but the content is wrong. If you use OneDrive, you can travel back in time.
1. Open File Explorer and navigate to your OneDrive or SharePoint folder.
2. Right-click the Word document in question.
3. Select Version History from the context menu.
4. A sidebar (or dialog window) will appear listing previous save points by date and time.
5. Click the three dots (ellipses) next to the desired version and select Restore (or Open to view it first).
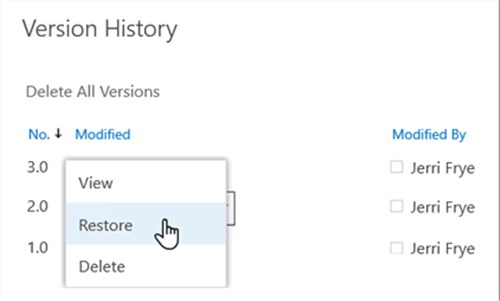
This method is the most reliable way to recover overwritten word document data, provided your file was synced to the cloud.
Method 3: Deep Search for Temporary and Backup Files
When the Document Recovery pane is empty and the Recycle Bin is clear, we move to advanced forensics. You must perform a deep search for temporary files word creates in the background. Windows often retains backup files (.wbk), AutoRecover files (.asd), or temporary files (.tmp) in hidden system directories.
Option A: Manual Folder Navigation
This requires looking into the “AppData” folders, which are usually hidden. Follow these steps carefully:
1. Press the Windows Key + R to open the Run dialog.
2. Type %appdata% and press Enter.
This command usually opens the C:\Users\[Username]\AppData\Roaming folder directly.
3. From here, double-click the Microsoft folder.
4. Inside that, double-click the Word folder.
5. Look for any files with the .asd or .wbk extension.
If the folder looks empty, remember to check the View > File name extensions setting again.
If this folder is empty, verify your specific AutoRecover file location in Word by going to File > Options > Save. Copy that directory address into File Explorer manually.
Option B: The “Nuclear” Search (Search Everything)
If you are unsure where the file might be hiding, force Windows to search your entire drive for recovery file types. This is useful when a word document disappeared completely from standard views.
1. Open File Explorer and click on This PC in the left sidebar.
2. In the search bar at the top right, type *.asd and hit Enter.
What this does: The asterisk is a wildcard. This command tells Windows, “Find every single file that ends in .asd, no matter where it is.”
3. Wait for the green loading bar to finish. This may take several minutes.
4. If no results appear, try searching for *.wbk (Word Backup) or ~*.* (Temporary files).
Using Windows File History
If you do not use OneDrive, you might have File History Windows enabled locally. This creates shadow copies of your files.
1. Right-click the folder where the file used to be (not the file itself, as it might be missing).
2. Select Properties and click the Previous Versions tab.
3. If Windows has created a restore point or backup, you will see a list of folder versions. Select one from before the data loss and click Open to search for your document.
Method 4: Handling Corrupted Files and Text Recovery
Sometimes a file is found but refuses to open, or it opens to display gibberish characters. To recover corrupted word file content, Microsoft Word includes native repair tools that bypass the standard loading process.
Tool 1: Open and Repair
This function forces Word to attempt a fix on the file structure before opening it.
1. Open Word (without opening a specific document).
2. Go to File > Open > Browse.
3. Select your corrupted document once (do not double-click).
4. Instead of clicking the main Open button, click the small arrow next to it.
5. Select Open and Repair from the dropdown menu.
Tool 2: Recover Text from Any File
If the file remains unreadable, try extracting the raw text.
1. Go to File > Open > Browse.
2. In the file type dropdown menu (usually set to “All Word Documents”), select Recover Text from Any File (.).
3. Select your document and click Open.
This method strips away formatting and images but often salvages the raw text data, which is usually the most critical part of your work.
Expert Insight: AutoSave vs. AutoRecover (Stop Losing Work)
Once you have recovered your file, the most important step is ensuring this doesn’t happen again. A major source of confusion—and data loss—is the difference between AutoRecover and AutoSave. Mixing these up is why many users think their work is safe when it isn’t.
- AutoRecover (The Crash Safety Net): This is a disaster recovery tool. It creates temporary files word uses as recovery snapshots locally on your PC (usually every 10 minutes). It is designed to help you only after a power outage or system crash. It does not save your actual file continuously. If you close a document and click “Don’t Save,” AutoRecover files are often deleted by design.
- AutoSave (The Real-Time Backup): This is a cloud synchronization tool. It continuously saves changes in real-time, second by second, but only when the file is stored in OneDrive or SharePoint.
The Pro Tip:
If you rely solely on saving to your local hard drive (C: drive), AutoSave is likely off, and you are vulnerable to losing up to 10 minutes of work at any time. To ensure you never lose more than a few seconds of work, switch to saving vital documents in OneDrive. This activates AutoSave and maintains the robust version history we used in Method 2. You can also ask free Hard Drive data recovery software for help.
Frequently Asked Questions About Word Recovery
Q1. Can I recover a Word document after I clicked Don’t Save?
Yes, in many cases. Word retains a temporary copy of unsaved files for a short period. Go to File > Info > Manage Document > Recover Unsaved Documents immediately to check for the draft.
Q2. Why is my recovered Word document missing changes?
This happens because AutoRecover saves snapshots at set intervals (default is every 10 minutes). If your specific interval was set to 10 minutes and you worked for 9 minutes before a crash, those last 9 minutes of work may not be captured. You can lower this interval in File > Options > Save.
Q3. Where does Word store AutoRecover files?
The default location for these files on Windows is typically:
C:\Users\[Username]\AppData\Roaming\Microsoft\Word\
However, you should always verify the exact location listed in your Word Options under the “Save” tab.
Q4. How do I recover a Word file saved in OneDrive?
If your file was saved to OneDrive, do not look in the local Recycle Bin first. Instead, right-click the file in your OneDrive folder and select Version History. This allows you to view and restore previous versions of the document unaffected by recent overwrites or deletions.
Conclusion
Losing a critical document creates a feeling of helplessness, but as we have demonstrated, a crash or accidental deletion does not mean your work is gone forever. By following the correct procedure—whether it is accessing AutoRecover Word files, checking OneDrive version history, or performing a deep search for hidden backups—you can resolve the issue of a Word document closed without saving or a file that has disappeared.
Do not let data loss disrupt your workflow again. Use the methods above to reclaim your document now, and then take a moment to enable AutoSave or adjust your AutoRecover interval. Or you can use PC data recovery software to help you get files back. Regain control of your digital workspace today and ensure your hard work is always protected against the unexpected.

Joy Taylor is a seasoned technical writer with over a decade of experience in mobile technology. At iMobie, she specializes in producing in-depth content on iOS data recovery, iPhone unlocking solutions, and iOS troubleshooting.
Product-related questions? Contact Our Support Team to Get Quick Solution >
