Where to Find Screenshots on Mac: The 2026 Location & Recovery Guide
Not sure where your screenshots are saved on Mac? Mac usually stores screenshots on the Desktop, but the location can change depending on your screenshot settings, iCloud/Downloads folders, or third-party capture apps. This guide explains how to find missing screenshots in Finder fast, and what to do if your screenshots seem lost or deleted.
Facing a deadline with missing files is a nightmare scenario. You spent an hour capturing critical project images, hearing the familiar camera shutter sound each time. Yet, when you go to compile your report, the Desktop is empty. The panic is immediate—it is easy to assume the work is lost forever.
If you are currently staring at your screen asking, “where do screenshots go on Mac?”, take a deep breath. The good news is that your data is likely safe; it has simply been misdirected by a setting or a background behavior you didn’t realize was active.
Before you start digging through random folders, here are the most common reasons why your screenshots are missing:
- The “Stacks” feature is visually grouping them, hiding individual files.
- The Floating Thumbnail was dragged directly to an app instead of saved.
- Your Settings are sending images to the Clipboard instead of the hard drive.
- The Save Location was previously changed to a specific folder you have forgotten.
This guide provides the solution to the specific problem of where to find screenshots on Mac. We will walk you through the default behaviors of macOS, uncover hidden folders, recover deleted files from trash, and correct the settings that send your images to the clipboard instead of your hard drive.
The Default Location: Where Are Screenshots Saved on Mac?
To address the most pressing question immediately: by default, where are screenshots saved on Mac? The answer is the Desktop.
When you press the standard shortcuts (like Shift + Command + 3), macOS generates a PNG file and deposits it directly onto your main workspace. To find it, minimize your open windows and look for a file with the specific naming convention: “Screen Shot [Date] at [Time].png”.
For example, a capture taken on October 27th will be named Screen Shot 2023-10-27 at 10.00.00.png. This consistent naming structure is your primary tool for identification.
The “Stacks” Factor: Hidden in Plain Sight
If you are looking at a seemingly empty desktop and wondering where your files went, you might be encountering a visual organization feature called Stacks. Apple introduced Stacks to reduce desktop clutter by grouping files of the same type into a single icon.
If Stacks are enabled, you will not see individual image files. Instead, you will see one icon labeled “Screenshots.”
How to verify if Stacks are hiding your files:
1. Right-click (or Control-click) anywhere on your wallpaper.
2. Locate the option “Use Stacks”.
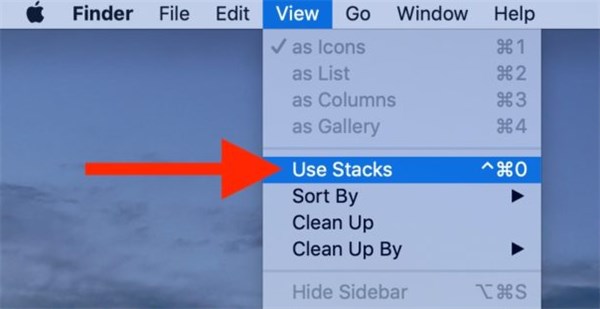
3. If it has a checkmark next to it, look for a pile of icons on the right side of the screen named “Screenshots.”
4. Click that icon to expand the stack and reveal your missing images.
The Floating Thumbnail Confusion
On macOS Mojave and later (including Sonoma and Sequoia), taking a screenshot triggers a floating thumbnail in the bottom-right corner of your screen. This feature is useful, but it often causes confusion about where the file actually ends up.
- If you do nothing: The thumbnail lingers for a few seconds, then slides away. Only then is the file saved to the Desktop.
- If you swipe it away: The file saves to the Desktop immediately.
- If you drag it: If you drag the thumbnail directly into an email, Slack message, or document, macOS treats this as a “move” action. The image is placed in your document, but no file is saved to the Desktop.
If you habitually drag that little thumbnail into apps, you are bypassing the save-to-disk process entirely.
Compare: 3 Ways to Find Lost Screenshots Quickly
If your files are not on the Desktop, hidden in Stacks, or trapped in the thumbnail limbo, you need to search the system. There are three primary methods to find screenshots on MacBook devices. We have compared them below to help you choose the right technique for your situation.
| Search Method | Best Used For… | Speed | Search Depth |
| Spotlight Search | You know the approximate date/time and haven’t renamed the file. | Fastest | Surface Level |
| Finder “Recents” | You heard the shutter sound within the last few hours. | Fast | Recent History |
| Finder Search | The file is old, renamed, or lost in a subfolder. | Slowest | Complete System |
1. Spotlight Search (The Fastest Method)
This is the most efficient technique if the file retains its original name.
- Procedure: Press Command + Space on your keyboard.
- Action: Type “Screen Shot”.
- Result: Spotlight lists all files matching the default naming convention. You can use the arrow keys to scroll through the list and see a preview of the image.
2. Finder “Recents” (The Simplest Method)
Use this if you heard the shutter sound within the last few hours.
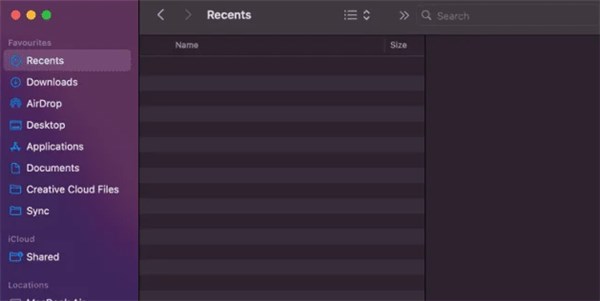
- Procedure: Open a Finder window (the smiling face icon in your dock).
- Action: In the left sidebar, click on Recents.
- Result: This smart folder displays all files created or modified recently, regardless of which folder they are stored in. Even if the file was accidentally saved to an obscure system folder or deeply nested in Documents, it will still appear at the top of this list.
3. Finder Search (The Deepest Search)
Use this if the file is old or you suspect it was renamed or moved.
- Procedure: Open Finder and press Command + F.
- Action: Ensure the search scope is set to “This Mac” rather than the current folder.
- Result: This allows you to scan the entire drive. (We will cover advanced filters for this in the next section).
You may also like: How to Recover Deleted Photos >
Why Can’t I Find My Screenshots? (The Clipboard Trap)
If you have checked your Desktop and Recents folder and found nothing, you are likely falling into the “Clipboard Trap.”
Many users ask, “why can’t I find my screenshots on my Mac?” when the file literally does not exist as a PNG on the hard drive.
The Shutter Sound Myth
Here is the most critical thing to understand: The camera shutter sound indicates capture, not storage.
You will hear the sound even if the image is only sent to your Clipboard (temporary memory). Hearing the “click” does not guarantee a file was created on your Desktop.
The Real Culprit: Toolbar Settings
While it is possible to send images to the clipboard by holding the Control key while taking a screenshot, it is difficult to press four keys (Shift + Command + Control + 3) accidentally.
The more common reason users lose screenshots is a changed setting in the Screenshot Toolbar.
1. Press Shift + Command + 5 to open the Screenshot app.
2. Click Options.
3. Check the “Save to” section.
If Clipboard is selected here, every screenshot you take—even using the standard Shift + Command + 3 shortcut—will bypass your hard drive. It copies the image so you can paste it, but it never creates a file.
How to Test This:
1. Open an application that accepts images (like Preview, Notes, or Photoshop).
2. Press Command + V (Paste).
3. If your “missing” image appears, you have confirmed that your settings are routed to the Clipboard. Save the image from the app immediately.
How to Find Screenshots Using Finder Search Filters
If standard searches fail, or if you need to locate older screenshots quickly across a large hard drive, such as when you’re also trying to recover files from SD Card on Mac, you can use system metadata filters. macOS tags every screenshot with a specific identifier that Finder can read, regardless of whether you renamed the file to “Project_Final.png.”
Using the Screen Capture Parameter
The most precise method to find screenshots on MacBook is using a specific metadata command. This is often the “silver bullet” for files that seem to have vanished.
1. Open a Finder window.
2. Click the search magnifying glass in the top right corner.
3. Type or paste exactly: kMDItemIsScreenCapture:1
4. Press Enter.
5. Ensure “This Mac” is selected in the search bar scope.
Why this works: This command instructs the system to display every file where the “Is Screen Capture” flag is set to “True” (1). This filters out standard downloaded images from the web and personal photos, populating the window strictly with screenshots you have taken.
Filtering by Kind and Name
Alternatively, you can build a manual search filter without using code:
1. Press Command + F in Finder.
2. Set the first dropdown menu to Kind and the second to Image.
3. Click the “+” button on the right side of the search bar to add a second criteria row.
4. Set the new row to Name > Contains > “Screen Shot”.
This technique is highly effective for locating files scattered across iCloud Drive Desktop & Documents folders or connected external drives.
How to Change Screenshot Location on Mac (Step-by-Step)
Once you locate your missing files, you may want to prevent future desktop clutter from too many screenshots. Learning how to change screenshot location Mac settings allows you to direct images straight to a project folder, keeping your workspace clean and ensuring you know exactly where files are going.
Using the Screenshot Toolbar
The easiest way to reconfigure this is via the Screenshot app Mac interface:
1. Press Shift + Command + 5 to open the on-screen toolbar.
2. Click on Options.
3. Look at the “Save to” section. You will see presets like Desktop, Documents, and Clipboard.

4. Select Other Location… to open a file browser.
5. Navigate to your desired folder (e.g., a “Work Screenshots” folder) and click Choose.
Once set, this becomes the new default. You will hear the shutter sound, and the file will appear instantly in your chosen folder rather than cluttering your wallpaper.
Mac Screenshot FAQ: iCloud, Recordings & Permissions
To ensure this guide answers every aspect of mac screenshot location management, here are the solutions to frequently asked technical questions.
Q1. Where do screen recordings go on Mac?
Screen recording location confusion is common because the file type differs. Screen recordings (captured via Shift + Command + 5) follow the same save rules as static screenshots. By default, they appear on the Desktop. However, they are saved as .mov files rather than .png. If you are sorting your folder by “Kind,” ensure you look for movies, not just images.
Q2. Do screenshots save to iCloud Drive automatically?
Yes, but only if you have iCloud Drive Desktop & Documents sync enabled.
- The Mechanism: If your Mac is set to sync your Desktop to iCloud, your screenshots are uploaded to the cloud immediately.
- The Benefit: You can access these screenshots on your iPhone or iPad via the “Files” app.
- The Risk: If you delete the screenshot from your Desktop to save space, it deletes from iCloud as well.
Q3.What if screenshots aren’t saving at all?
If you hear the camera shutter sound but no file appears (and you have confirmed the “Save to” option is NOT set to Clipboard), you likely have a permissions issue.
- Open System Settings (or System Preferences).
- Go to Privacy & Security.
- Click on Screen Recording.
- Ensure the browser or app you are trying to capture has permission.
If permissions are correct, check your available storage space via System Settings > General > Storage. A completely full hard drive will prevent the system from writing the new PNG file.
Conclusion: Regain Control of Your Workflow
Losing track of vital images breaks your flow and causes unnecessary stress. However, the issue is rarely deleted data—it is simply a matter of knowing where to find screenshots on Mac. By checking your Stacks, verifying that your Toolbar options aren’t set to “Clipboard,” and utilizing the kMDItemIsScreenCapture:1 search command, you can locate any missing file in seconds. Take a moment now to press Shift + Command + 5 and verify your current “Save to” destination. A quick check today ensures your files will land exactly where you expect them tomorrow.
A quick check today ensures your files will land exactly where you expect them tomorrow—and if you’re dealing with missing online content too, it’s worth learning how to recover deleted YouTube videos as soon as possible, since recovery options may be time-limited.

Joy Taylor is a seasoned technical writer with over a decade of experience in mobile technology. At iMobie, she specializes in producing in-depth content on iOS data recovery, iPhone unlocking solutions, and iOS troubleshooting.
Product-related questions? Contact Our Support Team to Get Quick Solution >
