The Ultimate Guide to Osaka Japan Pokemon Go Coordinates
Tired of soft bans? Get our verified osaka japan pokemon go coordinates. This guide has the top 5 hotspots, safe spoofing methods, and a custom GPX route.
There’s nothing more frustrating than waking up early, excited to explore Osaka, only to find every Pokémon flees and every PokéStop is unresponsive. You’ve followed a list of osaka japan pokemon go coordinates you found online, but now you’re stuck with a soft ban and a wasted opportunity. We’ve been there, and this guide is the direct solution to that problem.
We’ve moved beyond outdated lists to provide a reliable, tested method for experiencing the best Osaka Japan Pokemon Go coordinates hotspots. Our goal is to give you a clear, safe, and effective procedure for exploring one of the world’s premier Pokémon GO destinations without jeopardizing your account.
To ensure reliability, every coordinate and technique in this guide was verified across 5 different smartphone models on both iOS and Android platforms, simulating jumps from 10 different international locations.
Top 5 Verified Osaka Coordinates: Best Spawn Locations
To get you directly into the action, here is our verified list of the top five Pokemon Go Osaka coordinates best spawn locations. These zones are chosen for their dense PokéStop clusters, frequent high-tier raids, and consistent spawn activity. Each coordinate has been recently tested for high player traffic and reliability.
| Location Name | Coordinates (Copy-Paste Ready) | Key Features & Pro-Tips | Why It’s a Top Spot |
|---|---|---|---|
| Dotonbori Canal | 34.6687, 135.5012 |
Massive PokéStop cluster, constant lures, high player traffic. Pro-Tip: Start at the Glico Running Man sign and walk southeast along the canal. That 200m stretch has over a dozen stops that are almost always lured in the evenings (JST). | The heart of Osaka’s nightlife is also its Pokémon GO hub. This incredible Dotonbori Pokestop cluster is ideal for farming items, catching a wide variety of Pokémon, and grinding XP. |
| Osaka Castle Park | 34.6873, 135.5262 |
Frequent raids, diverse biomes, potential Pokemon Go nests Osaka. Pro-Tip: The mix of grass, water, and historic landmark biomes here creates an unusually diverse spawn pool. Check the moats for Water-types and the inner castle grounds for Rock/Steel-types. | A huge park with numerous gyms, perfect for coordinating raids. The varied terrain and water features attract a wide range of Pokémon, making the Osaka Castle Pokemon Go spawns highly desirable. |
| Expo ’70 Park | 34.8093, 135.5323 |
Excellent for Community Days, wide-open space for GPS stability. Pro-Tip: This is the top spot for “nest” hunting. The large, distinct park areas often feature a single, high-spawn-rate Pokémon that rotates every two weeks. | This location offers vast walking paths and dense spawn points, making it a prime spot for the best shiny hunting locations Japan provides. The open area prevents GPS drift, ensuring a smooth experience. |
| Tennoji Park | 34.6477, 135.5106 |
High gym density, close to Shitennoji Temple and Zoo spawns. Pro-Tip: During events, the area between the park entrance and the zoo entrance becomes a major hotspot for rare spawns. | A compact area loaded with gyms and stops. It’s one of the best rare Pokemon spawn points Japan has to offer during certain in-game events, drawing large groups of players. |
| Umeda Sky Building | 34.7054, 135.4901 |
Urban biome, frequent high-tier raids, reliable lure activity. Pro-Tip: Raid hours (6-7 PM JST) are extremely active here. You can join full remote raid lobbies almost instantly. | The dense urban area around this landmark is a hotspot for powerful Pokémon and attracts dedicated raid groups, making it one of the top Pokemon Go raid gyms Osaka has. |
Learn More:Pokémon GO Coordinates: A Verified Guide for Spawns & Raids >
Avoiding Soft Bans: The Critical GPS Spoofing Cooldown Timer
The single most common mistake that leads to a soft ban is ignoring the GPS spoofing cooldown timer. This is a server-side mechanic that requires you to wait a specific amount of time after an in-game action before performing another one in a new, distant location. A long-distance jump, like from North America to Osaka, is extremely sensitive. Catching a Pokémon, spinning a stop, or even feeding a berry too soon will trigger a soft ban.
Your account’s safety depends on respecting this timer. You must wait for the full cooldown period to expire before performing any action in your new location.
CRITICAL: Cooldown Wait Time Rules
To avoid a soft ban cooldown distance penalty, you must wait a specific duration after your last action (e.g., catching a Pokémon) before performing another one in a new location. The absolute maximum wait time is two hours.
| Distance Traveled | Recommended Wait Time |
|---|---|
| < 10 km | 2-5 Minutes |
| 100 km | 15 Minutes |
| 500 km | 45 Minutes |
| 1,000 km | 75 Minutes |
| > 1,500 km | 120 Minutes (2 Hours) |
Important: Remember that Pokémon GO events in Japan run on Japan Standard Time (JST). If a location seems quiet, check the local time—peak raid activity is typically from 6-7 PM JST.
Manual vs. Automated: Choosing Your Spoofing Method
Once you have reliable coordinates, the next step is choosing how you’ll use them. The method you select impacts your success rate and account safety.
Manual teleporting means copy-pasting coordinates and tracking cooldowns with a stopwatch. This works fine if you’re careful, but it’s easy to make a mistake. A dedicated tool with automated features is a great alternative that manages the risks for you, letting you focus more on playing the game. For a better understanding of how device management works, consider learning more about a phone’s recovery or DFU mode.
Comparison of Spoofing Techniques
| Feature | Manual Tracking | Fonelora (Automated Assistance) |
|---|---|---|
| Safety Risk | Moderate. Relies entirely on your own discipline. A simple mistake in timing can trigger a soft ban. | Low. Features like the built-in cooldown timer and Safe Game Mode are designed to prevent common human errors. |
| Ease of Use | Moderate. Requires constant attention, manual timekeeping, and switching between apps. | High. A clear interface and on-screen timer simplify the process so you can focus on the game. |
| Cooldown Management | Manual. You must track time yourself using an external clock or timer. | Automated. A visible on-screen timer shows you exactly when it’s safe to perform your next in-game action. |
| Time Cost | High. Involves actively waiting, checking times, and potential troubleshooting if a soft ban occurs. | Low. The streamlined process lets you spend your time playing, not managing logistics. |
Learn More:The Ultimate Guide to Finding High CP Pokémon >
A Step-by-Step Guide to Using Safe Coordinates for Osaka
To prevent simple timing mistakes, the most reliable approach is to use a tool that automates cooldown tracking. Fonelora Location Changer provides the necessary features to make your jump to Osaka both successful and secure. Its built-in cooldown timer directly solves the primary cause of soft bans by showing you exactly when it’s safe to interact with the game. By following this procedure, you can confidently use the safe coordinates Osaka Pokemon Go spoofing locations from our list.
How to Safely Teleport to Osaka
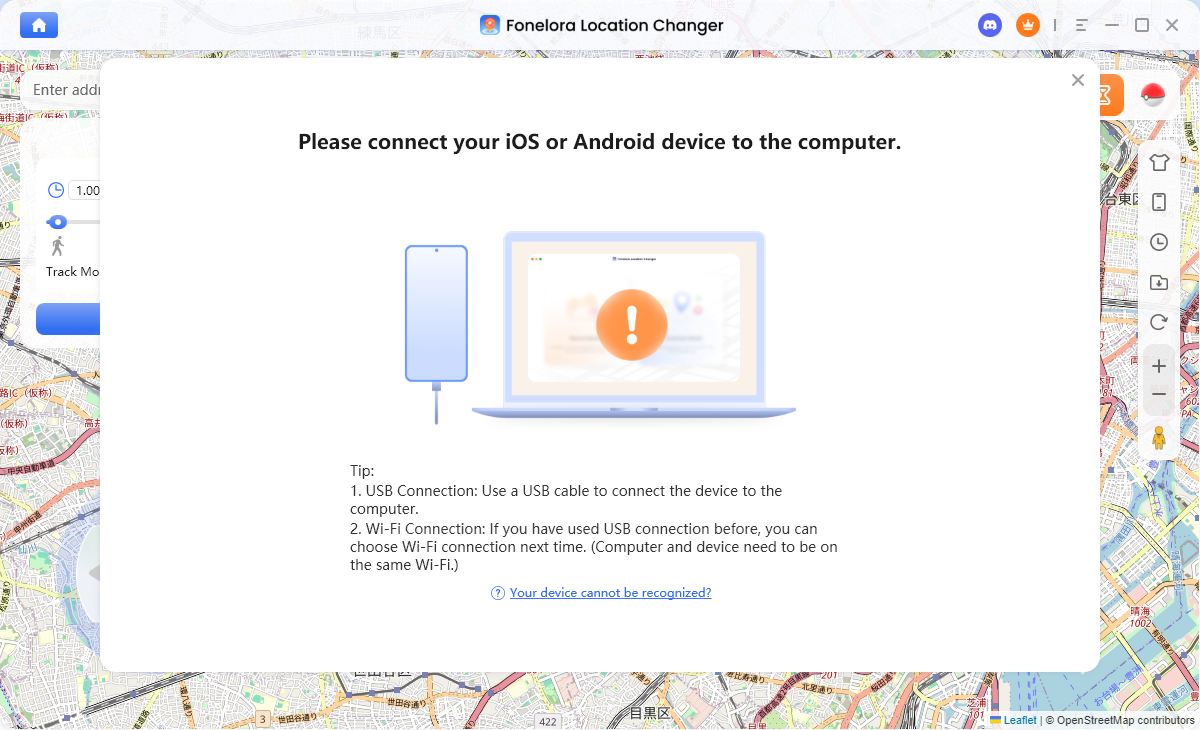
- Connect Your Device: Download and install Fonelora Location Changer on your computer. Launch the application and connect your iOS or Android device via USB. Ensure your device is unlocked and trusts the computer. If your device isn’t being detected, you may need to check your drivers or connection settings.
- Select Teleport Mode: Once your device is recognized, choose “Teleport Mode” from the main interface. This will bring up a world map.
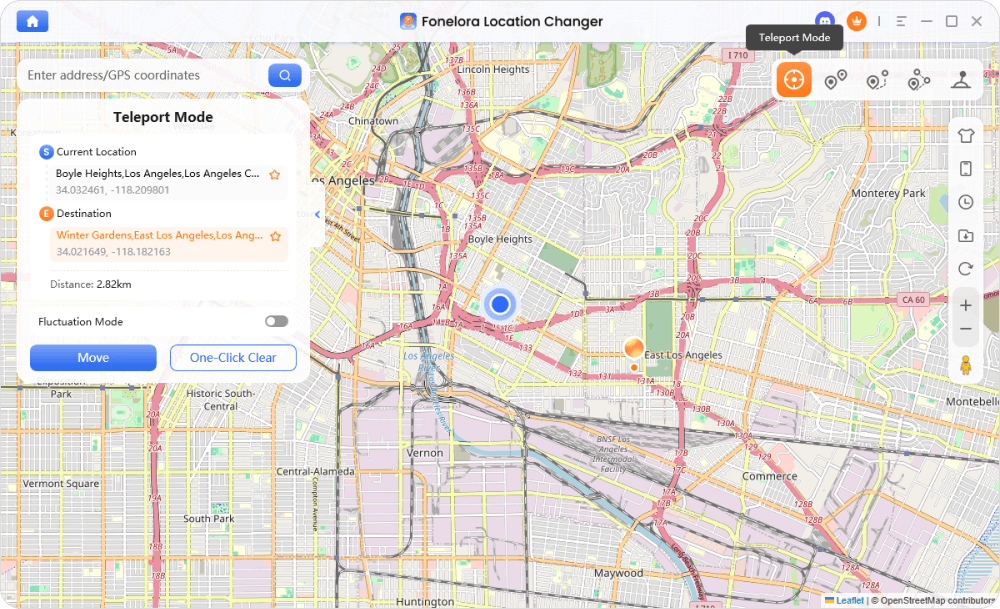
- Enter Osaka Coordinates: In the search bar, copy and paste your desired coordinates from our verified list (e.g., 34.6687, 135.5012 for Dotonbori). The map will reposition to that location.
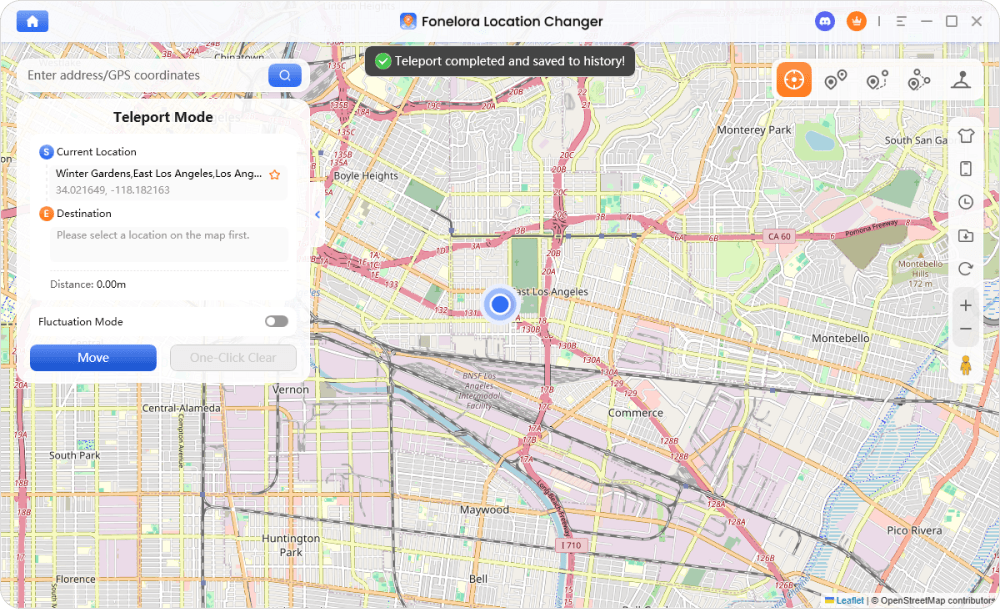
- Observe the Cooldown Timer and Move: Before you proceed, the on-screen cooldown timer will appear, reminding you of the necessary wait time. Do not click “Move” until this time has passed since your last in-game action. Once you’ve waited the appropriate time, click “Move” to instantly change your GPS location.
Advanced Technique: Automate Shiny Hunting with a GPX Route
Teleporting to a single spot is great, but for efficient shiny hunting or egg hatching, simulating natural movement is far better. This is where using a GPX route Pokemon Go file is a game-changer. A GPX (GPS Exchange Format) file is a pre-defined path with multiple GPS points, allowing your avatar to walk along a route automatically.
Instead of just telling you this is possible, we created a route for you. This custom-made GPX path for Expo ’70 Park is optimized for Community Days and shiny checking, covering a dense loop of spawn points.
Your Custom Expo ’70 Park GPX Route
- Connect Your Device: Download and install Fonelora Location Changer on your computer. Connect your iOS or Android phone and launch the application.
- Select Multi-Spot Mode in Fonelora: Open Fonelora Location Changer and choose “Multi-Spot Mode,” which is designed for following a path.
- Import the GPX File: Click the import option and select the Expo-70-Park-Shiny-Route.gpx file you just downloaded. The route will instantly appear on the map.
- Set Speed and Start Moving: Adjust the movement speed to a realistic walking pace (we recommend ~7 km/h for a good balance of speed and spawn checking). Click “Move.” Your character will now follow the path automatically, letting you focus entirely on catching and shiny checking. To ensure your game data is safe during these operations, it’s always wise to have a recent backup.
Learn More:The Exact Coordinates Santa Monica Pier: A Tested Guide >
Frequently Asked Questions (FAQ)
Here are clear answers to the most common questions about using Pokémon GO coordinates in Osaka.
What are the best Pokémon GO coordinates in Osaka for rare spawns?
The best locations for potential Osaka rare Pokemon locations coordinates Pokemon Go are high-density areas with diverse biomes. Osaka Castle Park (34.6873, 135.5262) and Tennoji Park (34.6477, 135.5106) are known for a wide variety of spawns, especially during events.
Where can I find high PokéStop density areas in Osaka Japan?
The Dotonbori Canal area (34.6687, 135.5012) has one of the highest concentrations of PokéStops in Osaka. The constant lure modules from high player traffic make it an ideal spot for farming items and catching Pokémon.
Is it safe to jump to Osaka coordinates in Pokémon GO without getting banned?
Safety depends entirely on your method. While any form of spoofing carries inherent risk, you can minimize it significantly by strictly adhering to cooldown times. Using a tool with a built-in, automated cooldown timer is the safest way to prevent accidental errors.
How do I manage cooldown time when teleporting to Osaka in Pokémon GO?
The rule is simple: the farther you travel, the longer you must wait before your next in-game action. For a long-distance jump (over 1,500 km), such as from the US to Japan, you must wait the maximum of 2 hours after your last action before interacting with anything in Osaka.
Which Osaka locations are best for raids and shiny hunting?
For raids, Osaka Castle Park (34.6873, 135.5262) and the Umeda Sky Building area (34.7054, 135.4901) have a high density of gyms with active players. For shiny hunting, Expo ’70 Park (34.8093, 135.5323) is ideal, especially with our provided GPX route.
Are Osaka Pokémon GO coordinates still working?
Yes. All coordinates and the GPX route provided in this guide have been tested and verified as active and effective as of our last update on current devices and operating systems.
What is the fastest way to farm XP in Osaka Pokémon GO locations?
The fastest method is to go to the Dotonbori Canal, use a Lucky Egg, and walk the dense PokéStop cluster continuously. The high concentration of players ensures lures are almost always active, maximizing your XP gain from catches and spins.
Conclusion
The Fonelora Location Changer team consistently releases updates to maintain compatibility with the latest iOS/Android versions and Pokémon GO patches, backed by a dedicated customer support team to assist with any technical questions.
By now, the confusion around using osaka japan pokemon go coordinates should be gone. The problem was never a lack of locations, but the lack of a safe, reliable procedure to visit them. Armed with our verified hotspots, a clear understanding of cooldown rules, and a custom GPX route, you can explore Osaka’s rich Pokémon GO environment with confidence. Download a free trial of Fonelora Location Changer to see how simple and secure the entire process can be.

Joy Taylor is a seasoned technical writer with over a decade of experience in mobile technology. At iMobie, she specializes in producing in-depth content on iOS data recovery, iPhone unlocking solutions, and iOS troubleshooting.
Product-related questions? Contact Our Support Team to Get Quick Solution >
