How to Record Screen on Mac with Internal Audio
Recording your Mac screen with internal audio at the same time is one of the simplest tasks to execute from the comfort of your home. However, if you find it hard, you can select any of our top 3 ways to screen record on Mac with internal audio shared in this post.
Hi there, I’m seeing a clip now on my Mac Air, and would like to record it. However, unfortunately, I can’t add internal audio to my recording using the QuickTime Player screen recorder. Is there anyone who knows how to go about this? Or is an alternative route I could use? Please help.
While Mac seems to power the best functions, it isn’t without its flaws, as users complain they cannot record their Mac screen with internal audio. If this is the same for you, kindly keep calm, as this post is structured to walk you through the top ways to record your Mac screen with internal audio.
| Screen Recording Technique | Ease of Operation | Success Rate | Effectiveness | Speed |
| How to Screen Record Mac with Internal Audio via Screenify | Straightforward interface layout that can be easily navigated by anyone, whether experienced or not. | ⭐⭐⭐⭐⭐ | Highly Effective, as Screenify allows you to record in 3 steps. | 60X |
| How to Screen and Audio via QuickTime Player | Simple | ⭐⭐⭐ | Average, as it often doesn’t support lengthy video recording. Also, the quality of the resulting content is pretty low. | 10X |
| How to Screen Record with Sound Using OBS | Outdated software interface makes it difficult for newbies to navigate around. | ⭐⭐ | Medium, and that’s because OBS Studio has a complex interface. Also, the file quality is very low. | 20X |
How to Screen Record Mac with Internal Audio
Screenify offers a simple yet professional approach to capturing your Mac screen with audio simultaneously. This software allows you to screen record Mac with internal and external audio depending on your preference.
Key Features
- Screenify allows you to record your laptop screen without any watermarks.
- You can record in high 4K quality with 60 FPS settings.
- Postproduction editing tools such as trimming and noise reduction further enhance the quality of screen recording.
- Record screen visuals alongside audio (system sound, microphone, or both).
- You can also adjust the volume and playback speed of the recorded clip.
- There is no screen recording time limit, and you can export the recording in various formats.
Steps to Screen Record Mac with Internal Audio Using Screenify
Step 1. Download and Install Screenify on Computer.
Step 2. Launch Screenify on your computer, and select Record screen mode.
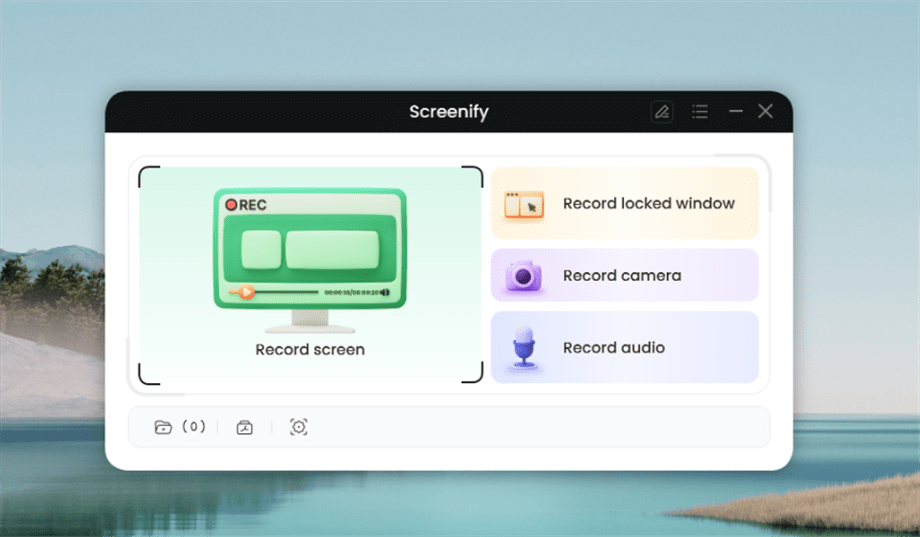
Select Record Screen Mode
Step 3. Configure Recording Settings aims to configure settings like system audio before recording.
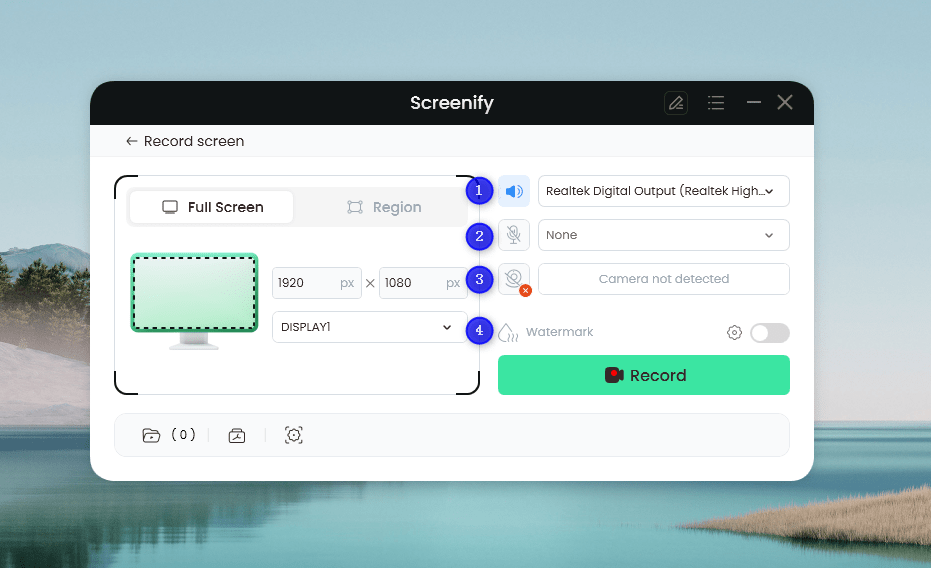
Set Configure Recording Settings
In this setting menu, you can:
1 Choose the System audio.
2 Choose the Microphone you want to record.
3 Choose the Camera you want to use.
4 Choose whether to add a watermark.
Step 4. Select Recording Screen.
Option 1. Full Screen Record
Please select Full Screen mode and choose the display you need to record. Hit Record button to initiate recording.
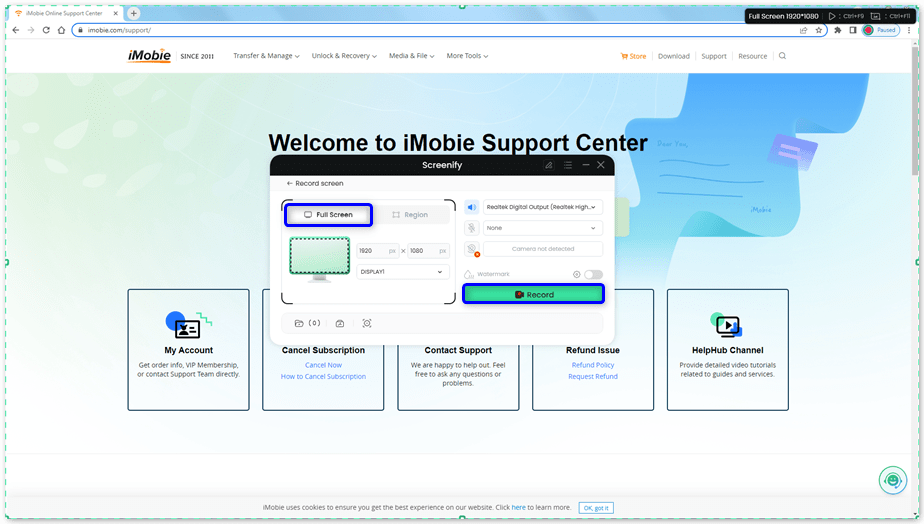
Select Full Screen
Option 2. Region Record
To record region, you need to manually select the recording area. After selection, you can still adjust the selected area. It supports customize selection, full screen, and proportional selection based on common social media dimensions.
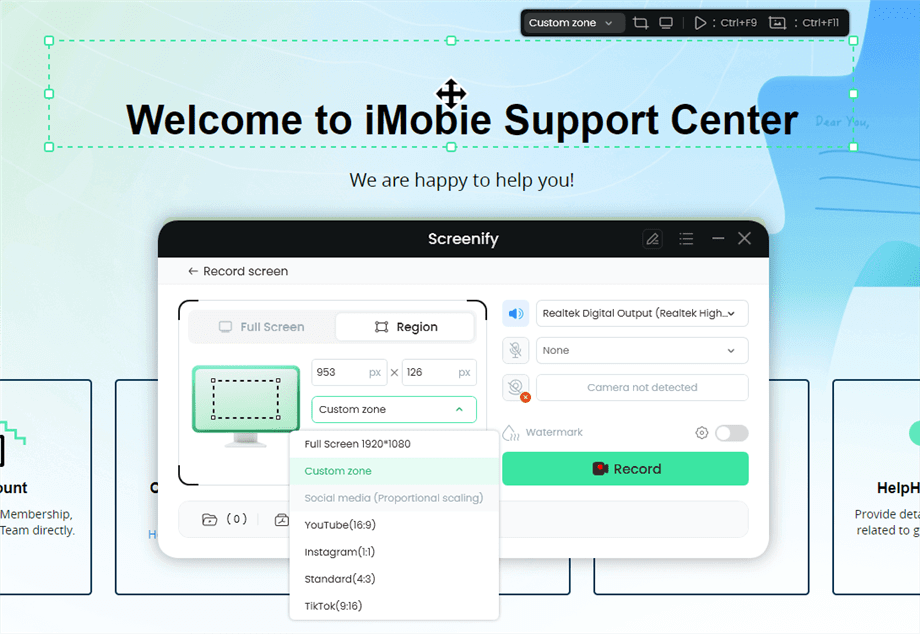
Record Region
Step 5. Wait for the Recording Countdown.
There is a 3-second countdown to help you prepare the recording after you are ready to start recording.
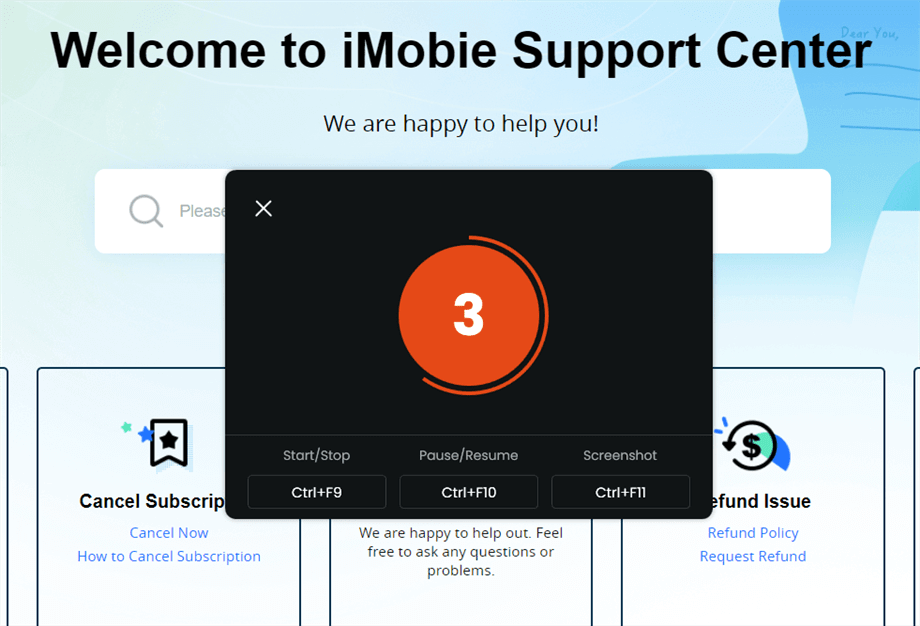
Wait for the Recording Countdown
If you would like to see a recording countdown before your recording starts, you can enable the countdown option. Or you can tap it off. View this post to know how to set the countdown option.
Step 6. Start Recording.
The recording will begin after a 3-second countdown. You can make annotations on the recording interface during the recording.
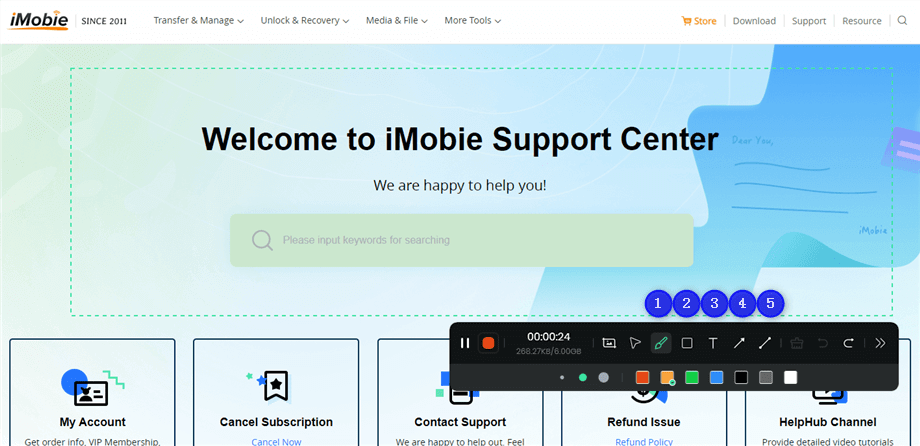
Annotate the Screen during Recording
With the toolbar, you can add the annotation in the screen:
1 Brush: Draw freehand on the screen recording interface to highlight or illustrate specific areas during the recording.
2 Rectangle: Draw rectangular shapes on the screen recording interface.
3 Text: Add written notes or labels directly onto the screen recording interface.
4 Arrow: Draw arrows on the screen recording interface to point out and emphasize specific areas.
5 Line: Draw straight lines on the screen recording interface to underline or connect specific points.
Step 7. Record Screen Process Completed.
When the recording is completed, you can click the red Stop button to end the recording. Your recorded files will be displayed. From here, you can preview and manage the recorded content as needed.
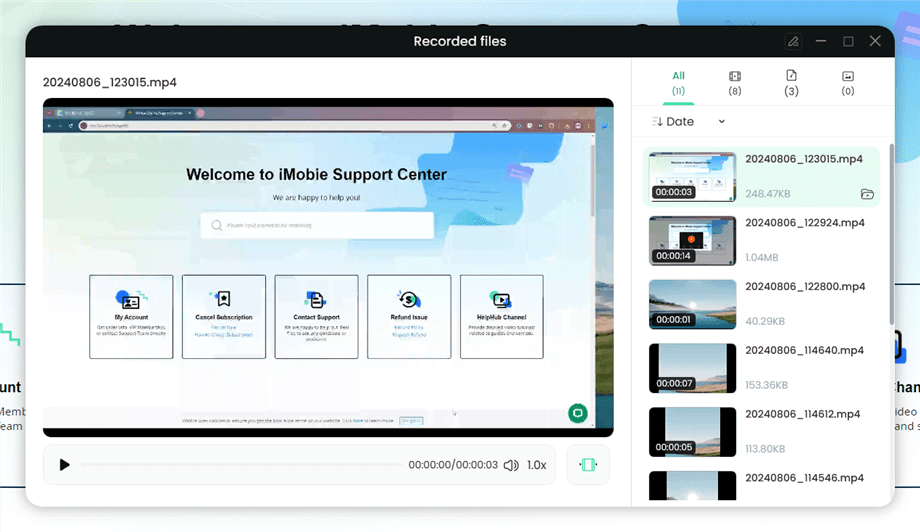
Preview the Recording
You may also want to know: How to screen record protected videos
[Video Tutorial] How to Screen Record Mac with Internal Audio
How Do I Record My Screen on a Mac with Sound
Obviously, Screenify offers the ultimate way to record your Mac screen with internal audio at the same time. However, there are two other techniques you also can follow to get a slightly similar result. One requires the use of QuickTime Player, while the other involves a popular screen recorder-OBS Studio.
Let’s discuss how each procedure works in the next section of this post.
How to Record Screen and Audio via QuickTime Player
QuickTime Player is a preinstalled app designed to help Mac users stream MP4 clips with minimal hassles. This app also comes in handy when you need to take screenshots, record audio, or take a screen record of what event you find noteworthy on your Mac screen. It lets you capture Mac screen and audio, strictly external audio, at the same time.
Though QuickTime Player doesn’t support screen capturing with internal audio just as we mentioned at the beginning of this post, we’ve got a simple trick you can apply to record Mac screen and internal audio simultaneously. Eager to know it? Then check out the simple guide shared below:
Step 1: Check for the most recent version of Soundflower online, and install it on your Mac computer system. After the installation is finished, proceed to switch/change the audio output device for your Mac computer to Soundflower. To do this;
- Click on the Apple Menu at the upper left corner of your Mac Home Screen, and select System Preferences from the menu options.
- Next, tap on Sound > Output.
- Select Soundflower 2ch to proceed.
- Now that you’ve successfully selected Soundflower as your preferred audio output on your Mac computer, there’s no way to hear yourself while capturing internal audio.
- To hear sound while recording internal audio, launch the Audio Midi Setup app and hit the + button at the bottom of the screen. Once done, select Create Multi-Output Device.
- On the screen that pops on the right-hand side, check the box next to Built-in Output and Soundflower (2ch).
- Once done, proceed to right-click on the Multi-Output Device button on the left sidebar.
- Select Use This Device For Sound Output from the flyout menu.
Step 2: Next, launch the QuickTime Player app on your Mac computer, then navigate your cursor to the upper left corner of your screen. Select File from the toolbar, and click New Screen Recording from the flyout menu options.
Step 3: Now the recording dock will pop up on your screen. Click on the drop-down menu beside the red Record 🛑 button to select your mic. Choose Soundflower (2ch) to continue.
Step 4: Once you’ve finished the step above, click on the Record button to commence screen recording. Wait to be done with the recording, then hit the Stop button to terminate screen recording.
How to Screen Record with Sound Using OBS
OBS Studio is an excellent screen recording suite that lets you capture a plethora of events you find on your Mac screen. This open source screen recording program captures live streams, YouTube clips, and more.
You can use OBS Studio to record your Mac screen, webcam, plus internal audio at the same time freely and quickly right from the comfort of your home. It lets you capture multiple screens at a go, depending on your preference.
OBS Studio is simple to operate. You can screen record your Mac with internal audio simultaneously using OBS Studio by following the simple instruction down here:
Step 1: Get an internet enabled Mac computer system, navigate to the official website for OBS Studio, and click on the right buttons to install the most recent version of the software. Once done, load up OBS Studio.
Step 2: Next, head to the Control panel and select Settings from the options, so you can make necessary configurations before recording your screen.
Step 3: Now proceed to the Sources panel and click on the + button and choose Display Capture. Tap on OK once done.
Step 4: After completing the setup, hit the Start Recording button located under the Control panel.
Wait until screen recording is over, then click Exit once you are done with the operation.
FAQs
Q1. How to screen record on Mac?
Screen recording is pretty easy to do on any Mac model. It’s not mandatory that you install a third-party tool to perform this operation, as all Mac models support QuickTime Player, a streaming app capable of recording on-screen activities.
Check out the steps given down here to screen record on Mac:
- Launch QuickTime Player on your Mac.
- Head to where you have the File icon at the top of the screen that appears. Click on the icon and select New Screen Recording to proceed.
- Now hit the Record button and screen recording will be initiated in no time.
Q2. How to stop screen recording on Mac?
After screen recording starts on QuickTime Player, you can stop the recording at your convenience once you are satisfied with what you’ve captured. To do this, just click on the red Stop 🛑 icon and screen recording will immediately terminate.
The recorded file will be stored on your local drive. So you can always check there to preview it, and make necessary changes or manipulations if necessary.
Final Words
Recording your Mac screen with internal audio is easier than ever before with the comprehensive guide above. Select any of the procedures introduced to capture Mac screens with internal audio at no cost. Screenify is however our best option from the procedures shared. The software records your screen with high quality.
Free Download * 100% Clean & Safe

Senior writer of the iMobie team as well as an Apple fan, love to help more users solve various types of iOS & Android-related issues.
Product-related questions? Contact Our Support Team to Get Quick Solution >
