How to Fix ShadowPlay Not Recording Audio [New!]
ShadowPlay not working is a common issue that can be fixed easily and quickly from the comfort of your home when you have the right tutorial guide at your disposal. For folks who don’t have, this article is for you. Here in this post, we look at the 8 amazing ways to fix ShadowPlay not recording audio issues, so you can start capturing your voice and nearby sounds without hassles.
Hi there,
I’m currently having issues with the ShadowPlay app on my computer system. It’s not adding sounds to recordings, and I don’t know why. Please, is there any way I can fix this? Kindly help with the appropriate guide.
ShadowPlay is one of the most sophisticated game recording tools available for Windows computer systems. This program is well known for its capability to capture high-end recordings, as it lets you record your gaming screen and share with friends in high quality. All thanks to the integration with the NVIDIA GeForce Experience
Inspite of the great qualities of this program, its not a complete game recording solution. Many end-users complain about the incapability to capture sounds while recording their gaming screen, just like the scenario above. If this is the same issue that brought you here, then this post is for you. Here, we walk you through the various ways to fix ShadowPlay not recording audio issues. Without further ado, let’s delve in.
Why does nvidia ShadowPlay not record discord audio?
The NVIDIA ShadowPlay game recorder on your computer system isn’t capturing audio for several reasons. Find below some of the potential causes of NVIDIA ShadowPlay not recording discord audio:
- Incorrect Audio Selection
One of the principal culprits of NVIDIA ShadowPlay not recording audio is the incorrect selection of audio devices. When you choose the wrong audio device for the NVIDIA category while configuring sound settings on your Windows computer system. In this case, no audio sound will be captured by ShadowPlay when activated to record your gaming screen. What you need to do here is to reconfigure your sound settings for the NVIDIA category.
- Sound System Disabled
Another reason you may face ShadowPlay not recording audio issues on your Windows computer system is when you have a disabled sound system. What this means in essence is that you’ve adjusted or configured your sound system to zero, so it doesnt capture any sound. Each time NVIDIA ShadowPlay tries to record your gaming screen, it won’t detect any sound. All you have to do to fix this is to increase sound settings for your Windows computer system.
- Damaged Installation
Lastly, you might encounter ShadowPlay not recording audio issues when you have an outdated or damaged NVIDIA GeForce Experience tool installed on your Windows computer system. Reinstallation, or updating the NVIDIA GeForce Experience tool is the best solution for this.
Now you have the various reasons why you may encounter ShadowPlay not recording sound or audio issues. Let’s proceed to fix the issue so you can record your gaming screen with audio again. Check out and apply any of the 8 simple yet effective solutions shared below:
Method 1. Raise Sound System Volume
Since a lowered sound system is one of the principal culprits for ShadowPlay not recording audio issues, raising or increasing sound system volume is a cool solution to resolve it. This solution is pretty easy to execute, and doesn’t require that you pay any premium price.
Here’s the corresponding how-to guide to raising your sound system volume on a Windows computer system so as to fix ShadowPlay not recording audio issues:
- Firstly, navigate to the bottom right corner of your screen, and right-click on the Sounds icon.
- Select the Open Volume mixer icon from the options that unfold on your screen.
- Next, a volume mixer tab showing the volumes for the different apps running on your computer system will come up, just like below:
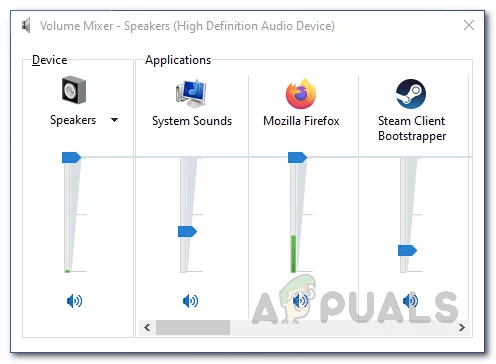
Open Volume Mixer
- Underneath the Applications panel, drag the sounds icon from zero to a manageable level.
- After completing the above, head to where you have the ShadowPlay app, launch it, and start recording your gaming screen with audio inclusive.
Method 2. Check Privacy Control
Have you tampered with the desktop capture function underneath the privacy control section of your Windows computer in the past? If so, then that might be the reason for the dilemma you are facing with the NVIDIA ShadowPlay app.
When you disable the desktop capture function on Windows, you restrict the computer system from instant replay, live broadcasts, or even recording audio. You need to enable the feature for your device to work at an optimal level, so ShadowPlay can record audio smoothly.
You can check and adjust privacy control on your Windows computer by following the steps down here:
- Go to the lower left corner of your screen, and enter Settings in the search field. Alternatively, you can use the hotkeys Ctrl + Z to quickly launch the Settings menu page on your Windows computer system.
- Navigate to where you have Privacy Control, click on it.
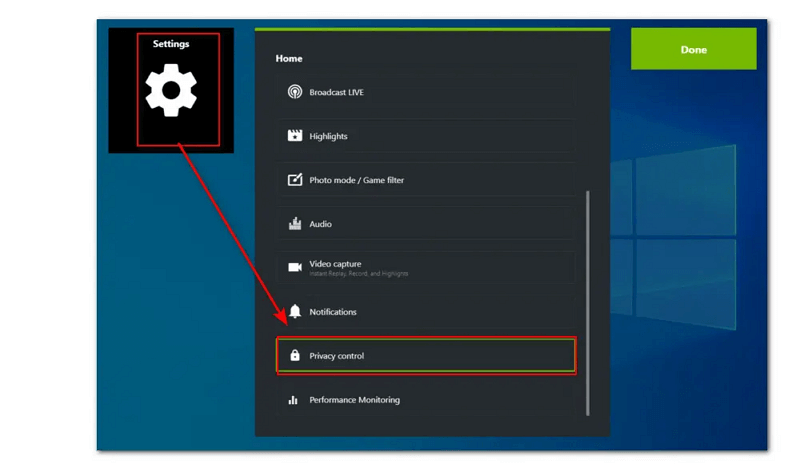
Click Privacy Control
- Depending on your Windows version or computer type, a new screen similar to what is down here will pop up on your screen:
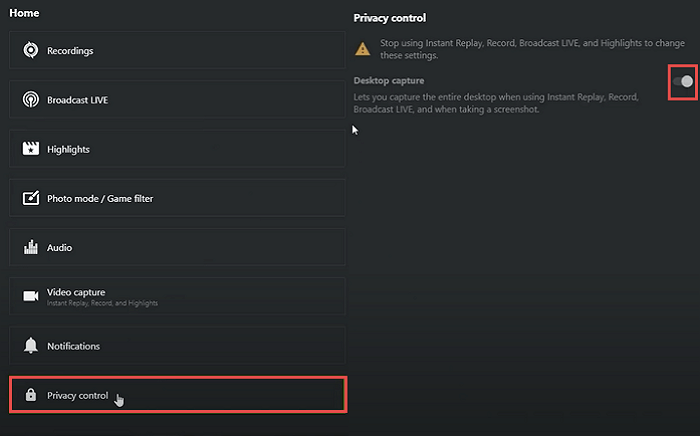
Activate Desktop Capture
- Kindly toggle the slider to activate Desktop capture.
If your computer doesn’t have a page similar to the above, you just have to toggle the Privacy Control button right, and ShadowPlay will start recording your screen with audio immediately.
Method 3. Enable In-Game Overlay on ShadowPlay
Here is another quick solution to fix ShadowPlay not working issues on your Windows computer system. By enabling in-game overlay, you can quickly fix ShadowPlay to start recording sounds while capturing your gaming screen. Here’s the appropriate guide to follow for you to activate or enable in-game overlay on ShadowPlay:
- Launch the NVIDIA ShadowPlay app on your computer by clicking on the corresponding icon. Alternatively, you can enter the app name in the search field at the bottom left corner of your screen to get the sae result.
- Head to where you have Settings on the page opened, and click on the corresponding icon to proceed.
- Next, scroll down the screen to where you have In-Game Overlay, then toggle the slider beside it to activate the feature on ShadowPlay.
Method 4. Configure/Setup Audio Device for ShadowPlay
As previously mentioned, the wrong selection of audio devices can cause Shadowplay not to record audio on your Windows computer system. Reconfiguring your ShadowPlay to connect with the right audio device is the best thing to do in this case.
This is the guide to follow for you to setup the right audio device for ShadowPlay:
- Type NVIDIA ShadowPlay in the search field, and hit the corresponding button to launch the game recorder layout. Alternatively, use the Ctrl + Z buttons to achieve a similar goal. The screen below should show up:
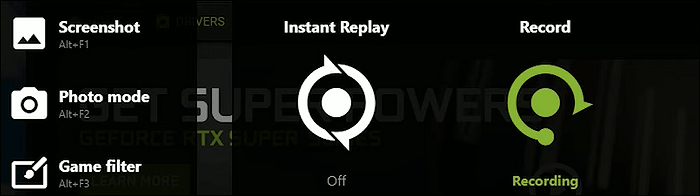
Launch the Game Recorder Layout
- Locate the gear or cogwheel icon, and click on it to access the Settings menu screen.
- Choose Audio from the list of options that pops up after completing the above.
- Next, adjust the System Sound option to optimal level, then choose the appropriate audio source by clicking on the drop-down menu beside Microphone.
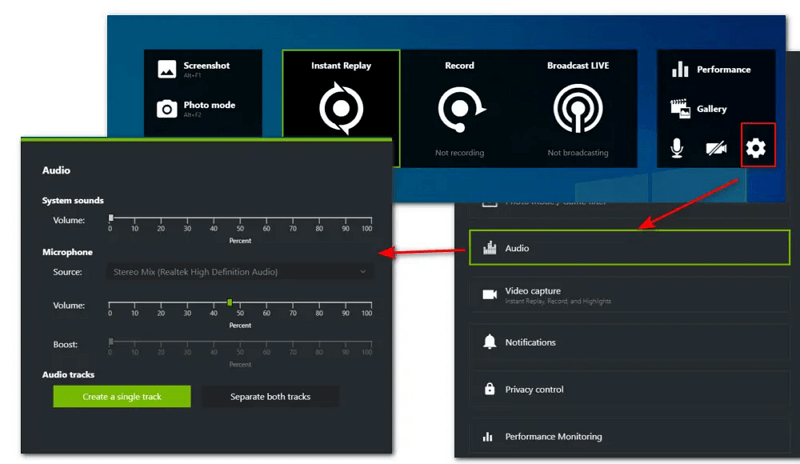
Adjust the System Sound
Should the guide above fail to work, use this alternative guide below:
- Go to the lower left corner of your screen, and right-click on the Speaker button.
- Choose Open Sound Settings from the menu that unfolds.
- Next, tap on the App volume and device preferences icon underneath the Advanced sound options.
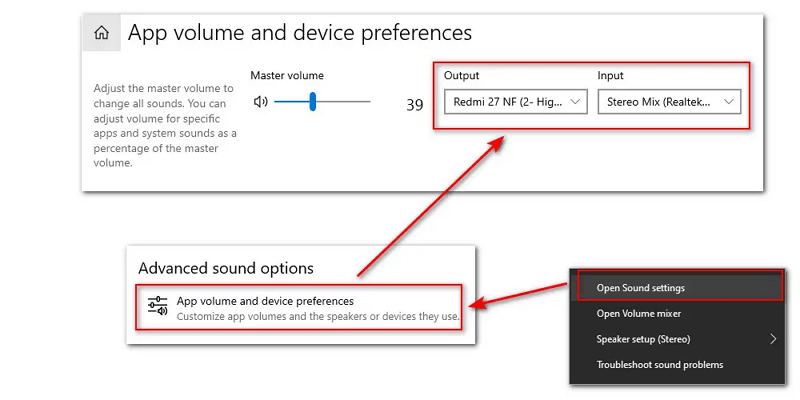
App Volume and Device Preferences
- Now click on the flyout menu under Output, then choose the one you are using currently.
Method 5. Restart the Screen Recorder
Sometimes Shadowplay not recording audio issues occur due to temporary glitch and bug attack, both of which can be fixed by simply restarting the screen recorder itself. By restart, we mean quitting the ShadowPlay app, and launching it again.
You can follow the steps below to restart the ShadowPlay screen recorder app on your Windows computer system:
- Hold down the Windows button plus R key on your keyboard, and a Run dialogue window will come up on your screen.
- Next, locate the NVIDIA Streamer Service icon, and right-click on it to proceed.

NVIDIA Streamer Service
- Choose Restart, and ShadowPlay will go off, and come up again.
Method 6. Sign Out of Twitch Account
Twitch is a renowned streaming service where many folks come to search, and play their favorite clips. Though its a great platform that offers excellent services, it sometimes poses one or more challenge to end-users, especially when you integrate it with your screen recorder.
This simple yet powerful streaming platform, Twitch, can cause your screen recorder to malfunction when too many messages/notifications come from contacts associated with your account. If you’ve integrated Twitch with ShadowPlay in the past, kindly opt to sign out of your account.
Here’s a simple way to sign out of your Twitch account so ShadowPlay can record with audio:
- Open the NVIDIA ShadowPlay program on your Windows computer by entering the corresponding keyword in the search field at the bottom left corner of your screen.
- Locate the My Rig tab and click on it to continue.
- Once done, hit the ShadowPlay button, and select Settings.
- Next, proceed to switch mode from automatic to Manual.
- After that, hit the Account button to launch your Twitch profile.
- Kindly sign out of Twitch, then restart your Windows computer.
Method 7. Update or Reinstall ShadowPlay
Should the solution shared above fail to work, you can consider reinstalling or updating ShadowPlay on your computer system. We suggest this because obsolete or damaged app is one of the principal culprits for ShadowPlay not recording audio.
A simple way to update or reinstall ShadowPlay on your Windows device is shared down here:
- Hold down the Windows button to launch the Quick Start Taskbar on your computer.
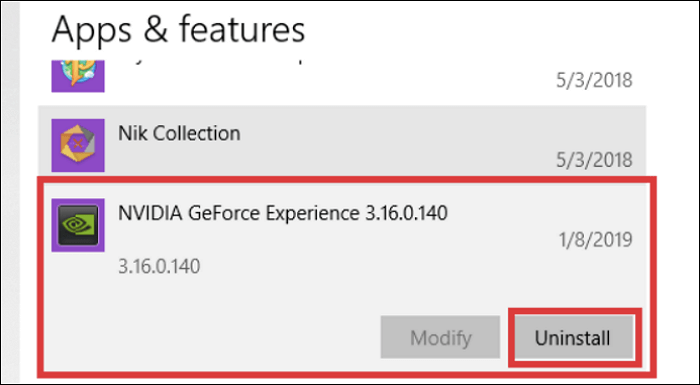
- Type Control Panel in the empty space and click the icon the related icon.
- Once the Control Panel shows up, select Uninstall a Program, and browse for NVIDIA GeForce Experience. Once found, click on it and select Uninstall/Change.
- Next, use the on-screen guide that pops up to finish removing the app from your system.
- After that, proceed to uninstall/delete HD Audio and PhysX System software.
- Now, go to the official homepage for NVIDIA Geforce Experience to download and install the most recent version.
NVIDIA Geforce Experience
Method 8. Look for NVIDIA’s Support
If the ShadowPlay app on your computer still fail, contacting NVIDIA’s support is the last option you’ve got fix ShadowPlay not recording audio issues. You should connect with the NVIDIA’s support team, and share your problem. You never can tell, the team can help you fix remotely. Some of the platforms you can find the support team include Twitter, Facebook, and other social media channels.
Geforce Experience
Bonus Tip: Record Screen via Third-party tool-Screenify
If you cannot record the virtual camera on your PC— you can always find third-party software to record the webcam and screen. We recommend using Screenify— a free 4K screen recording tool with multiple recording modes. You can record the entire screen or a region, depending on your preferences. Whether you want to record course, instructional, or tutorial videos, you can utilize the 4K resolution at 60 FPS settings to capture webcams and screens.
This recording tool offers a lock screen window option for both Windows and Mac. It enables you to capture content from the currently opened application or window. Like the virtual camera, you can also record the webcam alongside a desktop/laptop screen. Screenify also enables users to record audio from the system and microphone. The best part is that you can adjust the volume of both audio input sources to make a perfect blend.
Free Download * 100% Clean & Safe
Final Words
ShadowPlay not recording audio is no longer a complex issue to resolve as you now have the guide above at hand. We’ve selected the 8 simple yet professional ways to get ShadowPlay to start recording audio. Choose two or more of the techniques presented, and start recording your gaming screen with audio easily and quickly.

Senior writer of the iMobie team as well as an Apple fan, love to help more users solve various types of iOS & Android-related issues.
Product-related questions? Contact Our Support Team to Get Quick Solution >
