How to AirDrop Photos Between iPhone and Mac
Looking for ways to transfer photos between iPhone and Mac using AirDrop? Here we’ll show you detailed steps to AirDrop photos between an iPhone and a Mac computer.
Moving photos between an iPhone and a Mac used to involve either cables and importing to iPhoto, or sending emails with attachments and downloading them. There had to be an easier way to move a simple photo from one device to another, just a couple meters away. Luckily, we have an elegant solution from AirDrop.
With AirDrop, you can wirelessly move photos and other files from an iPhone to a Mac, or from a Mac to an iPhone – just like dropping them through the air.
AirDrop uses a combination of Bluetooth and a wireless connection to link an iPhone and a Mac in order to exchange files. You will need to give permission to receive files from another device (unless that device is already listed in your iCloud account), so you don’t need to worry about receiving anything you weren’t expecting.
It’s secure. It’s effective. It’s simple to use.
Tip 1. How to AirDrop Photos from iPhone to Mac
Step 1: Begin by making sure both devices have AirDrop open.
To open AirDrop on a Mac, first, open a window in Finder. Click on the Go menu at the top of the screen, and select AirDrop. The AirDrop icon may also be found in the menu panel at the left of the Finder window.
A window should appear with the AirDrop icon in the middle of it. If your Bluetooth is not on, there will be a button to activate it, otherwise, you are ready to continue. If there are others in the area (within about 9m) who have AirDrop on, they will be shown in this window as well.
Step 2: Select and send the Photo.
On the iPhone, select the photo you want to AirDrop and tap the share icon. The share icon is a square with an arrow pointing upward from the center. If it is not visible below the photo, tap or drag the image slightly and it should appear.
The Mac will show as a recipient, as will other devices in the area with AirDrop active. You can select any additional photos you want to send. In the example below, only one photo is selected, as indicated by the white checkmark in the blue circle. When you have selected the photo you want to send to the Mac, tap the recipient. In the sample below, the recipient is Jeff’s MacBook Pro.
Your photo will be sent to the Mac. A ping should be heard from the Mac once it has successfully received the photo.
Tip 2. How to AirDrop Photos from Mac to iPhone
Step 1: Make sure AirDrop is open
Open AirDrop on the Mac just as you did above: Open a Finder window, click the Go menu at the top, and select AirDrop. You may also click AirDrop directly from the Finder window.
If the iPhone already shows as a potential recipient, there is nothing more to do on it at this stage. This is usually the case.
If the iPhone doesn’t show up in the AirDrop window on the Mac, swipe upward from the bottom of the iPhone screen to open the Control Center. Tap AirDrop and choose to accept files from anyone, or only from those in your Contacts App.
Step 2: Send photos from the Mac to the iPhone
On the Mac, simply drag the photo you wish to share onto the picture of the person or device you want to share it with… and drop. The iPhone may ask if you want to accept the file, but if the sender is already signed into your iCloud account, this will happen automatically.
Progress will be shown by a blue circle around the recipient. For most files, the transfer will be too quick to require progress to be shown. Most devices will ping when the file has been successfully received.
Tip 3. How to Transfer Photos Between iPhone and Mac via AnyTrans
Actually there is a much more flexible way to move photos from iPhone to Mac or import photos from Mac to iPhone – AnyTrans. It’s an impressive iOS data transferring tool, which supports transferring photos between iPhone and Mac without any trouble. Now let’s check the steps to move photos from iPhone to Mac.
Step 1. Free download and install AnyTrans to your Mac computer and then connect your iPhone to Mac. Scroll down to the category page.
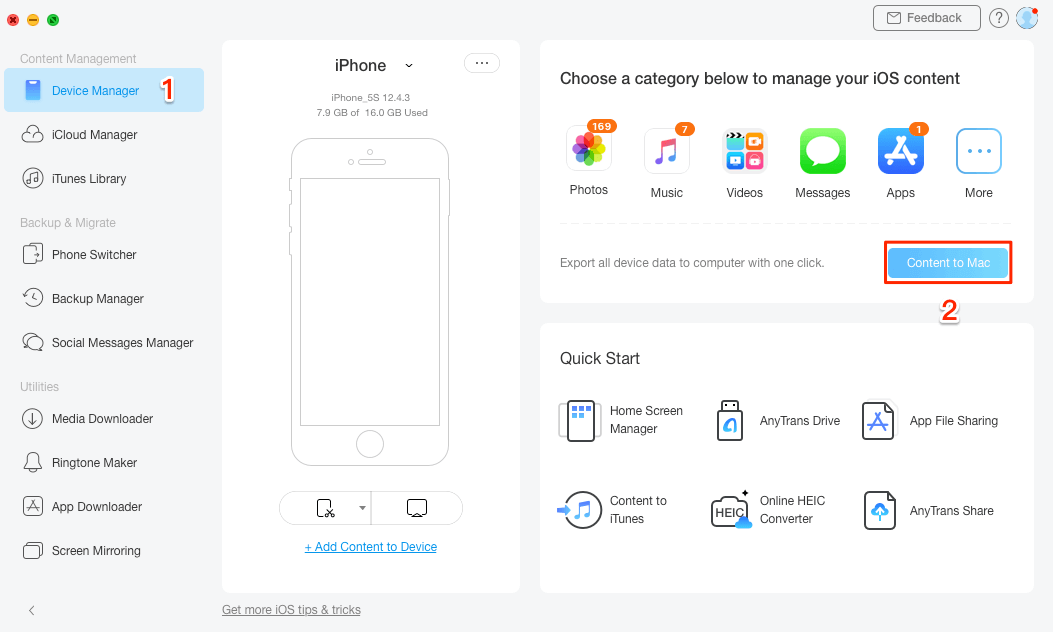
Go to Device Manager and Choose Photos
Step 2. Click on Photos > Select the album with the photos you want to transfer, like Camera Roll, Photo Stream, Photo Library, etc.
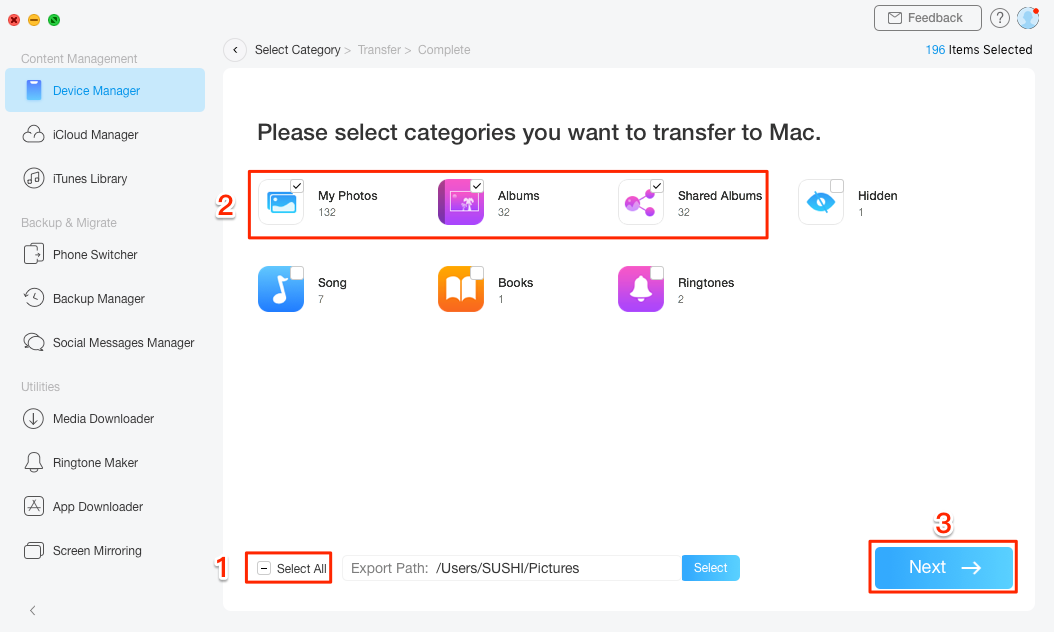
Check All the Albums that Contain Photos
Step 3. Preview the photos > select the photos you want to transfer to Mac > Click To Mac button to start.
The Bottom Line
One of the many benefits of using iPhones and Mac is the ease with which they interact. AirDrop is a clear example of how you can easily share photos back and forth between iPhones and Macs without the need for cables, emails, attachments, flash drives, or any other devices. And AnyTrans is even more intelligent to move photos between Mac and iPhone. Just get it to your computer and start a free trial >

Senior writer of the iMobie team as well as an Apple fan, love to help more users solve various types of iOS & Android-related issues.
Product-related questions? Contact Our Support Team to Get Quick Solution >
