3 Ways to Make Time-lapse Video on PC and iPhone
If you’re looking to capture a storytelling video that showcases changes over time, creating a time-lapse video is the way to go. Time-lapse videos offer a captivating way to condense time and show the beauty of change in a fast-paced format.

In today’s post, we’ll teach you how to make a time-lapse video on a PC or iPhone using three proven methods. So, if you’re eager to learn how this works, let’s dive right into the article!
What Is a Time-lapse Video?
A time-lapse video is a type of video that is created using multiple individual photographs that are captured at set intervals over a while. It is used to capture slow a process of changes over time like the movement of clouds, the growth of plants, or even the construction of a building.
Overall, time-lapse videos allow you to capture moments that are too slow, too fast, or simply impossible to observe in real time.
How to Make a Time-lapse Video on PC
Creating a time-lapse video on a PC can be quite tricky. However, the Movavi Video Editor makes the process easy. Just by using the unique features supported by this software, you can craft or create stunning time-lapse videos with minimal hassles.
Movavi professional video editing app offers a comprehensive video editing solution for users with any experience level to edit and create videos on their Mac or PC within a few clicks. Unlike regular online video editing apps, this tool boasts fast and easy processing of time-lapse videos for different purposes. It supports advanced video editing features like AI motion tracking, AI background removal, AI noise removal, and a revamped timeline for quicker editing.
Also, Movavi Video Editor offers two methods to create time-lapse video. It allows you to either create a time-lapse video from photos or by using a video. And the best part? It supports lots of built-in video effects, templates, and free music that you can use to enhance your video quality.
Key Features:
● Create time-lapse videos from videos or photos without requiring advanced settings.
● Easily share your edited videos to third-party platforms like YouTube, Vimeo, etc.
● Boasts a wide range of video editing features and AI-powered tools.
● Offers ready-made templates and visuals to enhance video editing and production tasks.
How to Make A Time-lapse Video With Movavi Video Editor
In this section, we’ve discussed how to turn video into time-lapse on PC using video or photos on Movavi Video Editor.
Method 1: Make A Time-Lapse Video From the Video File
Step 1: Download and install Movavi Video Editor.
Step 2: Import Video
Open the “Movavi Video Editor” app and click on the “Add Files” button to import the video you wish to turn into a time-lapse video.
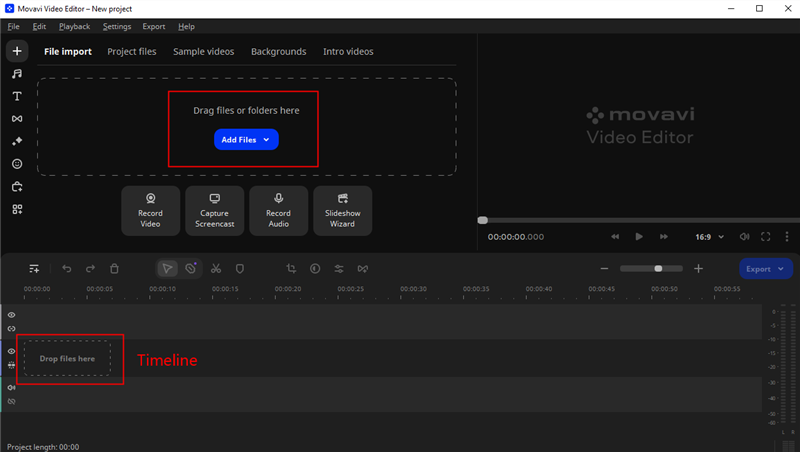
Add Files in Movavi Video Editor
● After you add the video file, drag and drop the video to the tool’s “Timeline”.
Step 3: Increase Video Speed
Double-click your video clip on the “Timeline”. Then, drag the “Speed” slider in the “Clip Properties” settings to the right. Then, right-click on your video on the “Timeline” and click on the “Play” icon in the “Preview” box to confirm the video plays at the speed that suits your requirements.
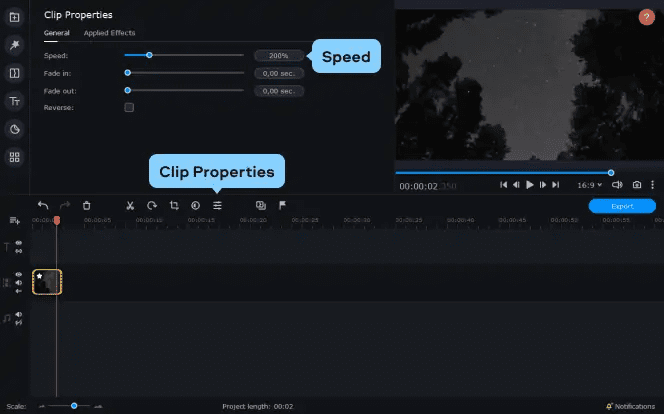
Increase Video Speed
Step 4: Export Time-lapse Video
Once you’re done, click on the “Export” button at the bottom right side of the “Preview” box. Then, select the “Path” to save your file and click “Start” to complete the operation.
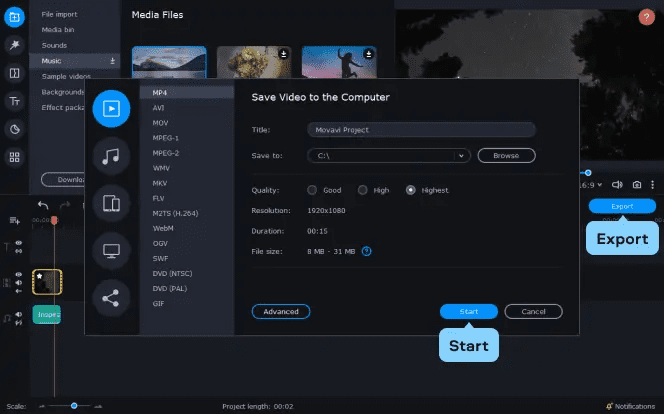
Export Time Lapse Video
Method 2: Make A Time-Lapse Video From Photos
Step 1: Import Photos To Movavi Video Editor
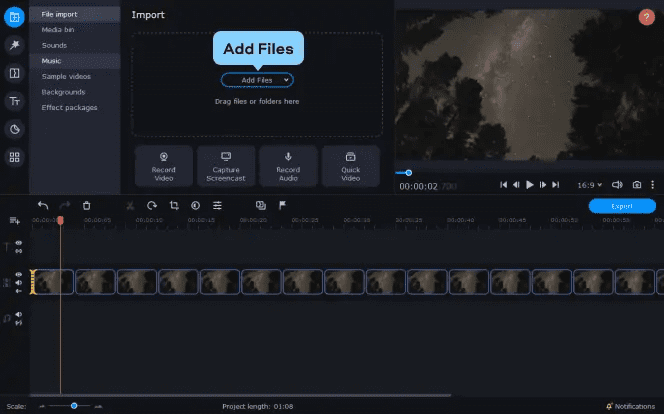
Click on “Add” files and select all photos file(s) you want to use in creating the time-lapse video. Then, drag-and-drop all imported photos to the “Video Timeline”.
Add Files in Movavi Video Editor
Step 2: Create Time-lapse
Click “Ctrl+A” to select all the “Photos” in the “Timeline”. Then, click on the “Clip Properties” icon to open the “Clip Properties” tab.

Create Time Lapse Video in Movavi Video Editor
● Now, reduce the “Duration” interval to display each photo to the shortest time (at least 00:00:00:010). This is to ensure a smooth transition between the photos. You can preview the output to ensure it suits your needs.
Step 3: Add Background Audio/Music (Optional)
Once you’ve created the time-lapse, you can navigate to the “File Import” tab and import an audio file to use for the time-lapse video. Then, drag and drop the video to the timeline below your video clip. Ensure to adjust the audio according to your requirements.
Add Background for the Video
Step 4: Export Video
Finally, preview your final video output and click the “Export” icon to choose a “Path” and preferred “Format” to save the time-lapse video. Then, click “Start” to download the project.

Export Video in Movavi Video Editor
How to Make a Time-lapse Video on iPhone
There are two effective methods you can use to make a time-lapse video on an iPhone. In this section, we will introduce you to these methods and show you the simple steps to use them to turn video into a time-lapse without compromising quality.
Method 1: Use Camera App
The quickest way to make a time-lapse video on iPhone is by using the camera app. Apple has provided a built-in “Time-lapse” video recording feature on all iOS devices, making it easy for user with any skill level to create a time-lapse video within a few taps.
Here is how to create a time-lapse video on iPhone using the camera time-lapse feature;
Step 1: Open your “iPhone Camera” app and swipe from left to right until you reach the “Time-lapse” recording mode.
Step 2: Tap on your device’s screen to adjust the “Focus” and “Exposure” point for the video that needs ti be recorded.
Step 3: Now, tap on the “Red” button to start recording the “Time-lapse” video.
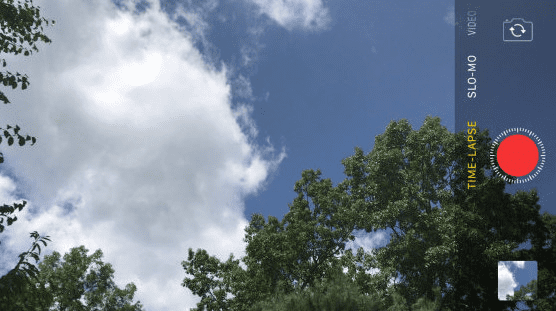
Make Time Lapse Video in iPhone Camera
Step 4: Once you finish recording the video, tap on the “Red” button again. The video will be automatically saved to your iPhone’s “Photos” app.
Method 2: Use Built-in iMovie App
The built-in iMovie app can come in handy when you want to create time-lapse videos from ready-made videos on your iPhone. The tool is 100% free to use and compatible with all iPhones running any iOS version.
See the following steps to learn how to create a time-lapse video using the iMovie app on iPhone;
Step 1: Open the “iMovie” app on your iPhone and select “Movie”.
Step 2: Select the “Video” you’d like to use for the time-lapse video and tap on “Create Movie”.
Step 3: Tap on the “Video” on the “Timeline” and tap on the “Speed” button at the bottom of your screen. Then, drag the “Slider” to your requirement.
Step 4: Preview and save the video on your iPhone once you’re satisfied with the output.
Bottom Line
There you have it. Creating a time-lapse video on a PC or iPhone is as easy as taking a walk in the park. Our article has explained how to make a time-lapse video on a PC or iPhone. All you just need is to follow the steps provided correctly to create your time-lapse video within a few minutes. Download Movavi Video Editor and enjoy a wonderful time-lapse video now!
More Related Articles
Product-related questions? Contact Our Support Team to Get Quick Solution >
