How-to Guide: Use iPhone as Webcam OBS
If you are looking to enhance your video quality in OBS Studio, then you have come to the right place. This article guides you on how to use iPhone as a webcam for OBS. It’s an all-in-one resource for those seeking to improve their video content.
Are you interested in stepping up the quality of your video streams or recordings? That’s right! We are talking about how to use iPhone as webcam OBS.
Most computers come with a lowest-quality webcam. If you are streaming & recording with OBS on these computers, you can use your iPhone as a webcam. The exceptional camera quality of the iPhone will greatly improve the results.
In this article, we will walk you through the process of turning your iPhone into a high-quality webcam. We will give you steps to use it in OBS as well as in Mac.
But first, let’s start with the basics!
Why Do You Need a Webcam for OBS?
You need a webcam for OBS because incorporating yourself into the video can improve your content. Seeing the person behind the content adds an extra layer of professionalism.
Let’s see how it affects video lectures, gameplay recordings, video conferencing, live webinars, and job interviews.
- In video lectures, having your face visible adds a personal touch. It can make the lecture more relatable for your students.
- For gameplay recordings, incorporating your live reactions can make your content more engaging. It gives your audience a fuller experience.
- During video conferencing, a high-quality webcam can deliver a clear and sharp image. It makes the meeting more effective as expressions are captured well.
- For live events or webinars, a webcam offers the ability to switch between slides and your video. It makes your presentation more dynamic.
- In job interviews, a good webcam can make a strong impression on the interviewer by delivering a crisp, clear image.
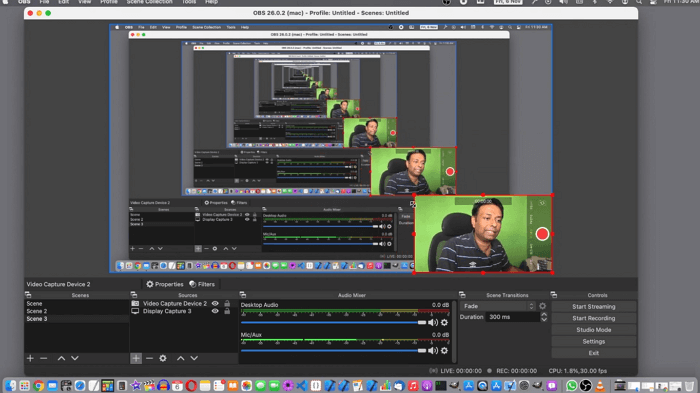
OBS Studio using an iPhone as the webcam
The quality of your webcam directly impacts all these scenarios. A grainy or laggy video can undermine the effectiveness of your communication. In contrast, a high-definition webcam captures details and elevates the quality of your content. So, using an iPhone as a webcam is a good choice if you don’t want a separate expensive webcam.
But before you use iPhone as webcam OBS, you need to make some preparations. Let’s have a look at them.
Prepare iPhone as a Webcam for OBS
Knowing what you need ahead of time will make the whole process smooth. Here’s a quick rundown of what to gather before you begin:
- Compatible iPhone
Make sure you have an iPhone 6s or later running on iOS 13 or above. These models support the features you’ll need. - Proper Computer
Your PC should be on Windows 7 or higher. If you’re a Mac user, you must have macOS 11 or above. These systems can handle the software requirements. - Connection Method
A stable Wi-Fi or a USB cable will be needed for connecting your iPhone to the computer. Both have their pros and cons, so pick what’s more convenient for you. - Webcam App
Download an iPhone webcam app that can install the required drivers. It allows your computer to recognize your iPhone’s cameras. Several apps are available for this purpose. - Mount or Stand
While optional, a stand can free up your hands during your activities. If you don’t have one, you can easily create a makeshift one.
So stand up from your chair and get all these things ready.
If you are done, then just move on! We are now going to show you how to set up your iPhone as a webcam in OBS.
How to Use iPhone as Webcam OBS
iPhone 6 can record videos up to 4K at 30fps. While models like the iPhone 12 Pro and iPhone 13 offer Dolby Vision HDR video even up to 4K at 60fps. IPhone 15 even breaks all these records with its 48-megapixel Sony image sensor.
Just spitting facts to keep you motivated!
Now, let’s get into the step-by-step guide on how to use your iPhone as a webcam on OBS.
Steps to Use Your iPhone as a Webcam in OBS
Here is a stepwise guide to use your iPhone as a webcam in the OBS studio.
Step 1. Downloading a webcam app from the App Store on your iPhone. For example, you can go with iVCam Webcam. Also, download the same app on your Windows or Mac as well.

Installing iVCam on the iPhone
Step 2. Now, launch the iVCam Webcam app on your iPhone and give it all the necessary permissions. Then, launch iVCam on your computer and connect your iPhone to it.
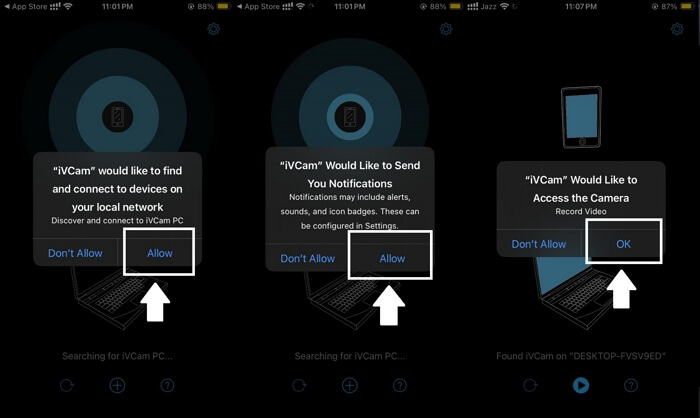
Giving the necessary permissions to the iPhone webcam app
Step 3. Once iVCam detects your iPhone on the computer, open OBS and go to the “Sources” panel. Now click on the “+” sign and select “Video Capture Device.”
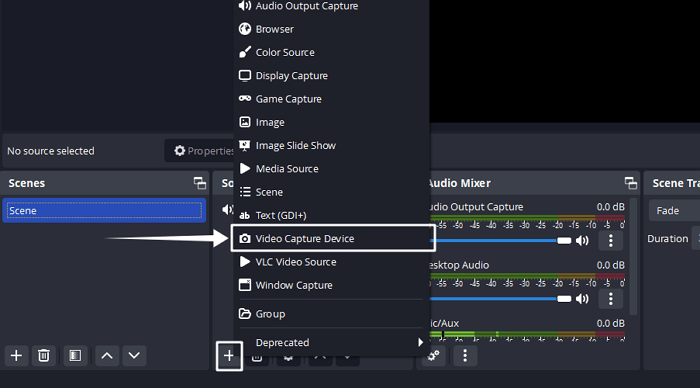
Adding a new Video Capture Device source in OBS
Step 4. Name this new video source and click on “OK.” Now click on the dropdown and choose the iPhone webcam app from the list of available devices. Click “OK” again.
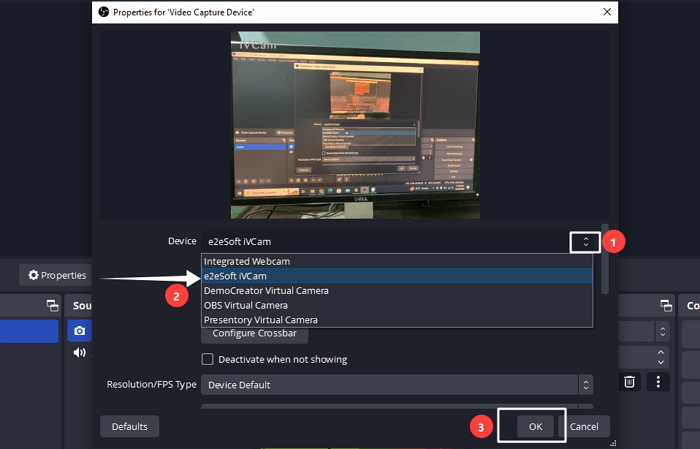
Selecting the iPhone Webcam App as the video source in OBS
Step 5. In the preview section, adjust the size and location of this video source. You can also add filters to this video source from the “Filter” section of OBS.
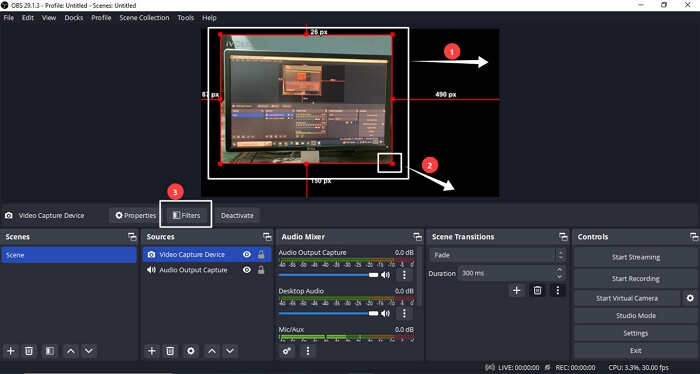
Adjust the size, location, and filters of your video source in OBS
Step 6. Adjust the frame rate, resolution, and other settings according to your preference within OBS. Once you’re set, you can start your OBS for streaming or recording.
Remember, this method requires an extra third-party iPhone webcam app. And whenever you depend on a third-party app, there are issues like unwanted watermarks.
Can’t we do the same thing without relying on any tool?
If you want to use an iPhone as a webcam on a Mac, then the answer is YES!
We are now going to show you how to use an iPhone as a webcam on Mac with the latest Continuity Camera feature of iOS.
Use iPhone as Webcam on Mac With Continuity Camera
Apple knows that people want to use their iPhones as a webcam. That’s why they have introduced a feature just for this purpose in the iOS 16 update. This new feature is called “Continuity Camera.”
Continuity Camera feature lets you use your iPhone as a webcam on a Mac device. Not only does it provide easy integration, but you can also use extra video effects. For example, Center Stage, Portrait mode, Studio Light, and Desk View.
Before we show you how to use Continuity Camera, let’s first look at the requirements needed for it.
Requirements
To use the Continuity Camera feature of iOS, you need to meet these requirements first:
- Your iPhone should be running iOS 16 or later.
- Your Mac needs to be running macOS Ventura or any later versions.
- Both your iPhone and your Mac should be signed in with the same Apple ID.
- Two-factor authentication should be enabled on both devices.
- Wi-Fi and Bluetooth must be activated on both your iPhone and your Mac.
- You must enable the Continuity Camera feature on your iPhone.
After you meet these requirements, you can use your iPhone as a webcam on a Mac without any iPhone webcam app.
Steps to Use iPhone as Webcam on Mac
Here are the steps to use your iPhone as a webcam using the Continuity Camera feature.
Step 1. Mount your iPhone near the Mac device and position it so that its rear camera faces you. Now, enable Wi-Fi and Bluetooth on both devices.
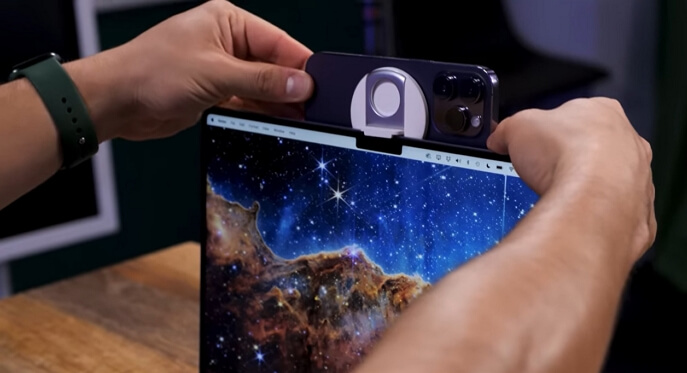
Mounting the iPhone near our Mac device
Step 2. Sign in to your iPhone and Mac using the same Apple ID. Also, enable two-factor authentication on both devices.
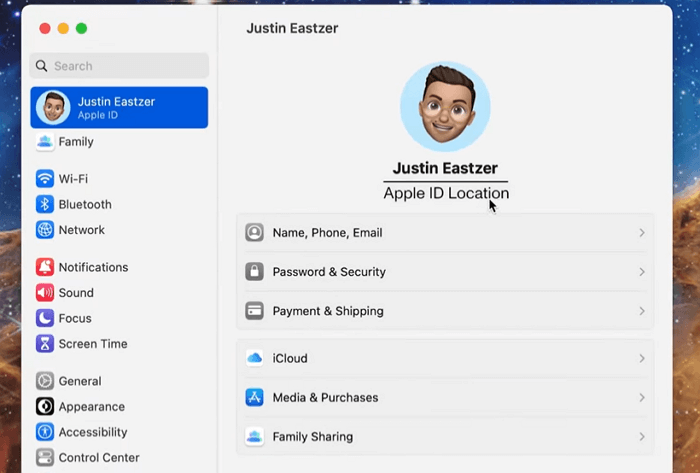
Sign in with the same Apple account on both iPhone and Mac
Step 3. Go to Settings > General > AirPlay & Handoff on your iPhone and enable Continuity Camera. On your Mac, avoid using AirPlay or Sidecar to ensure compatibility.
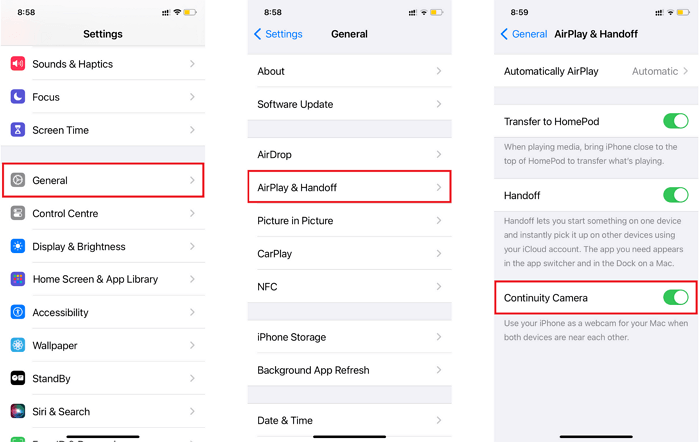
Enable Continuity Camera on iPhone
Step 4. Now open an application like FaceTime that utilizes the webcam. Click on “Video” in the top toolbar and select your iPhone as the video source.
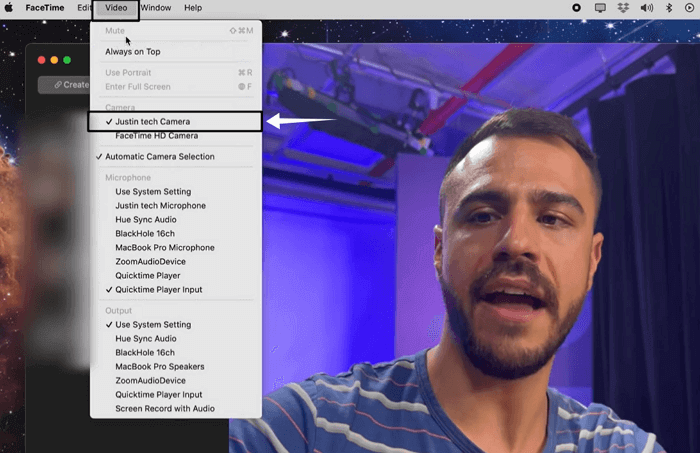
Selecting the iPhone camera in FaceTime on Mac
Step 5. If desired, you can enable additional video effects such as Center Stage and Portrait mode from the Control Center on your Mac.
If you receive a call during your session, macOS will notify you. Answering the call will pause the video and audio feed until you end the call.
Wait, wait, wait. Don’t go yet! We’ve still got some useful tips for you.
Bonus Tips for Using iPhone as a Webcam on OBS
Like any other task, if you want to achieve the best results, there are a few things you need to keep in mind.
So, here are some tips to help you make the most out of your iPhone as a webcam.
- Use the Rear Camera
Use your iPhone’s rear camera as the webcam source. It provides superior image quality compared to the selfie camera. - Customize Settings
Take advantage of the features provided by the best iPhone webcam apps. Adjust video resolution, quality, orientation, focus, white balance, and color effects according to your taste. - Steady Your iPhone
Stabilize your iPhone to avoid shaky and less professional-looking results. You can do it by using a tripod, stand, or tabletop mount. Holding it in your hand can lead to unwanted camera movement. - Perfect Lighting
Avoid places with low light or excessive backlighting. Good lighting enhances your appearance on camera and makes for a more engaging video.
Follow these tips. Then, you’ll get the best results while using your iPhone as a webcam on OBS and other platforms.
The Bottom Line
The need for high-quality video content is increasing. Whether you’re an educator, a gamer, or a professional, the quality of your webcam can make a significant difference.
This article has provided a complete guide on how to use an iPhone as a webcam OBS. We’ve covered the preparation steps, how to set it up in OBS, and how to utilize it on a Mac. All in all, if you want to improve your video presentations, using the top-quality camera of an iPhone as a webcam is a reliable way.

Senior writer of the iMobie team as well as an Apple fan, love to help more users solve various types of iOS & Android-related issues.
Product-related questions? Contact Our Support Team to Get Quick Solution >
