How to Use iPhone as Webcam
In this article, you are going to learn how to use iPhone as webcam. You will explore step-by-step guides for both Mac and Windows. Moreover, you will also uncover the benefits of using iPhone as a webcam. You will see how it enhances the video calling experience on a laptop and PC. In the end, you will find answers to the frequently asked questions.
Are you tired of setting up traditional webcams for video calls? What if you can use iPhone as webcam? Sounds cool, indeed.
Winter is here, and we’re spending more time indoors. Whether you’re working from home, having virtual meetings, or just catching up with loved ones, a good webcam can make a big difference.
Did you know that you can turn your iPhone into a fantastic webcam? It’s easier than you might think! In this article, we are going to uncover how to use iPhone as webcam. We will learn it through a step-by-step guide for both Windows and Mac.
Let’s get started!
Why Use iPhone as a Webcam?
You must be wondering why to use iPhone as webcam. Well, it can be a game changer, and there are various benefits to doing so. Let’s shed some light on some of the benefits that we can enjoy with this trick.
How to Use iPhone as Webcam
Benefits of using iPhone as a Webcam
Some of the benefits of using iPhone as webcam are as follows:
- Better Video Quality
Many built-in webcams on laptops or computers don’t offer the best video quality. By using your iPhone as a webcam, you can enjoy much clearer and sharper video during your video calls. It’s a great way to make a good impression. - Multiple Camera Options
iPhones come with multiple camera lenses. This means you have more flexibility in choosing the best angle for your video calls. You can easily switch between the front and rear cameras. - Portability
Your iPhone is lightweight and portable. You can take it with you to different locations around your home or office. It becomes easy to change your video call background or position. It’s a versatile solution for those who like to switch things up. - Cost Effective
If you already own an iPhone, using it as a webcam won’t cost you anything extra. You don’t need to invest in an external webcam. However, saving money can be better spent on other winter essentials. - User-Friendly Setup
Setting up your iPhone as a webcam is relatively easy, even if you’re not a tech expert. You don’t need to be a computer whiz to get it up and running. It’s a convenient and accessible solution for everyone. - Wide Compatibility
Whether you’re using a PC or a Mac, most video-calling apps work well with iPhones as webcams. This means you won’t have compatibility issues. You can connect with friends, family, and colleagues using various devices.
The benefits of using iPhone as webcam must have made you curious. Let’s move forward to see the steps to do so!
How to Use iPhone as a Webcam on a Windows Computer?
Some users might think that it is not possible to use iPhone as webcam on Windows. However, the good news is it is possible, and not only that, it is very easy too. No matter if you don’t have a Mac, you can enhance your video conferencing experience on Windows as well. You can learn how to connect iOS to a Windows PC from our step-by-step guide.
Steps to Use iPhone as a Webcam on Windows
You can follow the instructions given below to use iPhone as webcam on a Windows computer:
Step 1: Open the App Store on your iPhone. Search for “EpocCam” and download and Install the app on your iPhone.
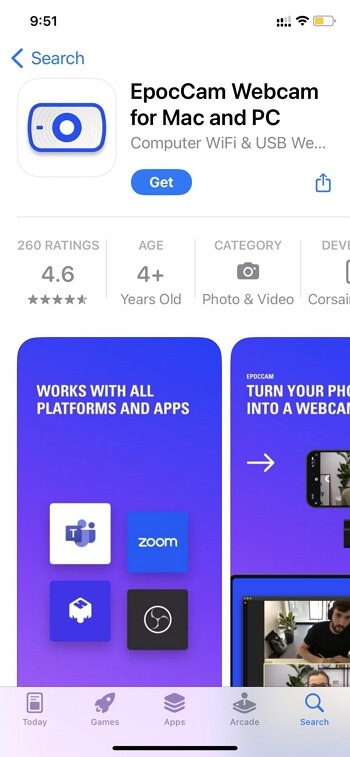
EpocCam on App Store
Step 2: Open your web browser on your Windows computer and Visit the Kinoni website. Navigate to the “EpocCam” section and download and install the Windows software.
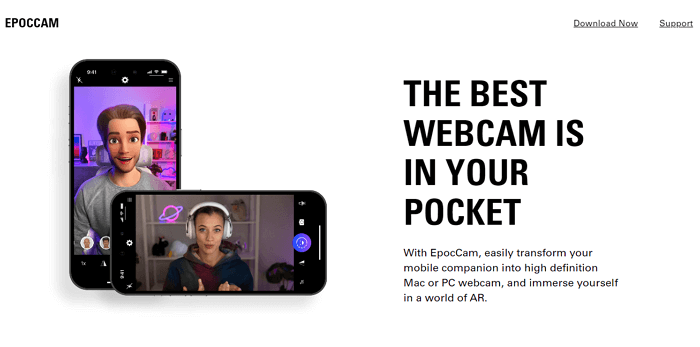
Download EpocCam Software on Windows PC
Step 3: Ensure that both your iPhone and Windows computers are connected to the same Wi-Fi network. Then, connect your iPhone to your computer using a USB cable. Make sure your iPhone is unlocked.
Step 4: Launch the EpocCam software on your Windows computer. You should see a list of available devices. Choose your iPhone from the list.
Step 5: Open your preferred video conferencing app on your Windows computer (e.g., Zoom, Skype, Microsoft Teams). Go to the app’s settings and select “EpocCam” as your camera source.
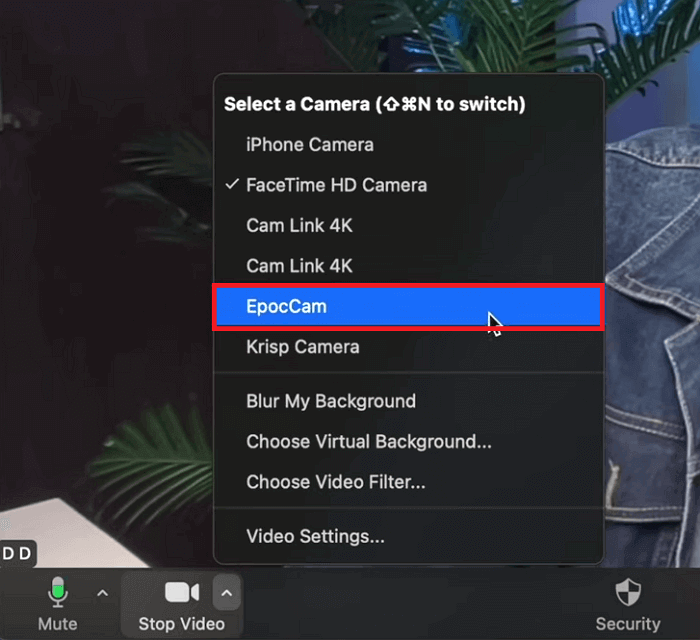
Select EpocCam as a camera source
Now, let’s move forward to how to use iPhone as webcam on a Mac.
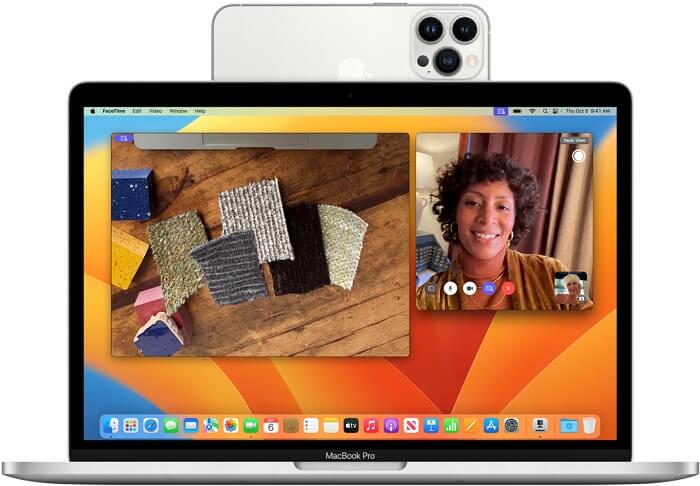
How to Use iPhone as a Webcam on Mac?
Apple has been evolving to make the user experience even better. Similarly, it launches a new feature known as “Continuity Camera” to enhance your video calling experience. This feature helps users to use iPhones as webcams. It allows them to enjoy video calling with better quality. Didn’t know about it? Let’s explore it together!
Steps to Use iPhone as a Webcam on Mac
You can follow the instructions given below to use iPhone as webcam on a Mac:
Step 1: Make sure to update your iPhone and Mac to the latest version of iOS. Your Mac should have macOS 13 or later, and your iPhone should have iOS 16 or later.
Step 2: Sign into both devices (iPhone and Mac) with the same Apple ID. Then, turn on the Wi-Fi and Bluetooth on both devices.
Step 3: Now, open “Settings” on your iPhone. Then go to “General” > “AirPlay & Handoff” and check if the “Continuity Camera” toggle is enabled. If yes, then mount your iPhone.
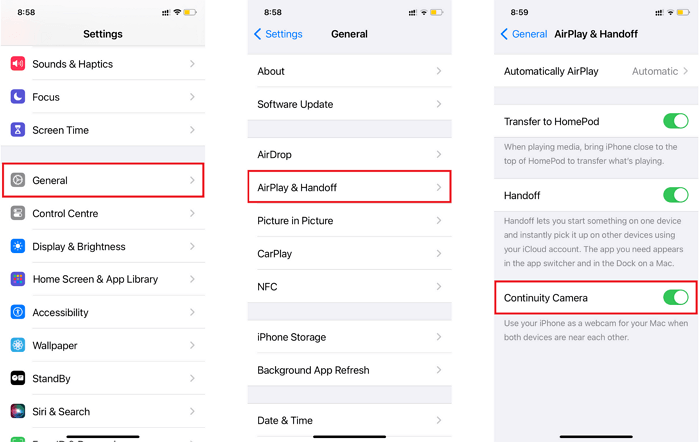
Enable Continuity Camera on iPhone
Step 4: On your Mac, open any video conferencing app that has access to the camera and microphone. Let’s open Zoom as an example.
Step 5: On the Zoom app settings bar, click “Stop Video” and select “iPhone Camera” from the options.
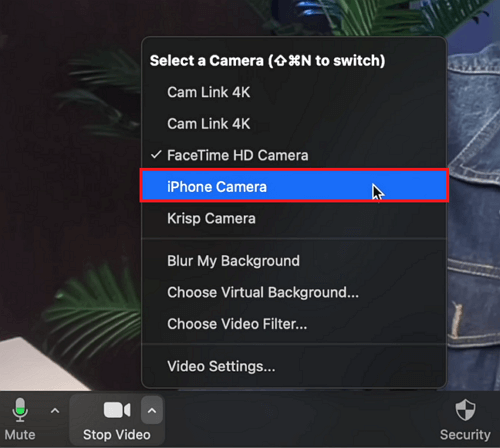
Select the iPhone camera from the settings
Step 6: Similarly, on the Zoom app settings bar, click “Mute” and select “iPhone Microphone” from the options.
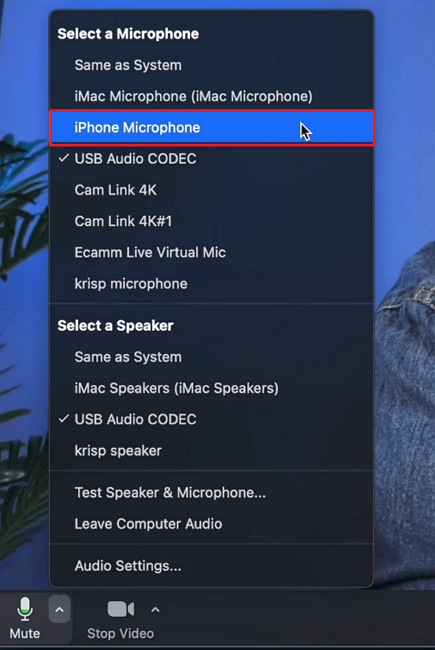
Select the iPhone microphone from the settings
The Continuity app opens on your iPhone and starts streaming audio or video from the rear camera to your Mac.
FAQs about Using iPhone as Webcam
1. Do all computers come with webcams?
No, not all computers come with built-in webcams. Usually, laptops that are designed for video conferencing have built-in webcams. Otherwise, desktop computers do not have built-in webcams. If your computer doesn’t have a built-in webcam, you can use an iPhone as a webcam.
2. How do I know if my computer has a built-in webcam?
Here’s how you can check if your computer has a built-in webcam:
For Windows: Look for a small, circular lens on the top of your computer’s screen. This is the camera. Or, open the “Device Manager” on your computer and check under “Imaging devices” for a webcam.
For Mac: On most Mac laptops, the webcam is located at the top center of the screen. You can also go to “System Preferences” > “Camera” to see if your Mac recognizes a built-in camera.
3. Should I get a webcam for Zoom?
Well, it depends on whether you need it or not. If your PC or laptop already has a built-in webcam, there is no need to buy a separate one. However, if they don’t have a built-in cam and you own an iPhone, you still don’t need to buy a webcam. You can use iPhone as webcam and enjoy a better experience than an ordinary webcam.
The Bottom Line
Turning your iPhone into a webcam for winter is a smart choice. It offers better video quality, no extra cost, and versatility. The best part? Setting it up on both Mac and Windows is easy. However, Continuity Camera simplifies the process for Mac users.
If you have more virtual interactions, a reliable webcam is a must, and your iPhone can be your solution. So, stay cozy and connected during the winter, use iPhone as webcam, and enjoy clear video calls.

Senior writer of the iMobie team as well as an Apple fan, love to help more users solve various types of iOS & Android-related issues.
Product-related questions? Contact Our Support Team to Get Quick Solution >
