iOS 17 Check In Not Working? How to Fix [8 Fixes]
In this article, you are going to explore the common causes for the iOS 17 Check In not working issue. You will also discover various solutions with their step-by-step guides to grasp the concept and perform it. Moreover, we will also introduce you to an amazing tool. It will not only help you fix the issue but will be your reliable partner for your iOS-related issues.
Have you updated your iPhone to iOS 17? Are you facing an issue with the newly launched check in feature? If yes, then you are not alone! Many users reported the iOS 17 check in not working issue on their devices. They feel helpless because they have no clue what to do in this situation. But luckily, there are various solutions available.
In this article, we are going to explore eight simple fixes you can try to get the check in feature working again. We will also walk through their step-by-step guides so that you can easily do what needs to be done. Let’s get started!
What Is iOS 17 Check in
Before we dive into the fixes, let’s take a moment to understand what iOS 17 check in actually is. In basic terms, the iOS 17 check in is like saying, “Hey, I’m here!”
With this feature, you don’t have to send a message manually to tell your loved ones that you have reached. Whenever you reach your destination, it will send a message to your selected contacts automatically. However, just like other new features, this feature is also showing hiccups.
But don’t worry! We are here to help you with this iOS 17 check in not working issue.
Why Is iOS 17 Check in Not Working
There can be several reasons for the check in feature not working. By identifying the issue, we will be one step closer to the solution. Here are some of the most common causes:
- Connection Issues: Sometimes, your iPhone needs a good connection with the internet to make things work. If your Wi-Fi or mobile data isn’t playing nice, the Check-In feature might act up.
- Location Lapse: Your iPhone loves to know where it is, but if the location setting is off or not accurate, Check In can get confused.
- Outdated Update: Is your iPhone still running an older version of iOS 17? Updates are like magic spells that fix a lot of problems. If your phone isn’t up to date, that might be the hiccup.
- App Permissions: Sometimes, apps can be a hurdle. If you haven’t given permission for an app to use your location, it won’t join the check in party.
These are the most common causes of iOS 17 check in not working. In the next part, we will explore the most easy and effective solution to fix this issue.
Ultimate Fix for iOS 17 Check in Not Working
Who doesn’t love automation and shortcuts? Well, we have brought something that is going to be a blessing in disguise for you! Let us introduce you to AnyFix – iOS System Recovery, an effective and reliable solution for the iOS 17 check-in not working issue.
AnyFix is a one-stop solution for almost all of your iOS-related problems. With this powerful tool, you don’t have to rely on manual and daunting tricks. Just a few clicks, and you are done. Moreover, you can also solve issues like the iPhone won’t charge, won’t turn on, stuck on the lock screen, and many more. Here are some key features of this tool.
- Fix 150+ iOS issues and 200+ iTunes errors – iPhone stuck on Apple logo, iTunes won’t back up iPhone, black screen, stuck on recovery mode, etc. All can be fixed by this tool.
- 3 repair modes – It provides you with 3 different repair modes according to the types and difficulties of these issues. Meet all repair needs.
- Fix without data loss – Standard Repair mode allows you to remove system issues without any data loss. All the important files will be safe and sound after repair.
- Easy to use – No skills are needed. All you need to do is click the buttons to fix iOS.
Before starting, free download AnyFix on your PC/Mac. Then, follow the instructions given below to fix iOS 17 check in not working issue:
Free Download * 100% Clean & Safe
Step 1: Connect your iOS device to your PC/Mac. Launch AnyFix and select the System Repair mode.
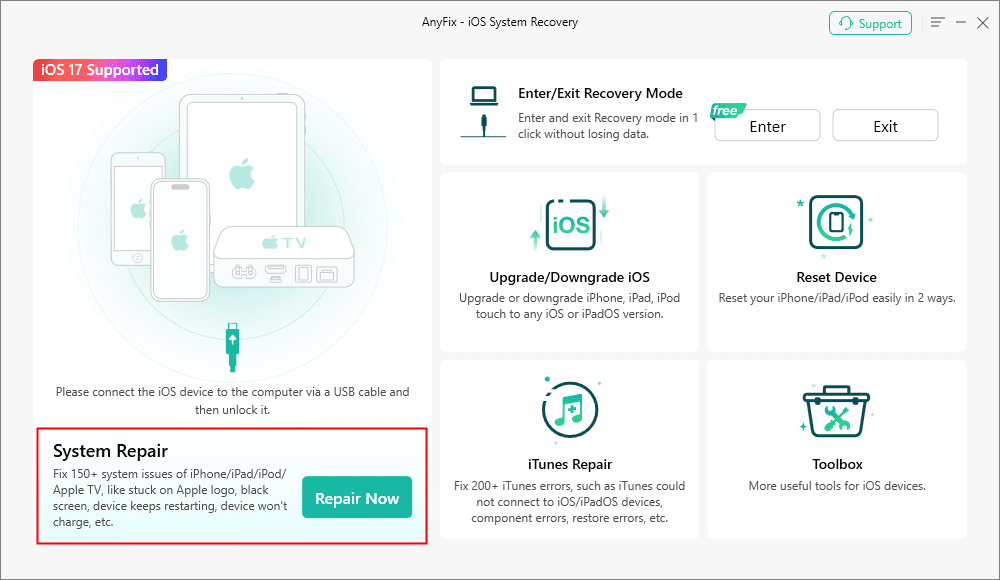
AnyFix System Repair Option
Step 2: Now, AnyFix will start to detect your iOS device. Once completed, you will see the below interface. Click the Start Now button.

AnyFix System Repair Device Bug
Step 3: Now, you are supposed to select a repair mode. Choose the Standard Repair option.
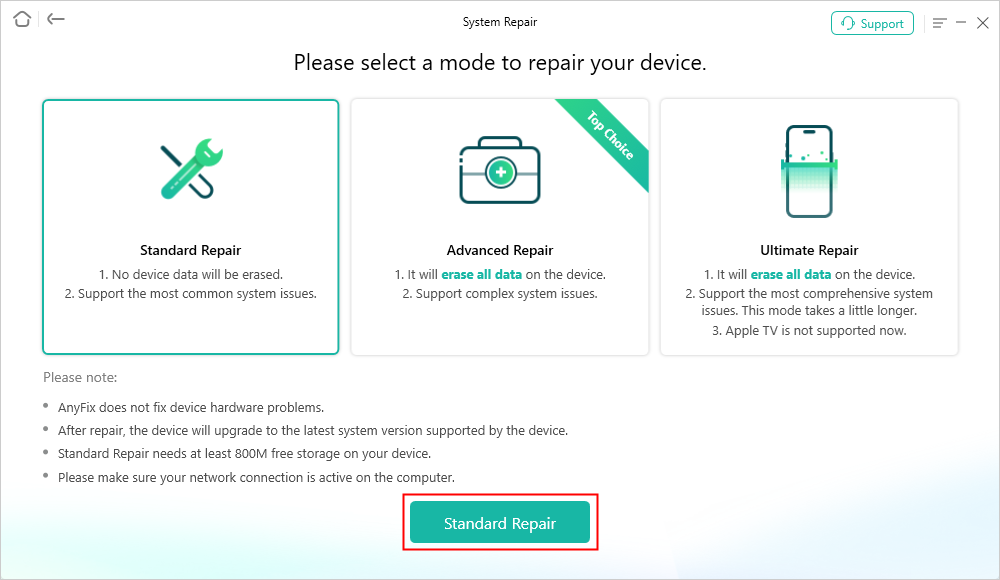
AnyFix Standard Repair
Step 4: AnyFix will provide you with the firmware of your iOS device. Click the Download button to download your device’s firmware package.
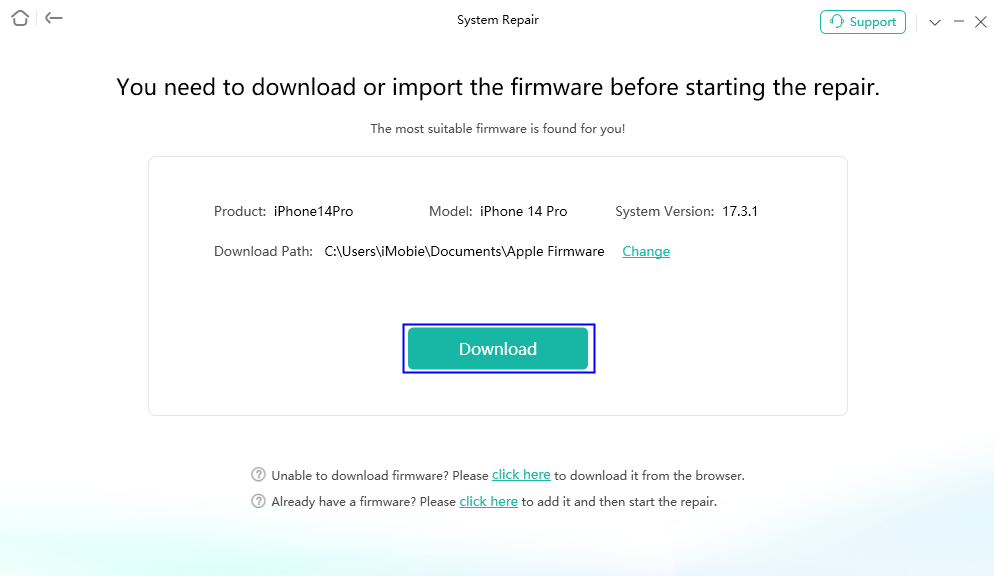
AnyFix System Repair Firmware Download
Step 5: After the firmware package for your iOS device is downloaded successfully, you will see the below interface. Click the Start Standard Repair button.
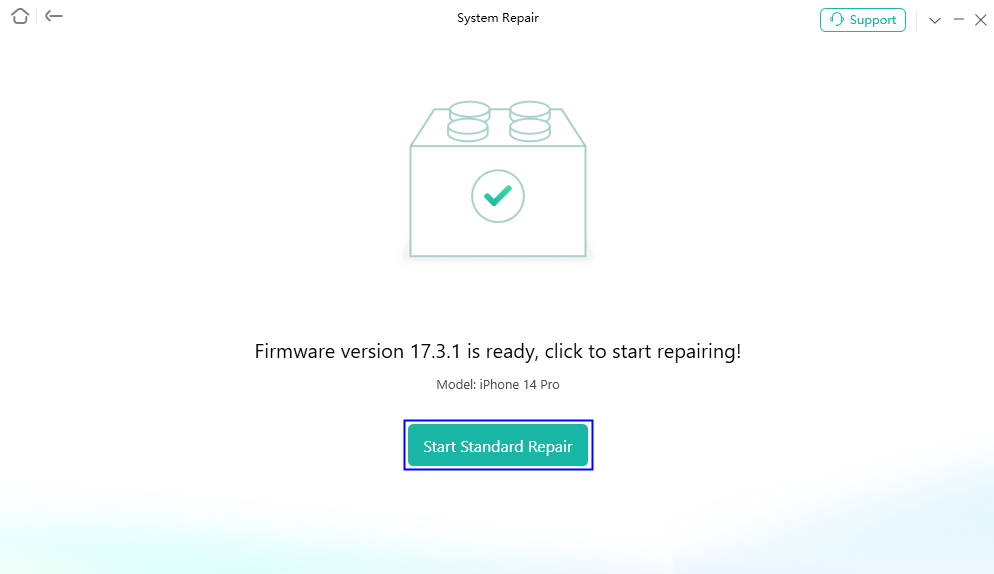
AnyFix System Repair Firmware Finish Downloading
Step 6: Now, AnyFix will start repairing your iPhone. It is suggested not to disconnect your iPhone until it restarts. Once the repair process is completed, you will see the below interface.
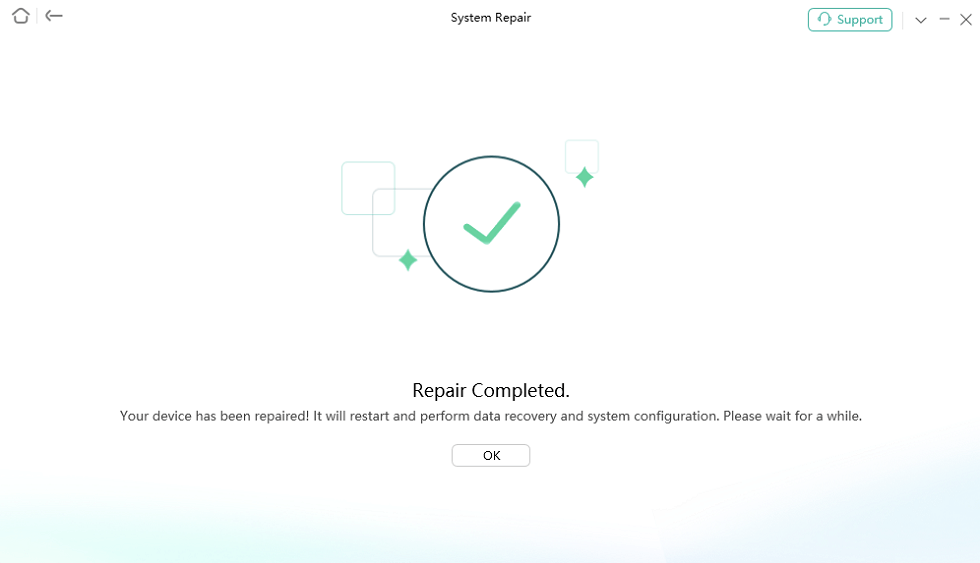
Repair Is Completed
After system repair with AnyFix, we are positive that iOS 17 Check In not working issue will be resolved. However, if it doesn’t, then try the below fixes.
Common Fixes for iOS 17 Check in Not Working
There are various regular ways that you can try to fix the iOS 17 Check In not working issue. These methods are very easy and can be followed by anyone. Let’s explore them together!
Fix 1. Ensure iOS 17 Is Installed
To make sure that the latest version of iOS 17 is installed on your device, you can follow the instructions given below:
Step 1: Open “Settings” on your iPhone.
Step 2: Tap on “General.”
Step 3: Select the “Software Update” option.
Step 4: If any latest update is available, click “Download and Install.”
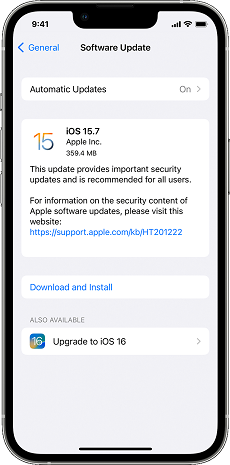
Check the Software Updates
However, if it doesn’t fix the iOS 17 Check in not working issue, you can try another method.
Fix 2. Turn on Mobile Data
iOS 17 Check In feature needs an internet connection to inform the world. If your Wi-Fi is taking a nap, make sure your mobile data is wide awake.
Step 1: Open “Settings” on your iPhone.
Step 2: Tap on “Mobile Service” > “Mobile Data.”
Step 3: Select your network and turn on Mobile Data.
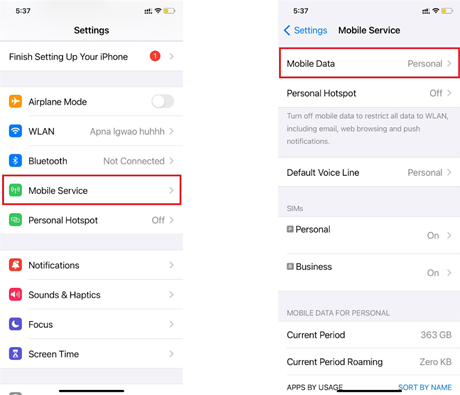
Turn on Mobile Data
Still, the iOS 17 Check In not working? Try another method.
Fix 3. Enable iMessage
iMessage is like the VIP pass for your iPhone. Make sure it’s turned on so Check-In can breeze through. Follow the below steps to turn on the iMessage:
Step 1: Go to “Settings” on your iPhone.
Step 2: Scroll down and tap on “Messages.”
Step 3: Toggle the switch next to “iMessage” to turn it on.
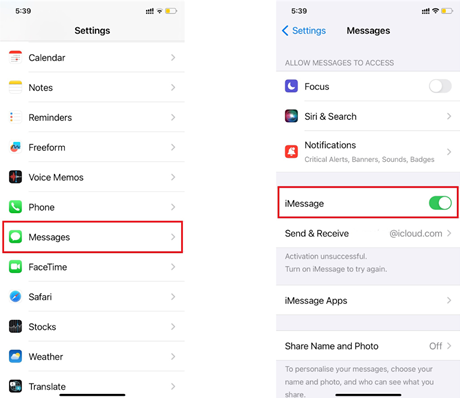
Enable iMessage
If it doesn’t fix the issue, you can go for another method.
Fix 4. Force Close Messages App
Sometimes, apps need a little break. Force close the Messages app and open it again. It might send the Check In message. Follow the below steps:
Step 1: Double-press the home button of your iPhone or swipe up from the bottom (on iPhone models without a home button) to view your recently used apps.
Step 2: Find the Messages app and swipe it up or off the screen to close it.
Recently Used Apps
Step 3: Open the Messages app again.
Sometimes, it fixes the iOS 17 Check in not working issue. If it doesn’t, try another method.
Fix 5. Change Check In Data Settings
Sometimes, the issue occurs due to the check In data settings. To fix it, follow the steps given below:
Step 1: Open the “Settings” app on your iPhone.
Step 2: Scroll down and click the “Message” option
Step 3: Then, tap on “Data.”
Step 4: Now select your preferred option, “Limited” or “Full.”
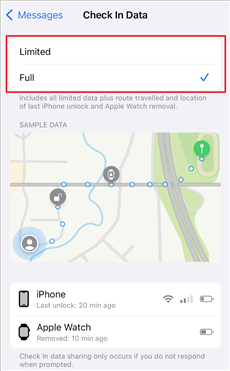
Select Check In Data Limit
If the iOS 17 Check In not working issue is not resolved, go for the next method.
Fix 6. Enable Location Services
To use the Check In feature in iOS 17, your iPhone location must be on. If you don’t know how to turn it on, you can follow the below steps:
Step 1: Open “Settings” on your iPhone.
Step 2: Tap on “Privacy & Security.”
Step 3: Select “Location Services.”
Step 4: Turn on the toggle to turn on Location Services.
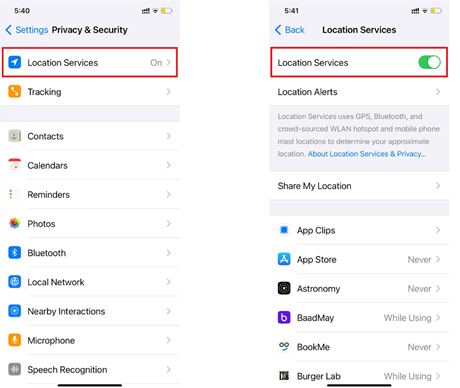
Enable Security Settings
It should fix the iOS 17 Check in not working. Otherwise, you can go for the last resort.
Fix 7. Reset Your iPhone
Sometimes, a simple restart can clear temporary issues and get your iPhone back on track. It’s a quick and easy fix. However, it should be attempted after trying all the fixes.
Step 1: Hold down the “Power” + “Volume Down” buttons simultaneously.
Step 2: “Slide to Power Off” when the slider appears.
Step 3: Turn your iPhone back on by holding the “Power Button.”
Step 4: Test your iOS 17 Check In feature after the restart.
The Bottom Line
All the updated features of your iPhone should work properly. However, since iOS 17 has launched, users have reported various problems, and iOS 17 check in not working is one of them. But thankfully, in today’s fast-tech world, there is a solution for almost everything.
In this article, we have explored eight methods with their easily-to-follow guides to fixing the iOS 17 check in not working issue. But if you want a reliable and convenient way to do it, download AnyFix. It is a complete toolkit for all your iOS-related issues. Now, you don’t have to rely on operators. You have the solution at your fingertips.
Free Download * 100% Clean & Safe

Senior writer of the iMobie team as well as an Apple fan, love to help more users solve various types of iOS & Android-related issues.
Product-related questions? Contact Our Support Team to Get Quick Solution >
